GTM template
NoteThe template assumes, that the data layer has already been created, and contains all the necessary data, as variables for product/category/transaction IDs.
All information about Data layer can be found here.
Template overview
Template supports two GA data formats:
- Universal Analytics (UA)
- Google Analytics 4 (GA4)
Each tracking code has a selector for a data type. So make sure you select data type which you are using.
For each tracking code you'll need to create a separate Tag.
Creating the template
First, you need to download the template file which is located here (Retail Rocket.tpl):
Download Retail Rocket GTM template
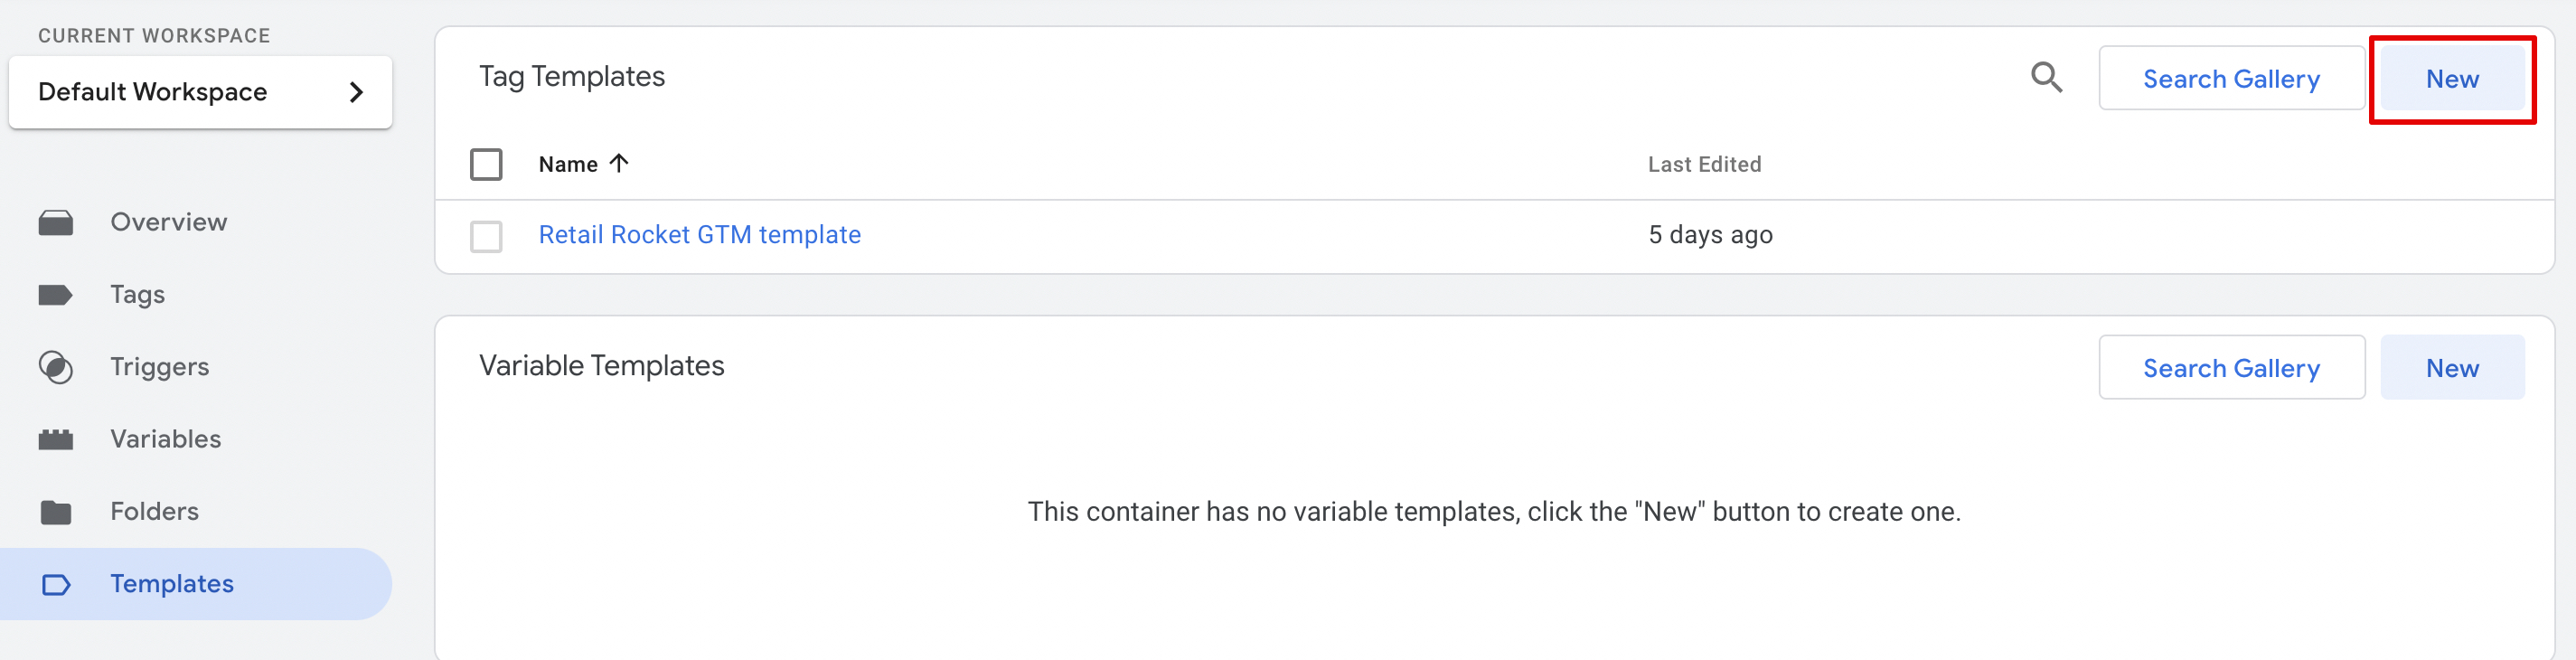
Then go to your GTM Templates

Click on "New" button in "Tag Templates" section
Go to setting in the tip right corner and click "Import"
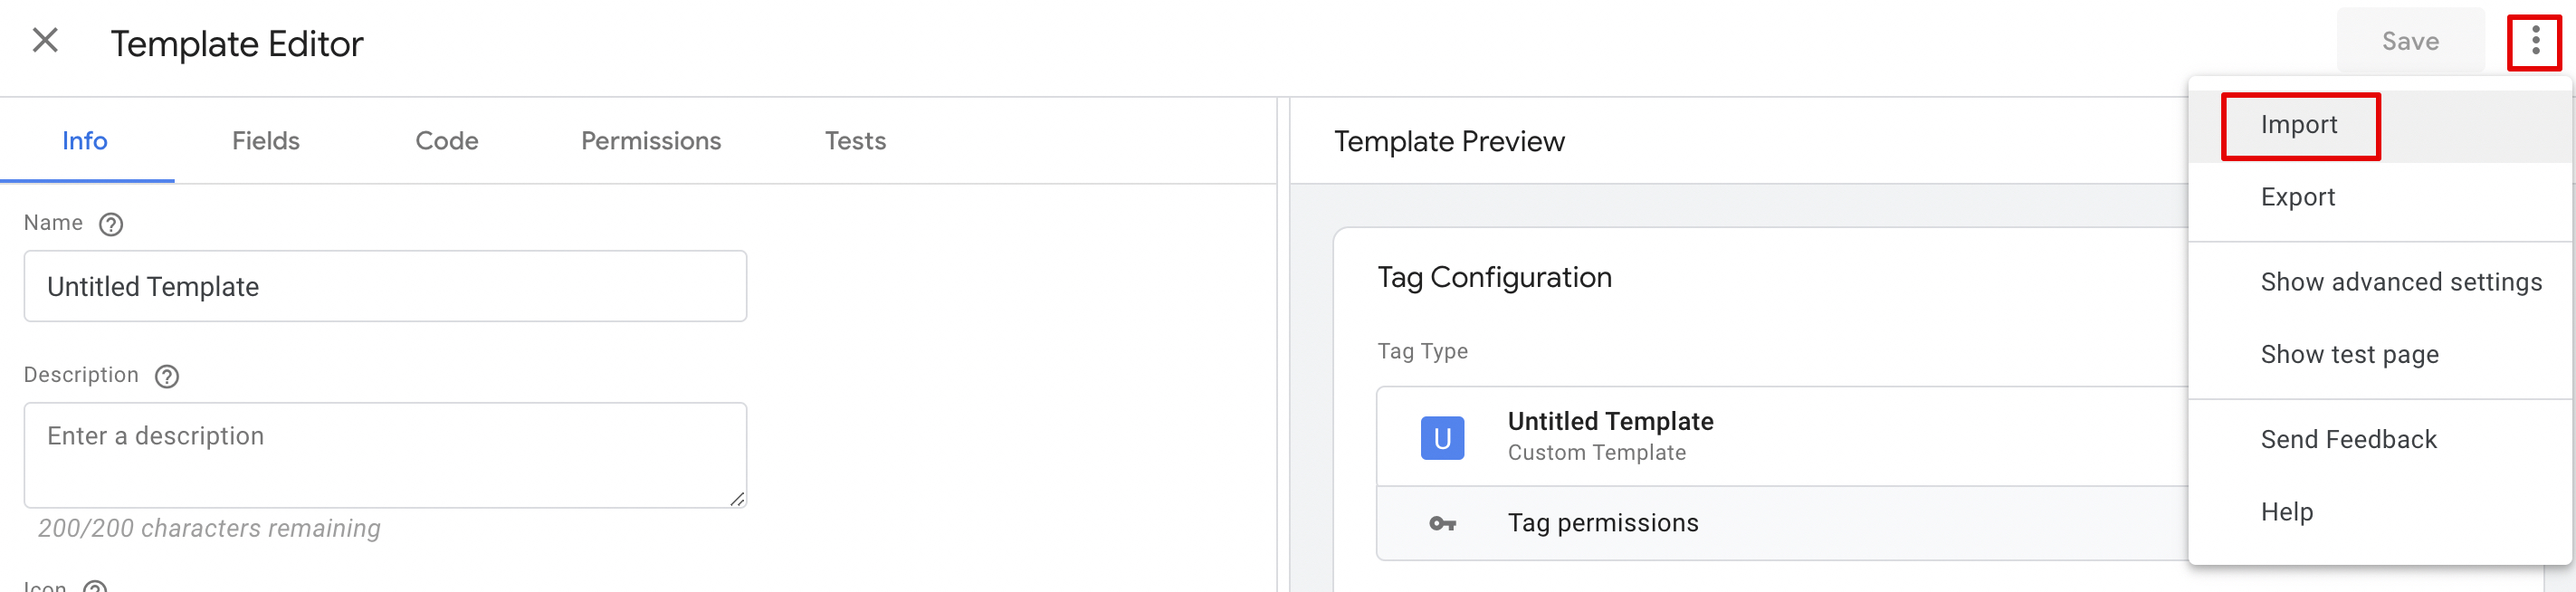
Select the template file and save it.
Tracking codes implementation
Main tracking code
NoteThis tracking code should be called on all pages of your website.
Moreover, it should be called prior to any other Retail Rocket's tracking codes.
Tag
In order to install this tracker, you need to create new tag.
Go to "Tags" click on "New" button.
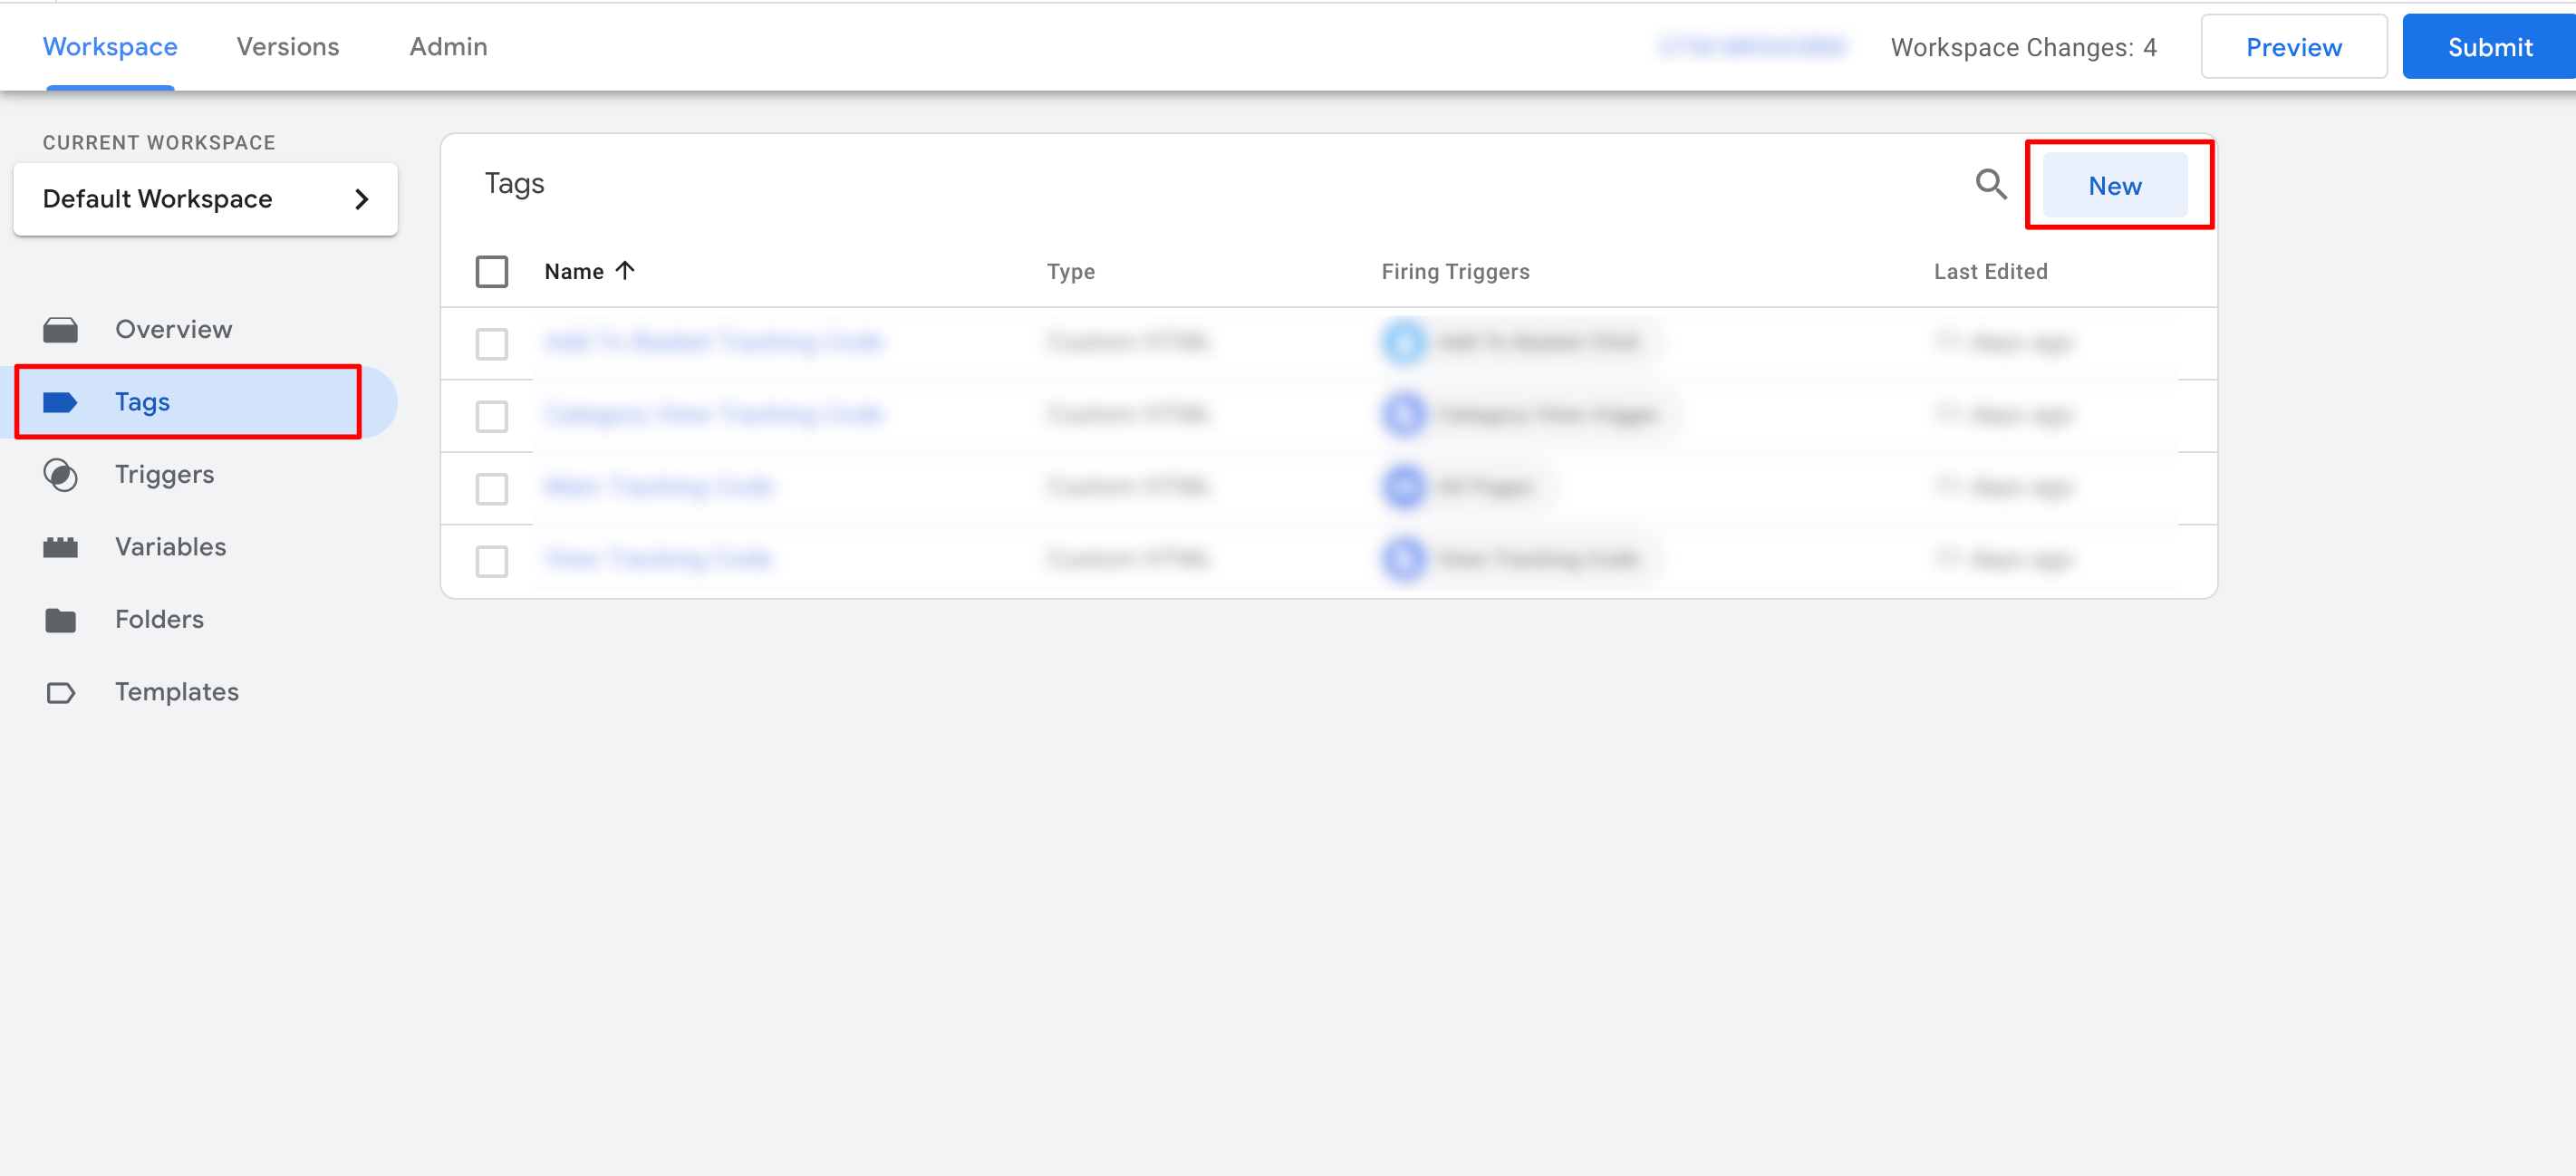
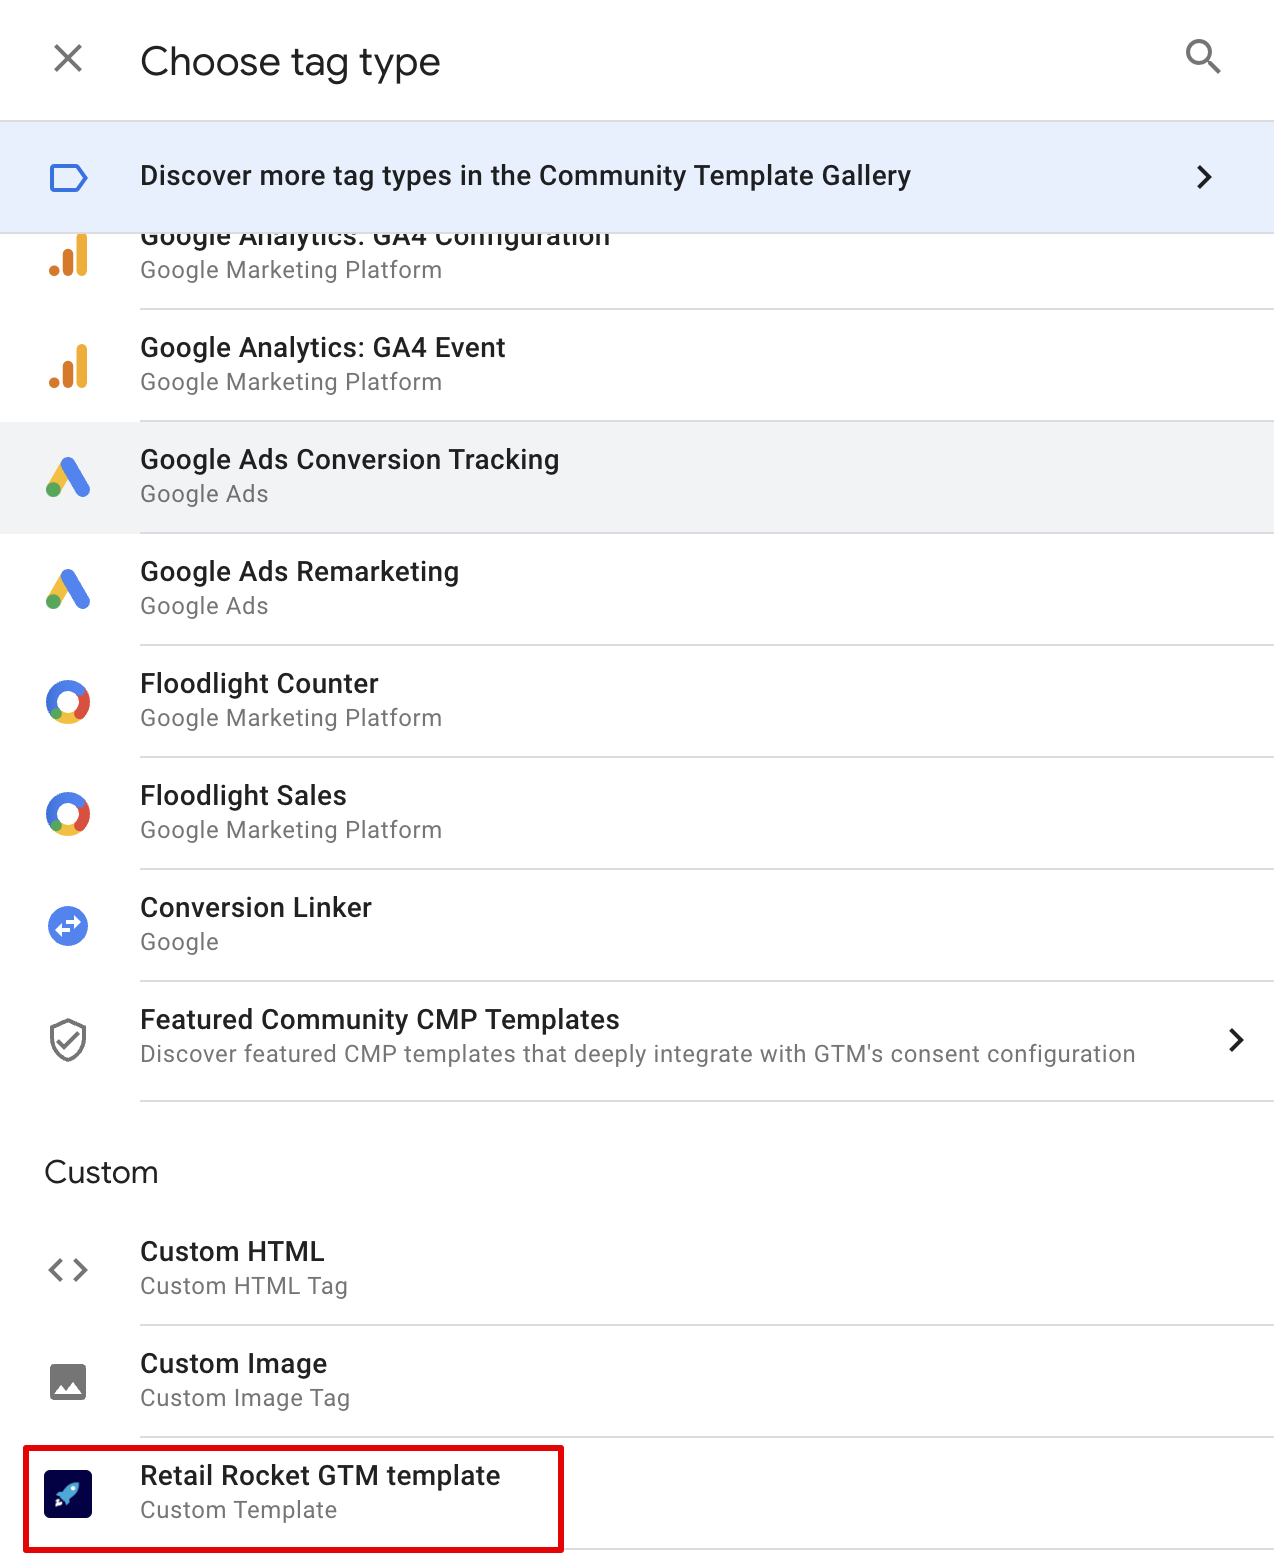
In the Tag Configuration select "Retail Rocket GTM template" under Custom
"Track type" should be "Main tracking code".
"rrPartnerId" is your id in Retail Rocket system.
Trigger
This tag should be executed on every page of your website. Prior to any other Retail Rocket's tracking codes.
In "triggering" you will need to either select a trigger which is executed when any page loads or, if you don't have one, create it.
To create trigger click on "Triggering" "+"
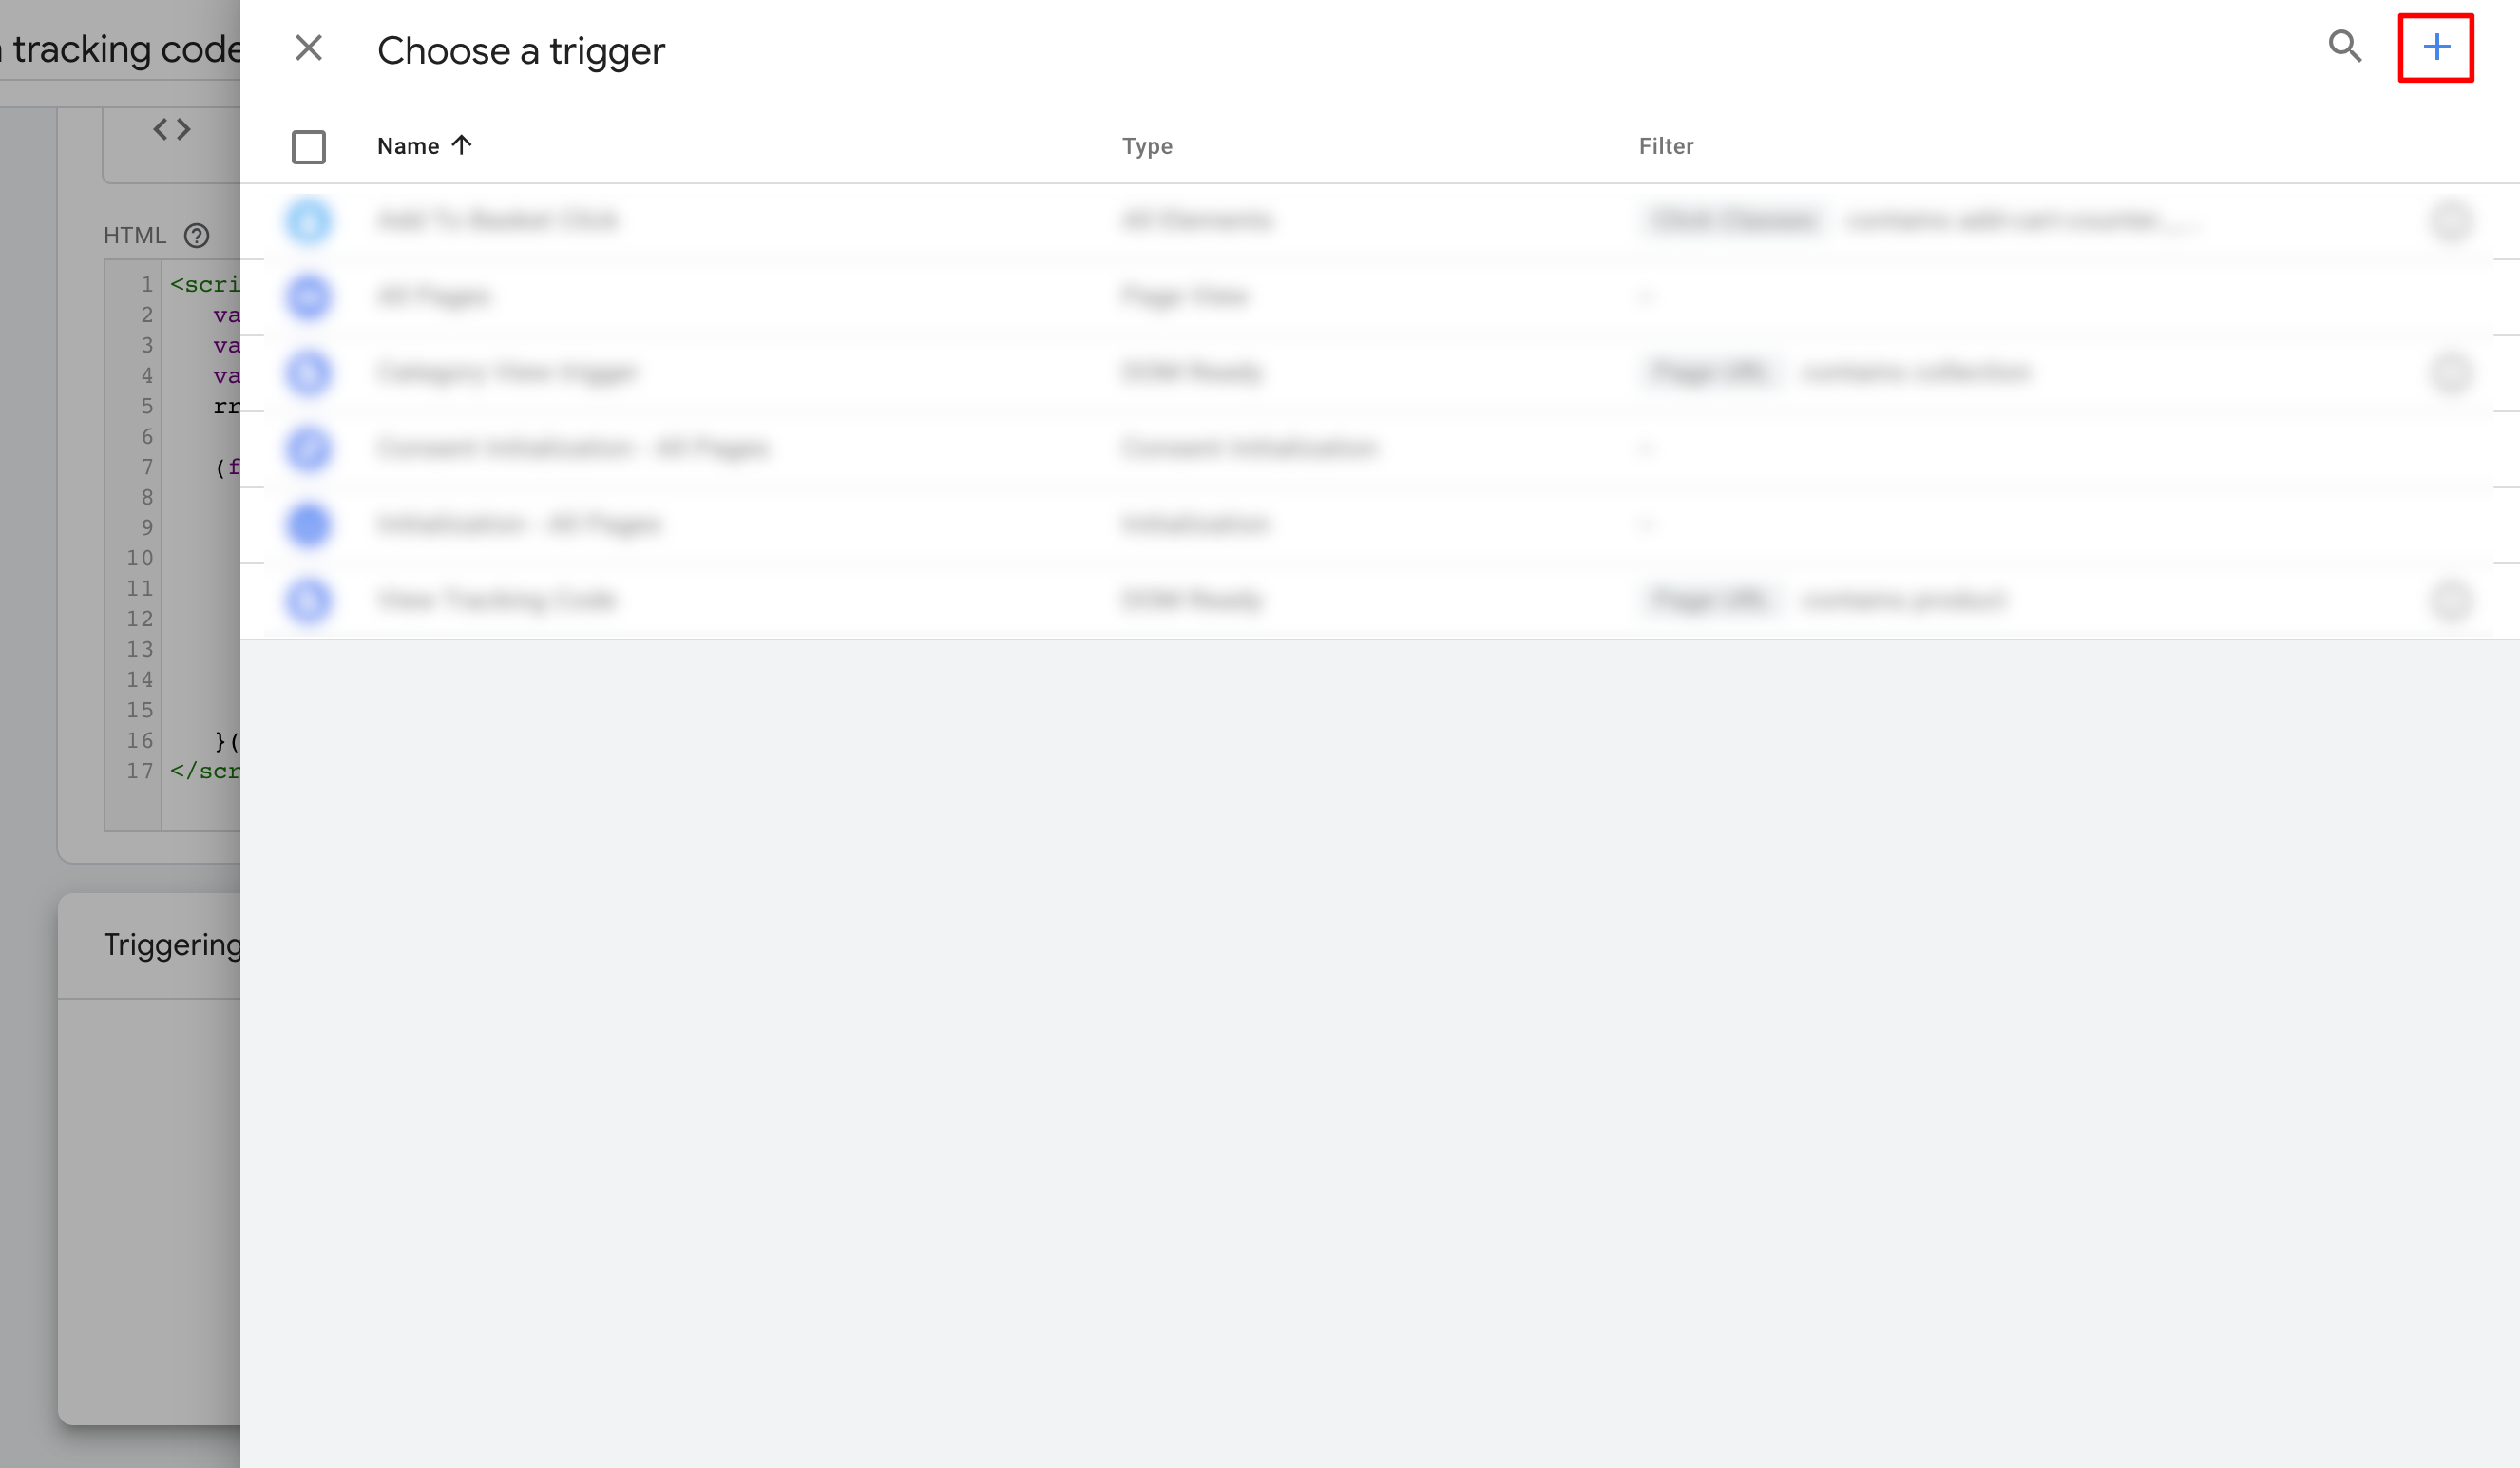
As a trigger type select "Page view" and select "All Page Views", save it.

Now, save the tag. We can recommend "Retail Rocket initialization" as a name for this tag.
Tracking code for viewing a product page
Tag
In "Tags" section click on "New" button, to create new tag for this tracking code. Tag type should be set as Retail Rocket GTM template.
"Track type" should be "Product page tracker".
Select GA4 or UA data scheme.
If your integration requires stocks, check the "stock_id from tag manager variables" and specify the variable with stock_id.

Trigger
To create trigger click on "Triggering" below, and click on "+"
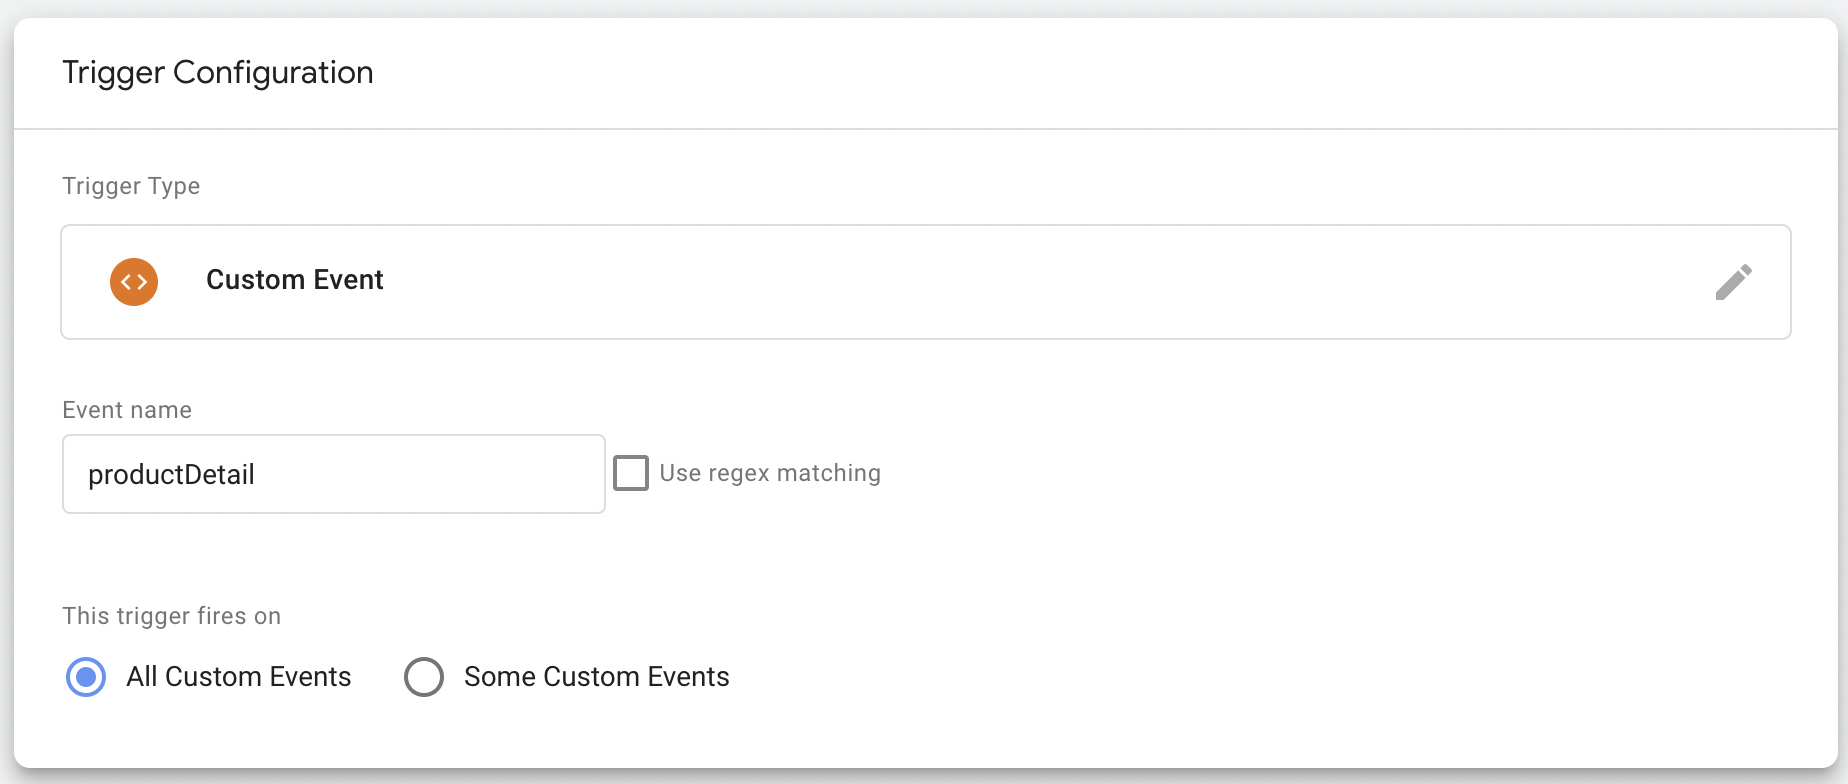
As a trigger type, you should select "Custom Event" under "Custom" section.
In the "Event name" field you should specify the name of the event that contains the variable containing the product id and is executed on every product page.
For example, it can be the event that contains ecommerce object.
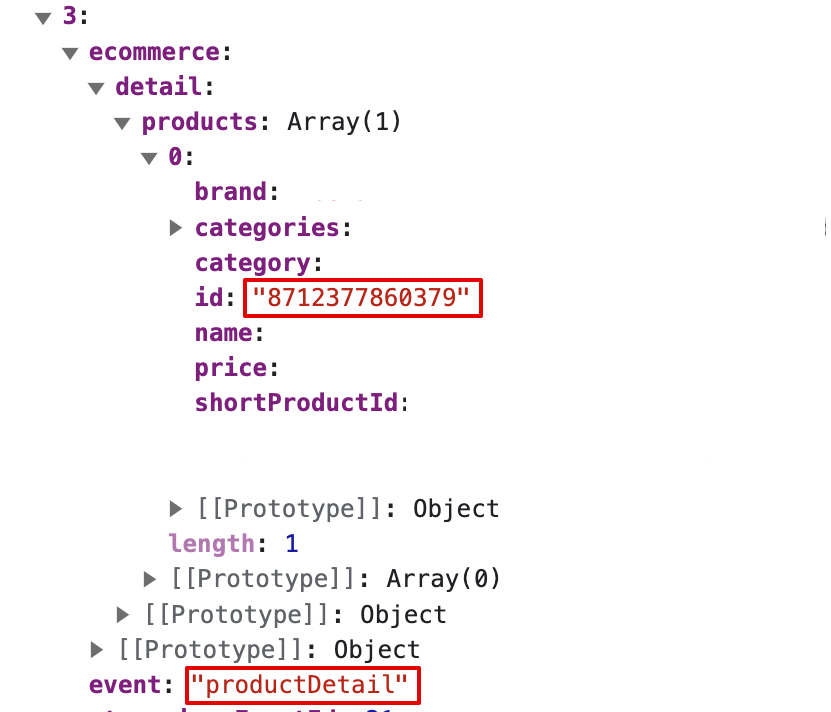
In this case you will need to specify productDetail as Event name.
"This trigger fires on" should be left on "All Custom Events"
Tracking code of viewing category page
Tag
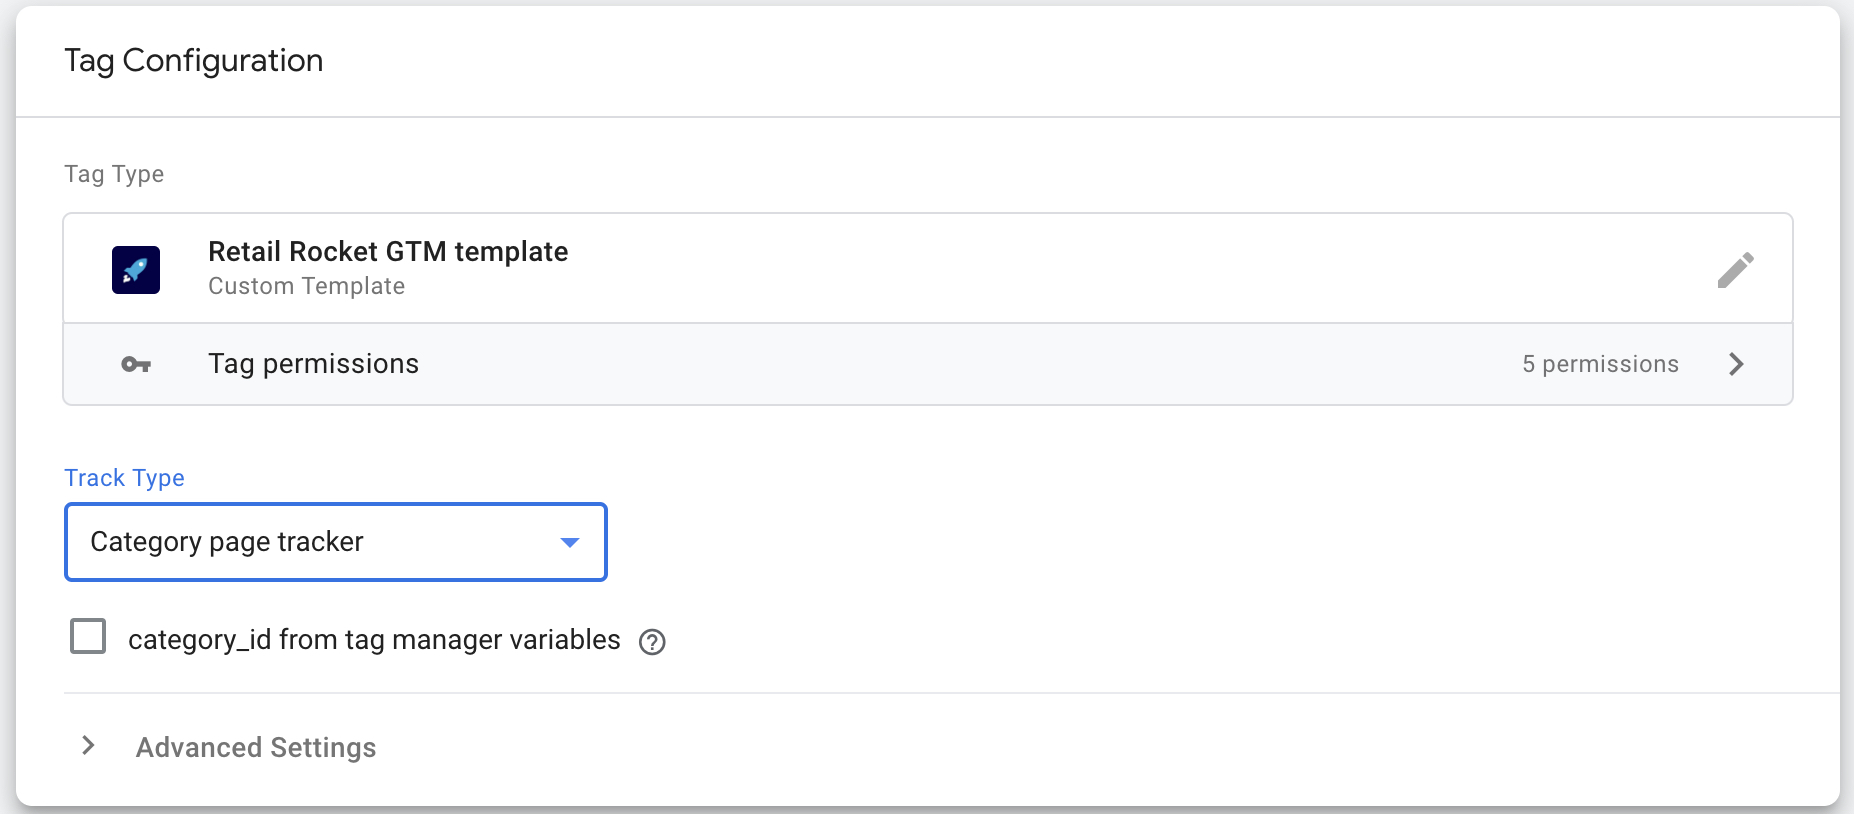
In "Tags" section click on "New" button, to create new tag for this tracking code. Tag type should be set as Retail Rocket GTM template.
"Track type" should be "Category page tracker".
Tracking code should receive numeric id of a category. It can be done in two ways:
- Send data to dataLayer like dataLayer.push({ "category_id": "numeric_category_id" });
- Choose variable from tag manager by checking "category_id from tag manager variables" and selecting variable with numeric category_id.
Trigger
To create trigger click on "Triggering" below, and click on "+"
As a trigger type, you should select "Custom Event" under "Custom" section.
In the "Event name" field you should specify the name of the event that is executed on every category page.
Tracking code of adding product to the basket
Tag
In "Tags" section click on "New" button, to create new tag for this tracking code. Tag type should be set as Retail Rocket GTM template.
"Track type" should be "Add to cart tracker".
Select GA4 or UA data scheme.
If your integration requires stocks, check the "stock_id from tag manager variables" and specify the variable with stock_id.

Trigger
Tracking code of adding product to the basket must be executed every time a customer clicks on "Add To Cart" button and adds product to the cart.
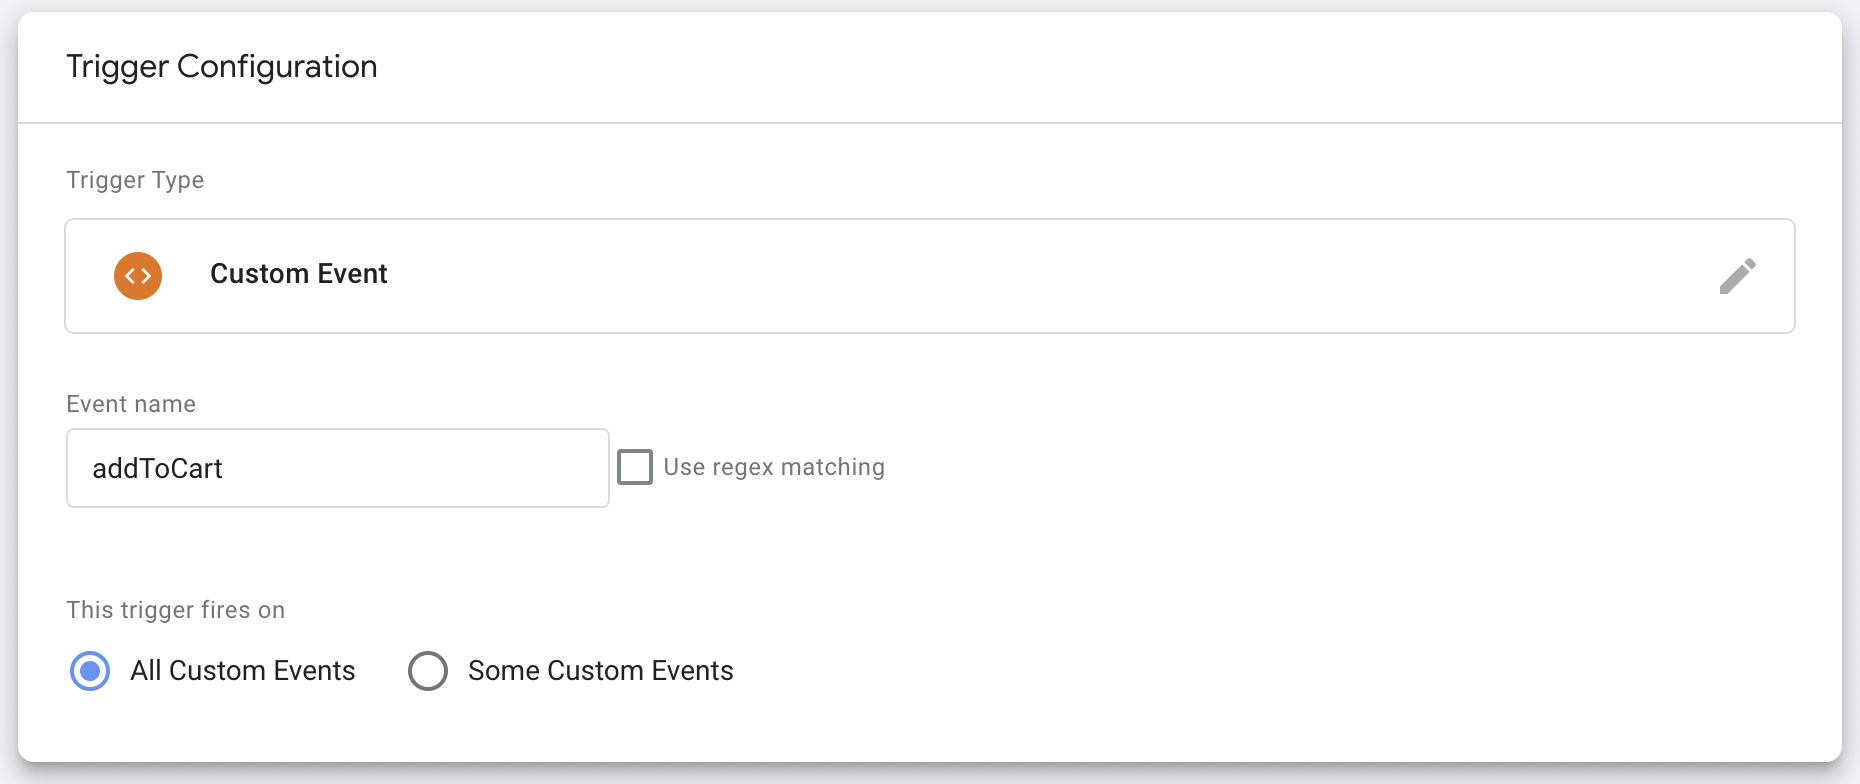
To create trigger click on "Triggering" below, and click on "+"
As a trigger type, you should select "Custom Event" under "Custom" section.
In the "Event name" field you should specify the name of the event that contains the variable containing the product id and is executed every time product is added to the cart.
For example, it can be the event that contains ecommerce object.
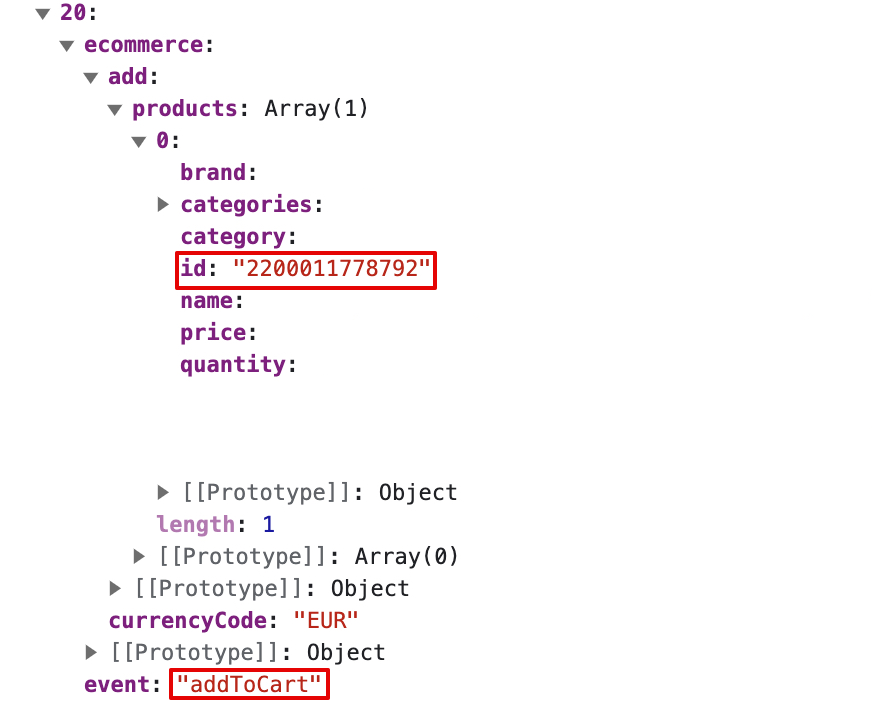
In this case you will need to specify "addToCart" as Event name.
"This trigger fires on" should be left on "All Custom Events"
Transaction tracking code
Tag
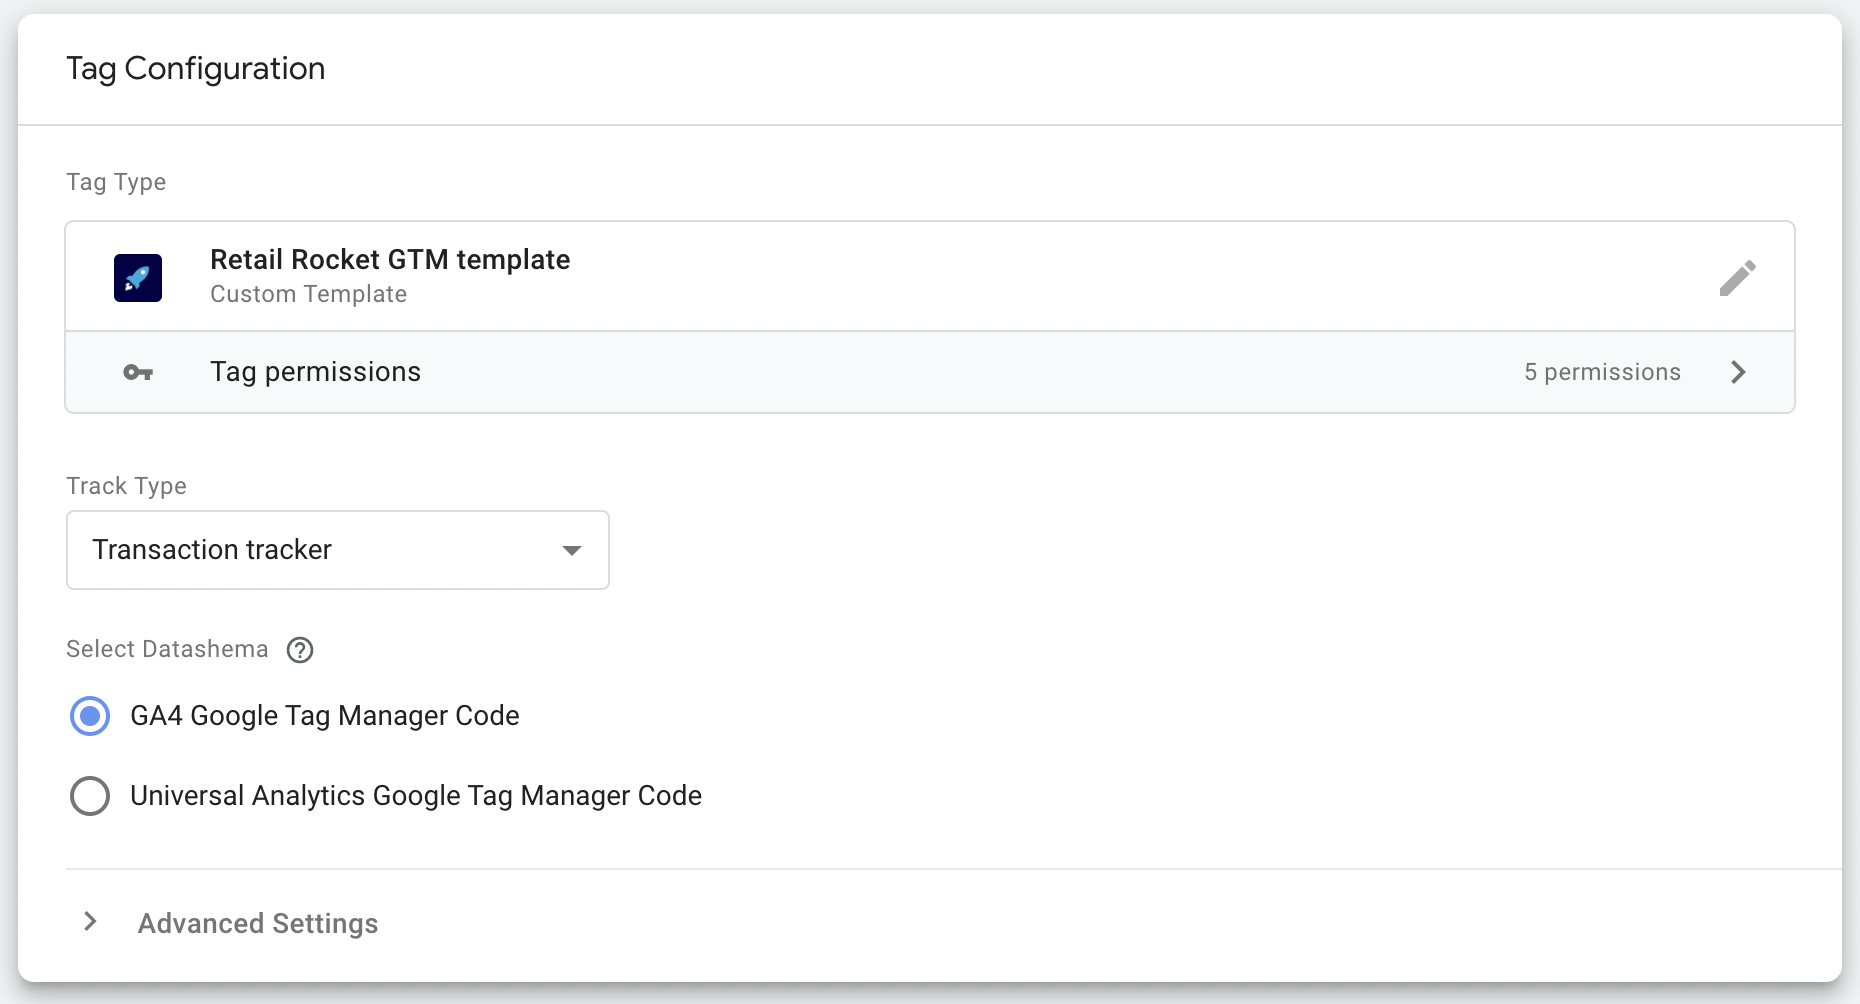
In "Tags" section click on "New" button, to create new tag for this tracking code. Tag type should be set as Retail Rocket GTM template.
"Track type" should be "Transaction tracker".
Select GA4 or UA data scheme.
Trigger
Transaction tracking code must be executed every time a customer has competed an order on the website.
To create trigger click on "Triggering" below, and click on "+"
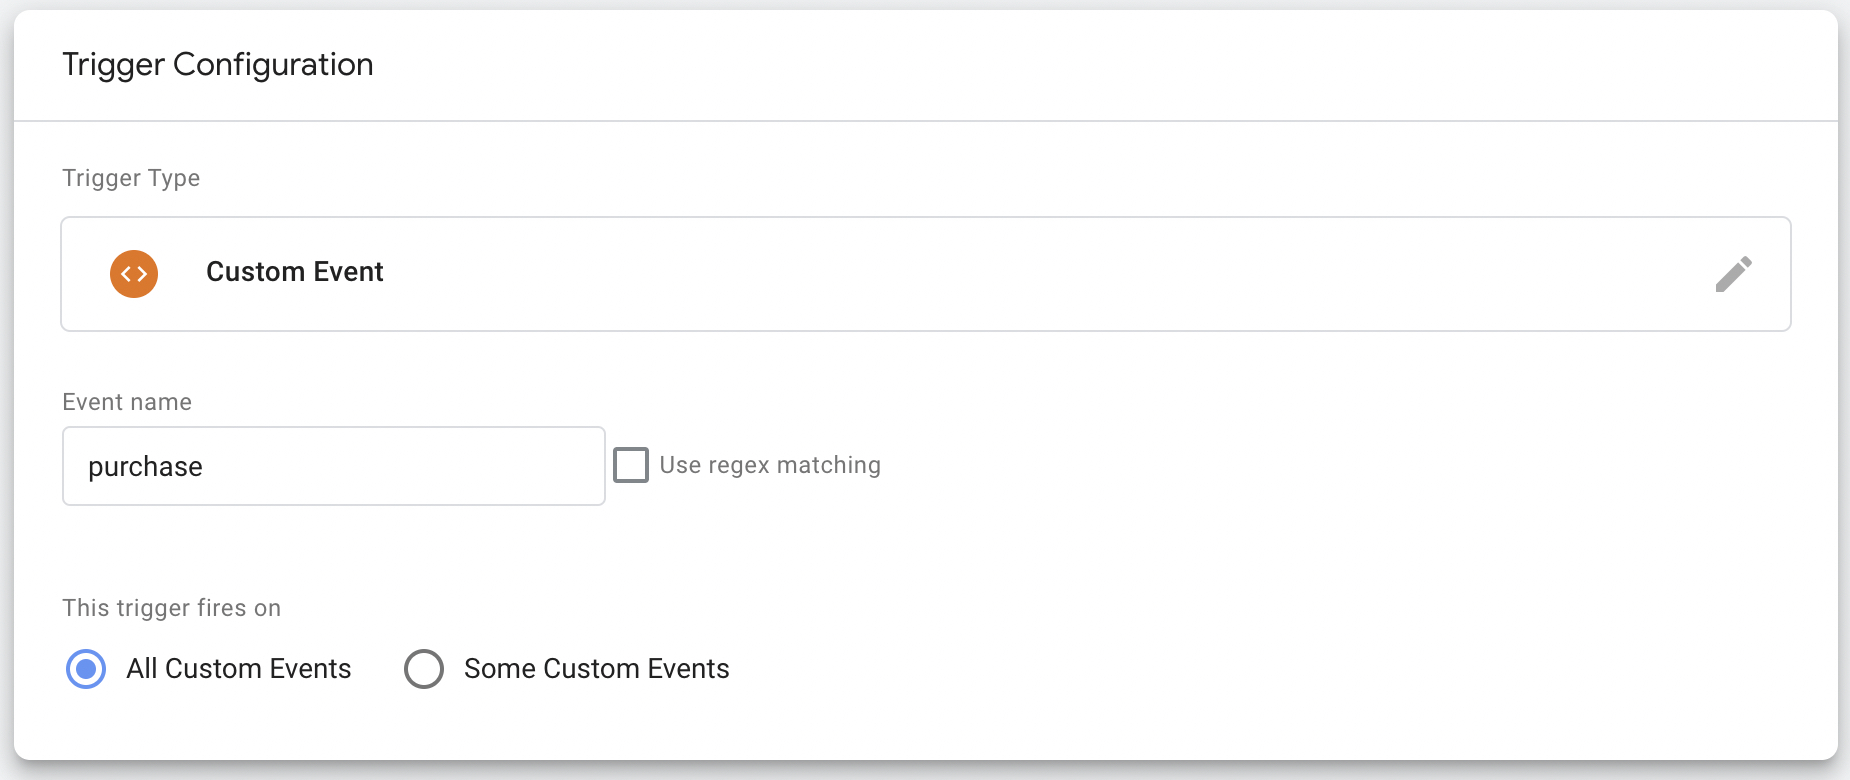
As a trigger type, you should select "Custom Event" under "Custom" section.
In the "Event name" field you should specify the name of the event that contains the variable containing information about products which the customer has bought as well as transactionId.
For example, it can be the event that contains ecommerce object.
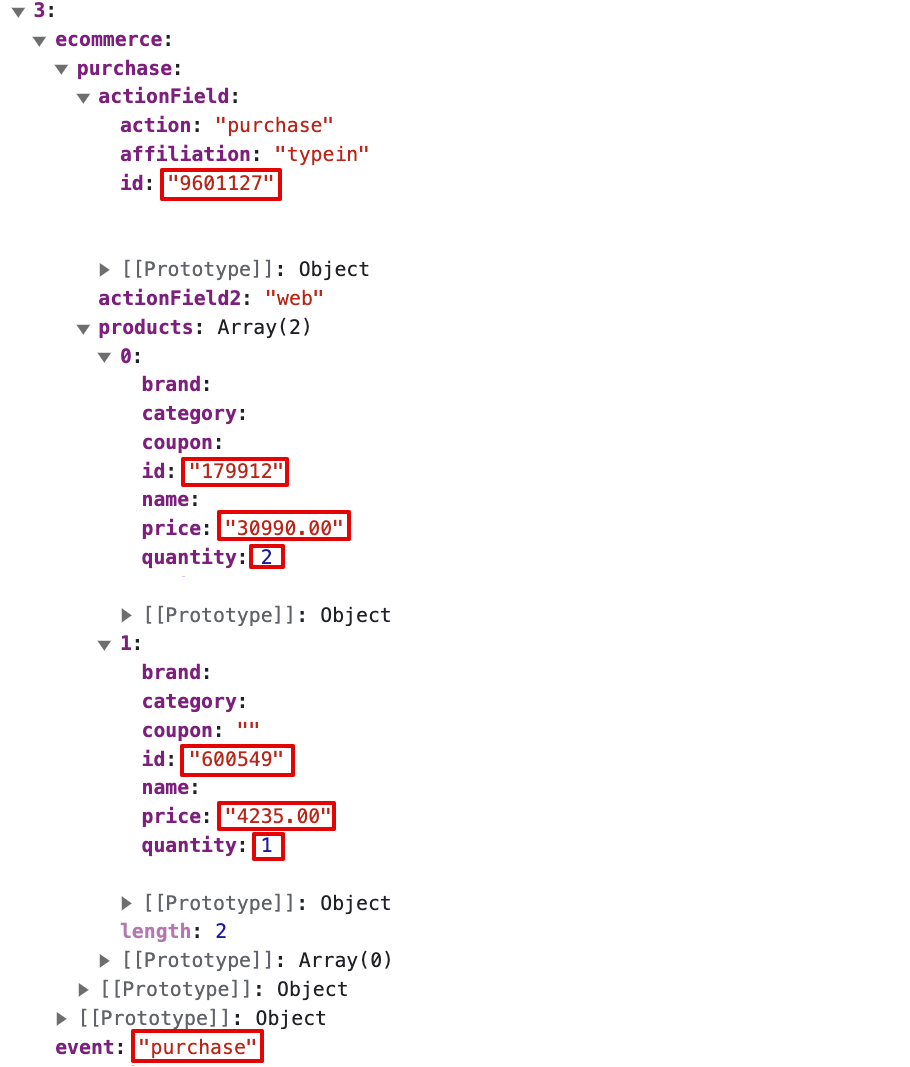
In this case you will need to specify "purchase" as Event name.
"This trigger fires on" should be left on "All Custom Events"
Email tracking code
Tag
In "Tags" section click on "New" button, to create new tag for this tracking code. Tag type should be set as Retail Rocket GTM template.
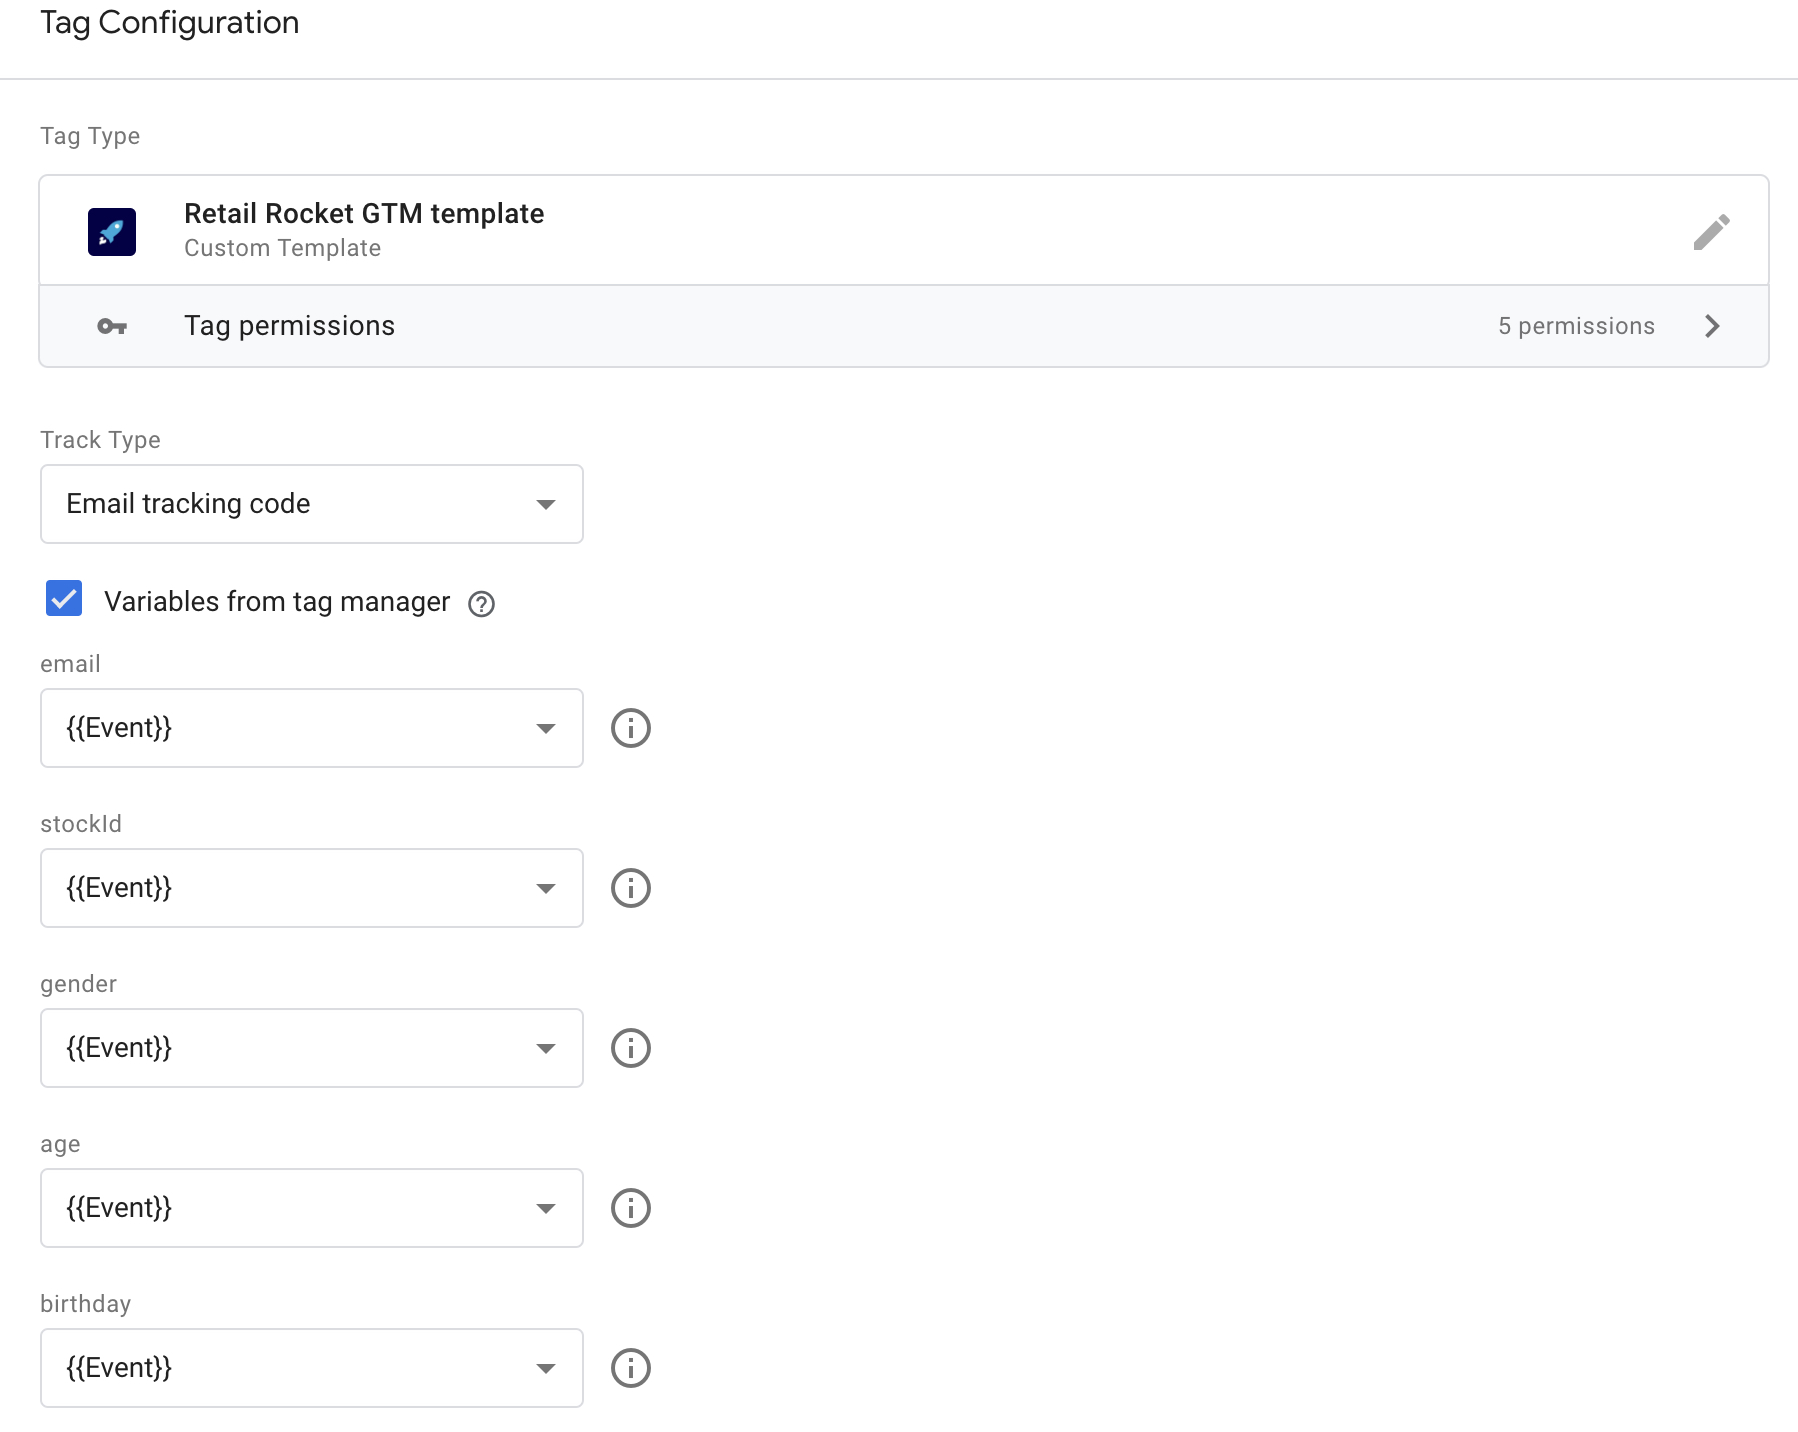
"Track type" should be "Email tracking code".
Additionally, this tracking code can receive additional parameters, such as stockId, gender, age, birthday etc.
In order to send this information check the "Variables from tag manager" and select variables with corresponding data or you can send them with a script:
dataLayer.push({ "stockId": "value", "gender": "value", "age": value, "birthday" : "value" });gender - user gender, string;
age - age, number without quotes;
name - user' name, string;
birthday - date of birth, format YYYY-MM-DD, string;
Trigger
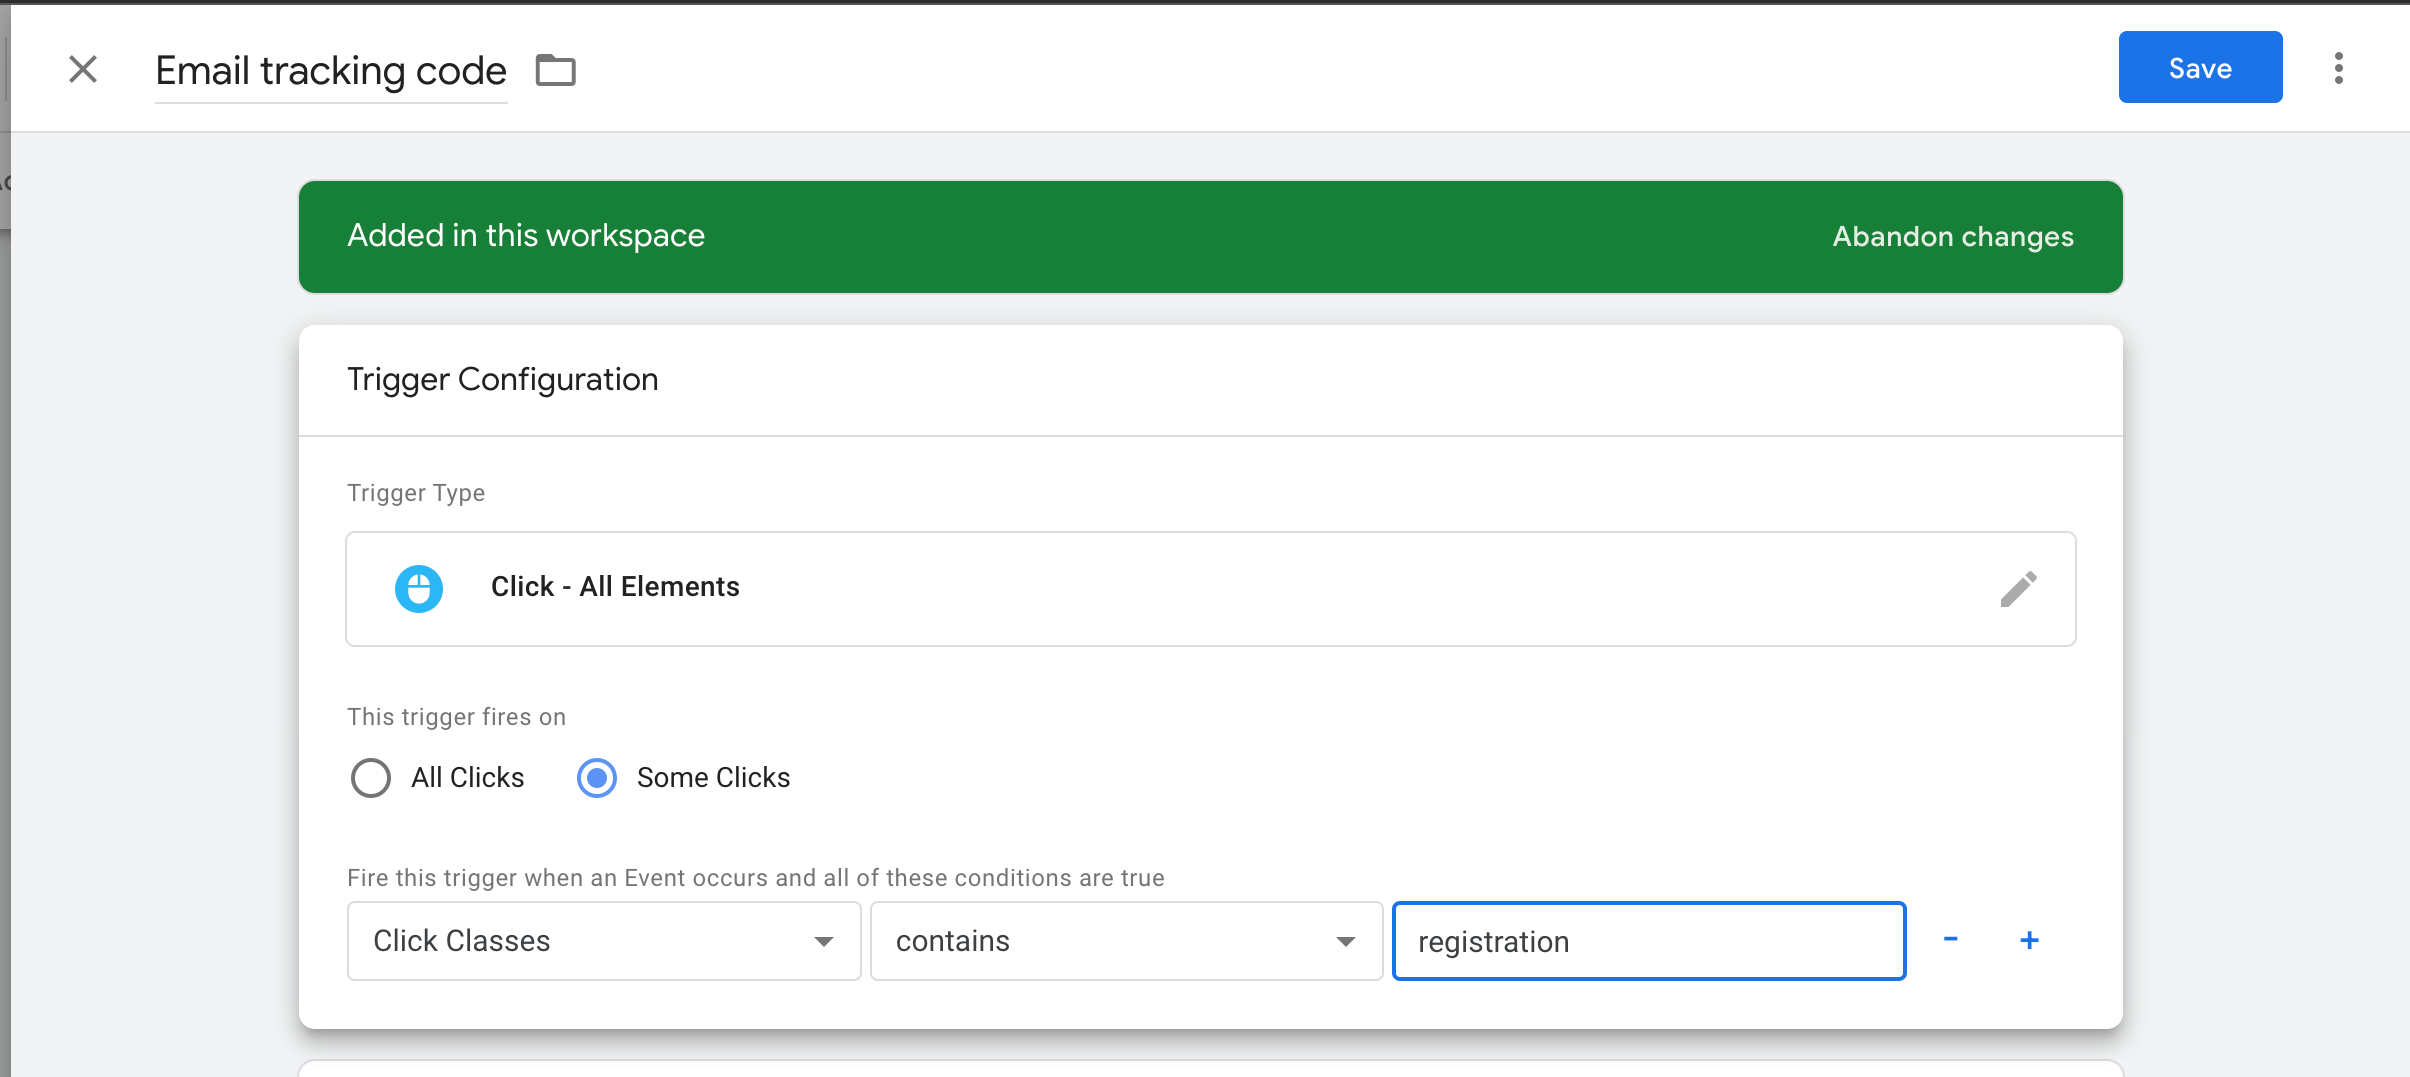
Email tracking code must be executed on registration and authorization page, and you need to pass user's email address to it.
Make sure the user has consented to receive emails
To create trigger click on "Triggering" below, and click on "+".
As a trigger type, you should select "Click - All Elements", and mark option "Some Clicks". Below you can select a condition for firing this trigger. You can use attribute of class of your "Registration" button, for example it's "registration"
Search phrase tracking code
Tag
In "Tags" section click on "New" button, to create new tag for this tracking code. Tag type should be set as Retail Rocket GTM template.
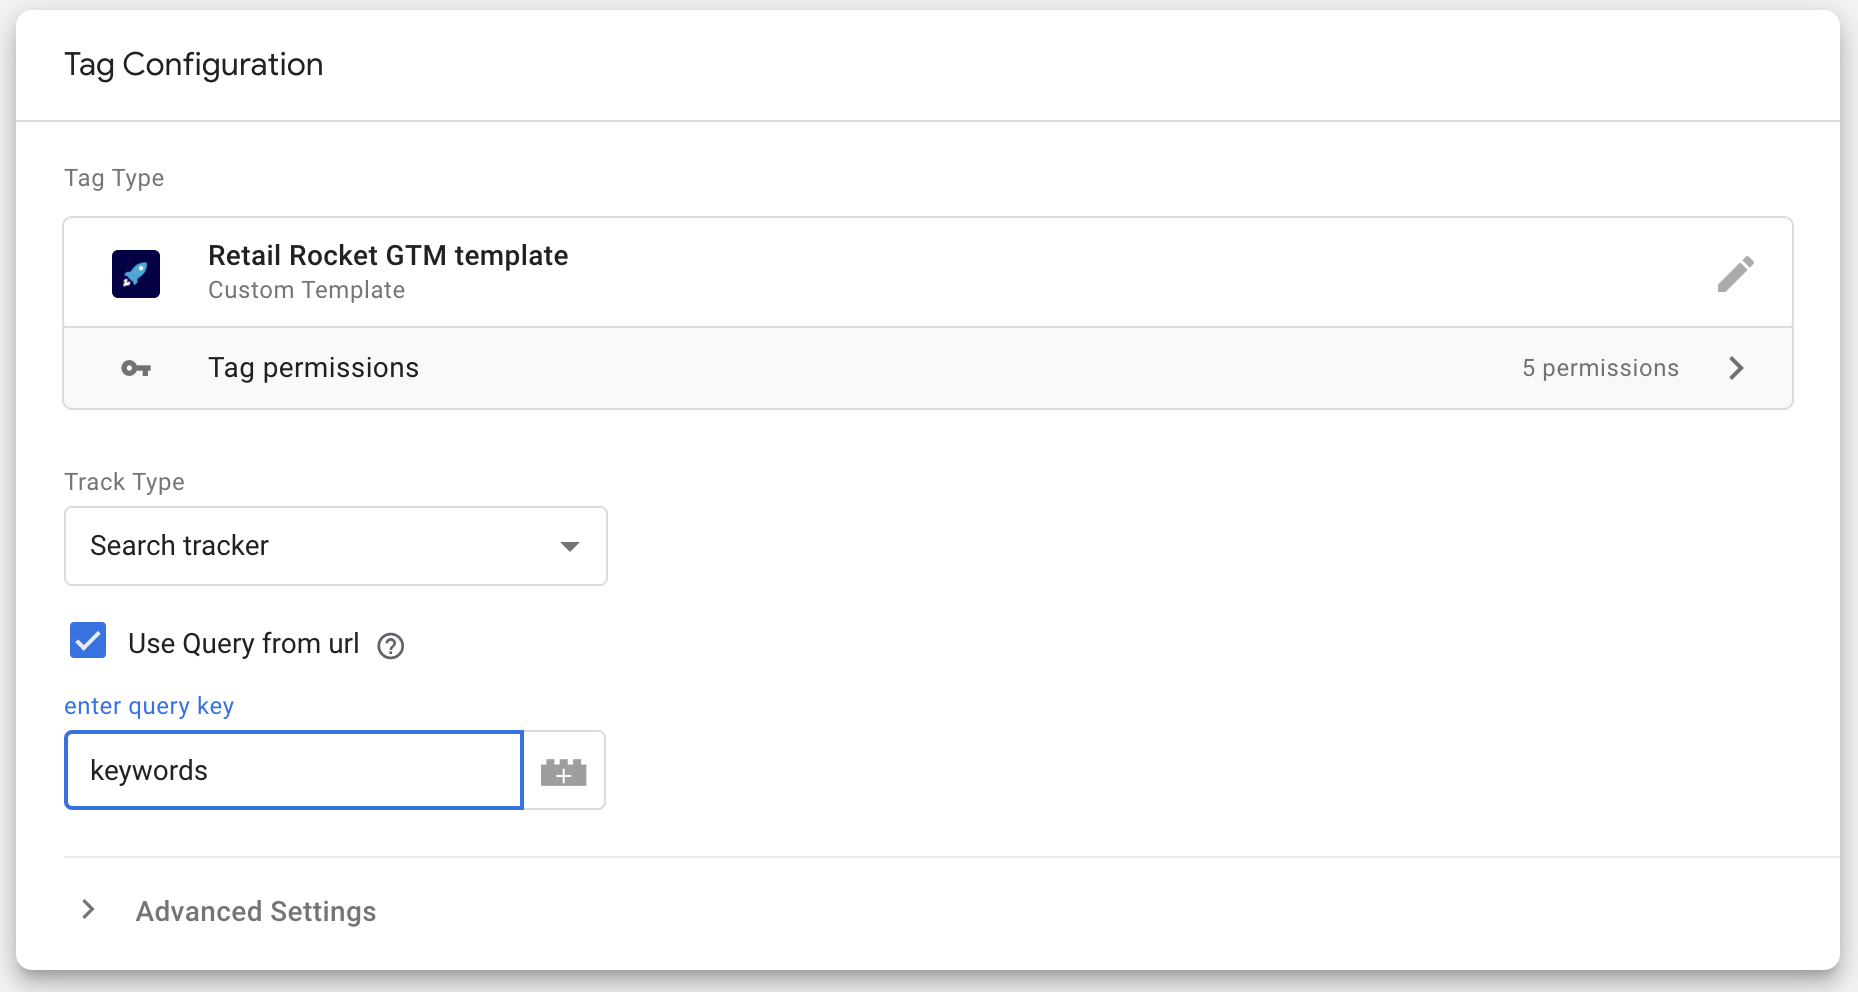
"Track type" should be "Search tracker".
There are two options of sending data to this tracking code (toggeled by "Use Query from url" checkbox):
- By variable - custom variable with search phrase;
- By query parameter - name of a query parameter from URL which holds search phrase as value. For example https://domain.com?keywrods=userSearchPhrase. In this case "keywords" would be the query parameter to input.
Trigger
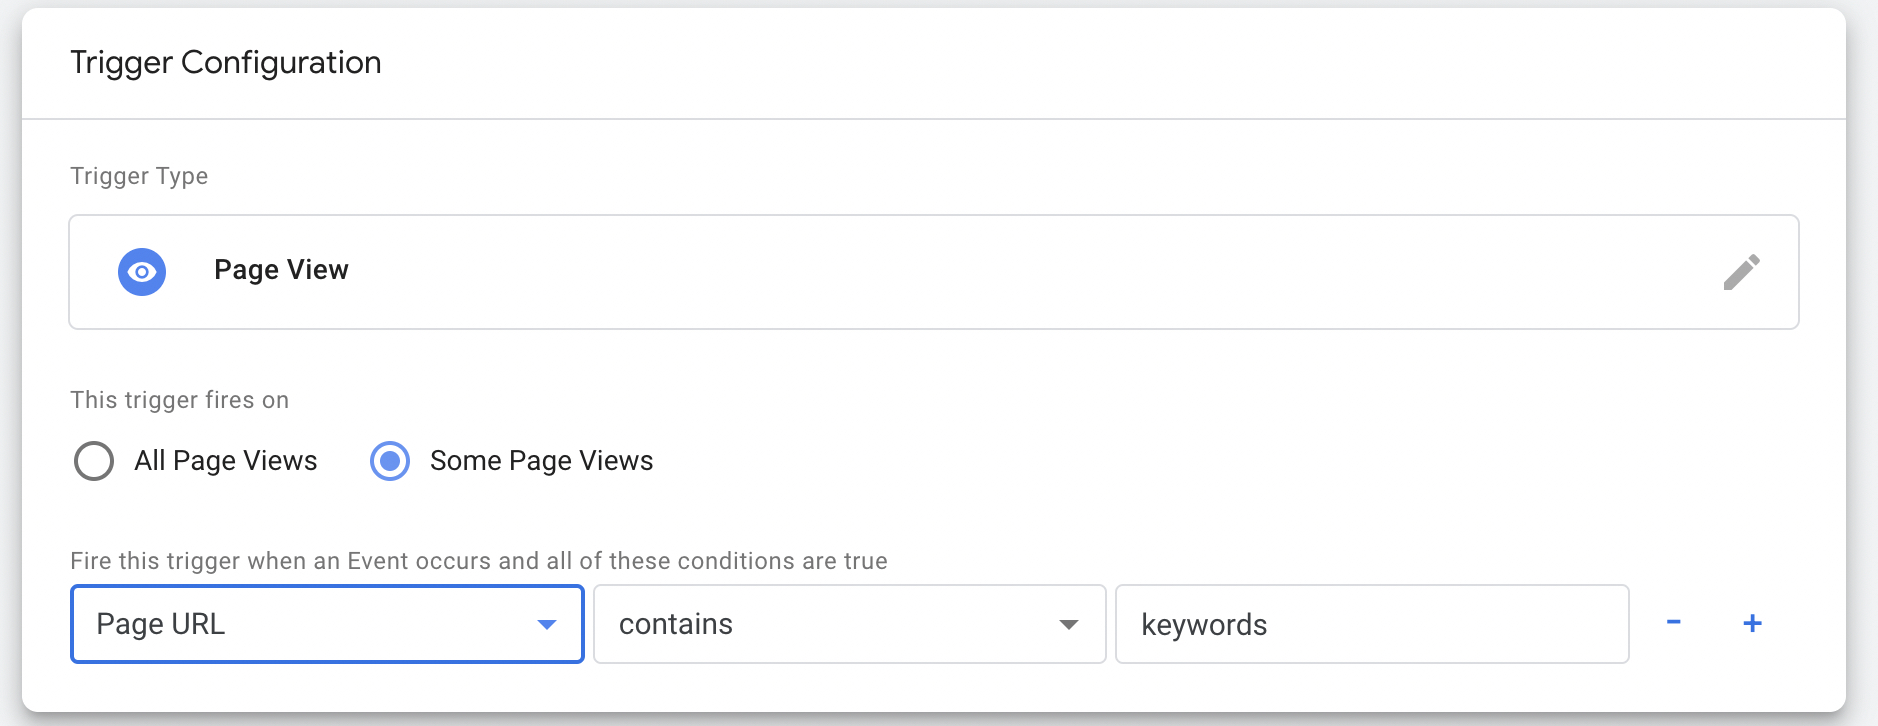
Search tracking code must be executed on every time user enters a search phrase.
To create trigger click on "Triggering" below, and click on "+".
As a trigger type, you should select "Page View", and mark option "Some Page Views". Below you can select a condition for firing this trigger. You can use "Page URL", "contains" and your query parameter name. For example it's "keywords"
Updated about 1 month ago