Instruction
NoteThe instruction assumes, that the data layer has already been created, and contains all the necessary data, as variables for products/category IDs.
List of required variables and events for Data Layer you can find here.
Main tracking code
Tag
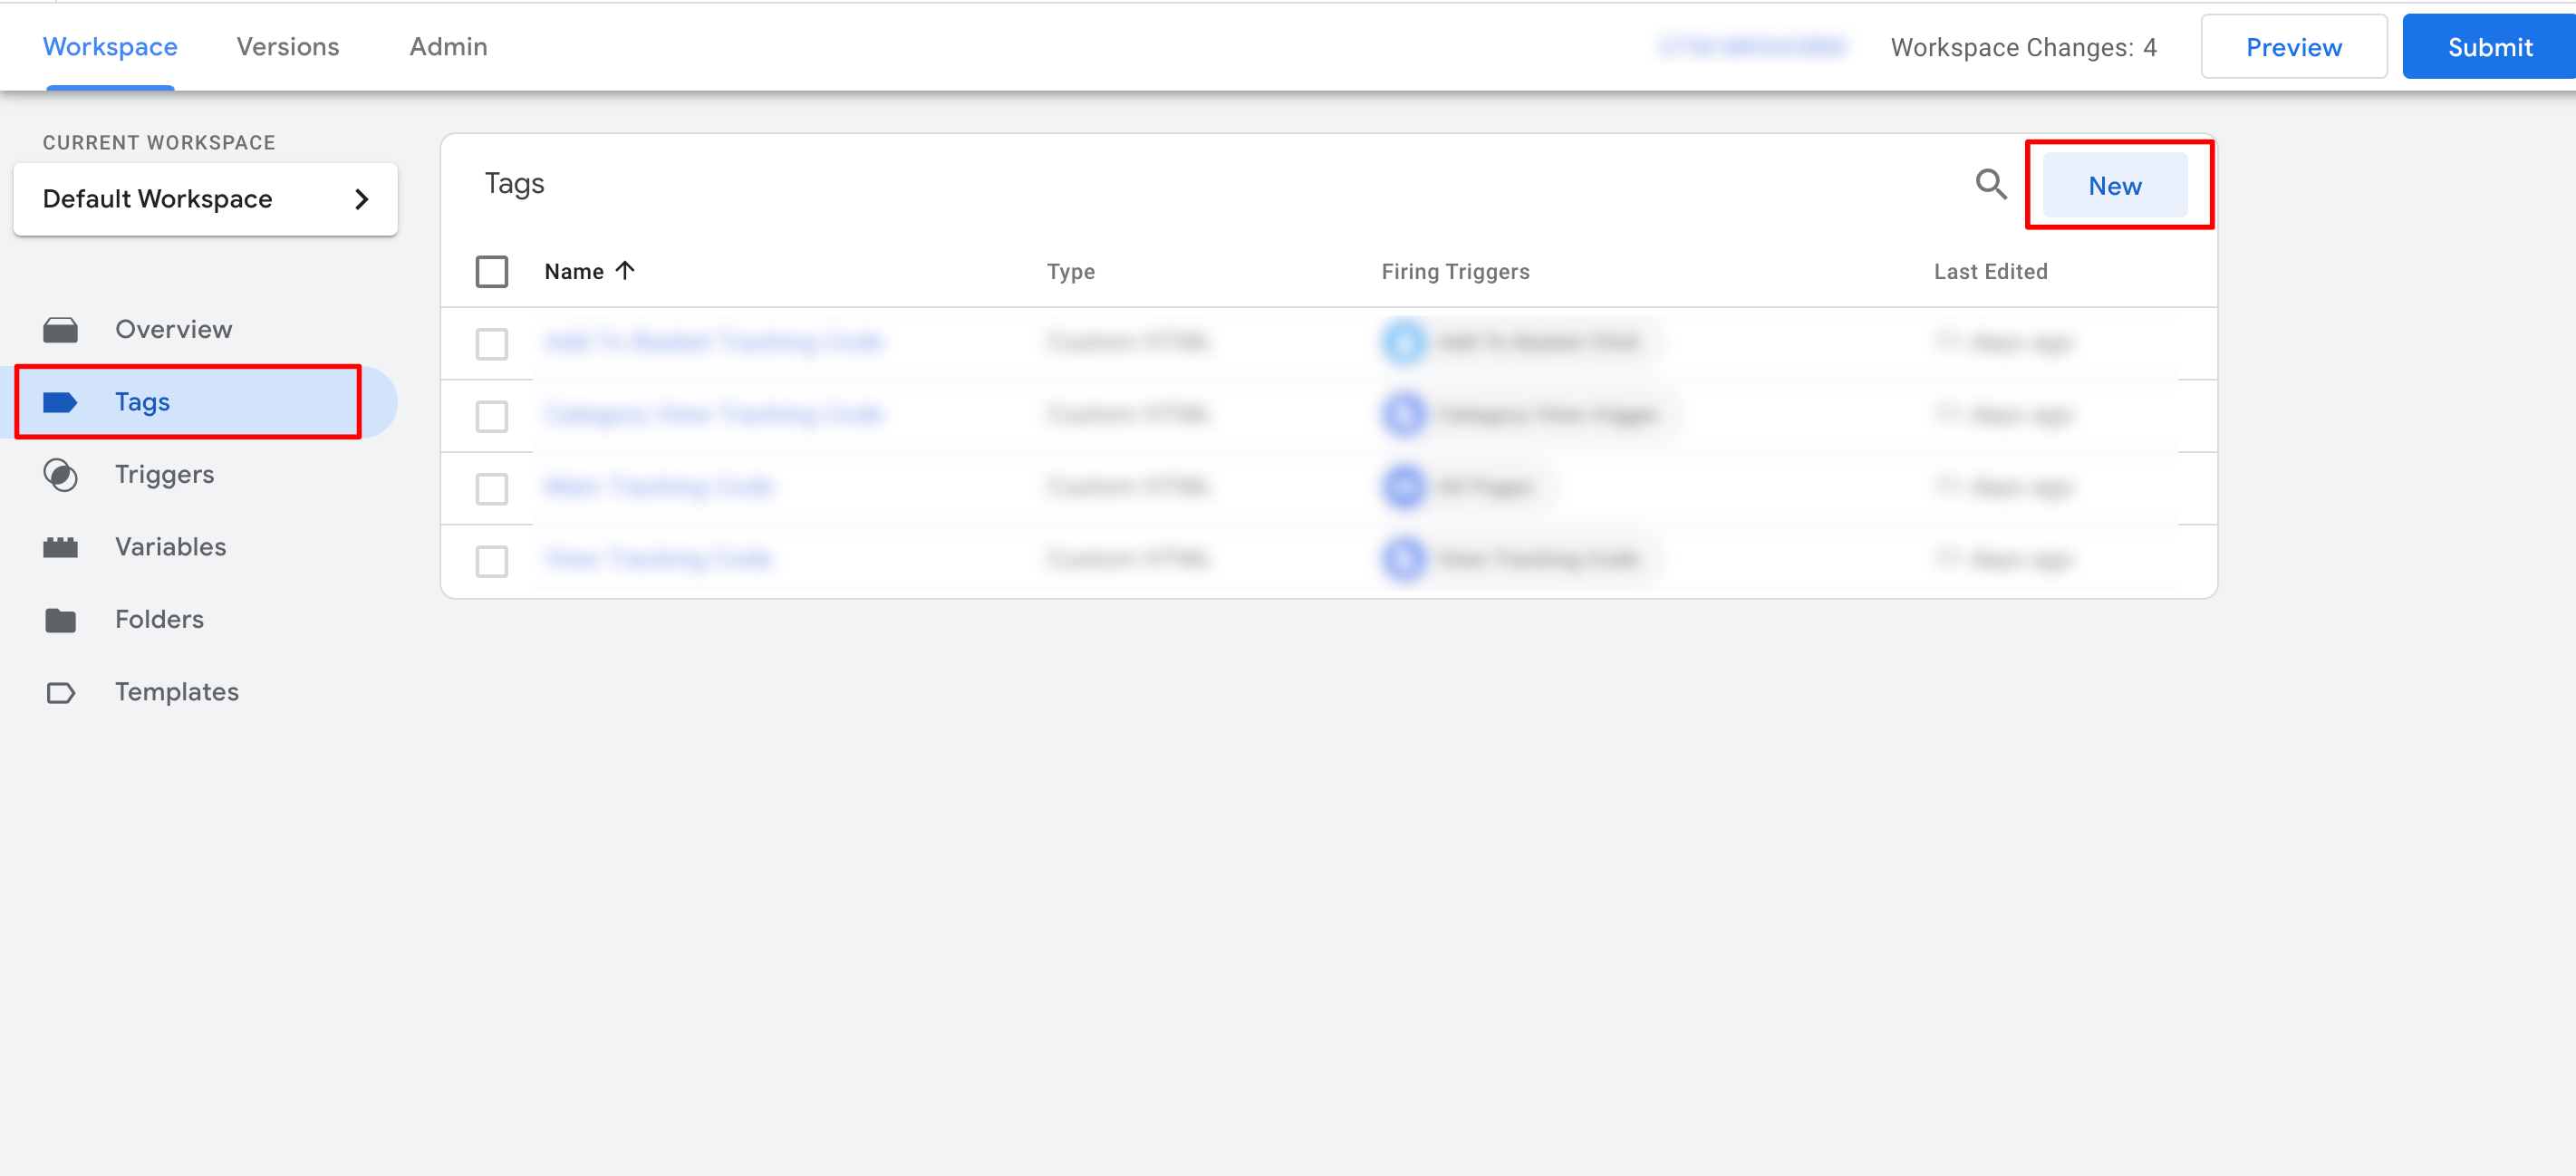
In order to install this tracker, you need to create new tag, which will contain main tracking code.
In section "Tags" click on "New" button.
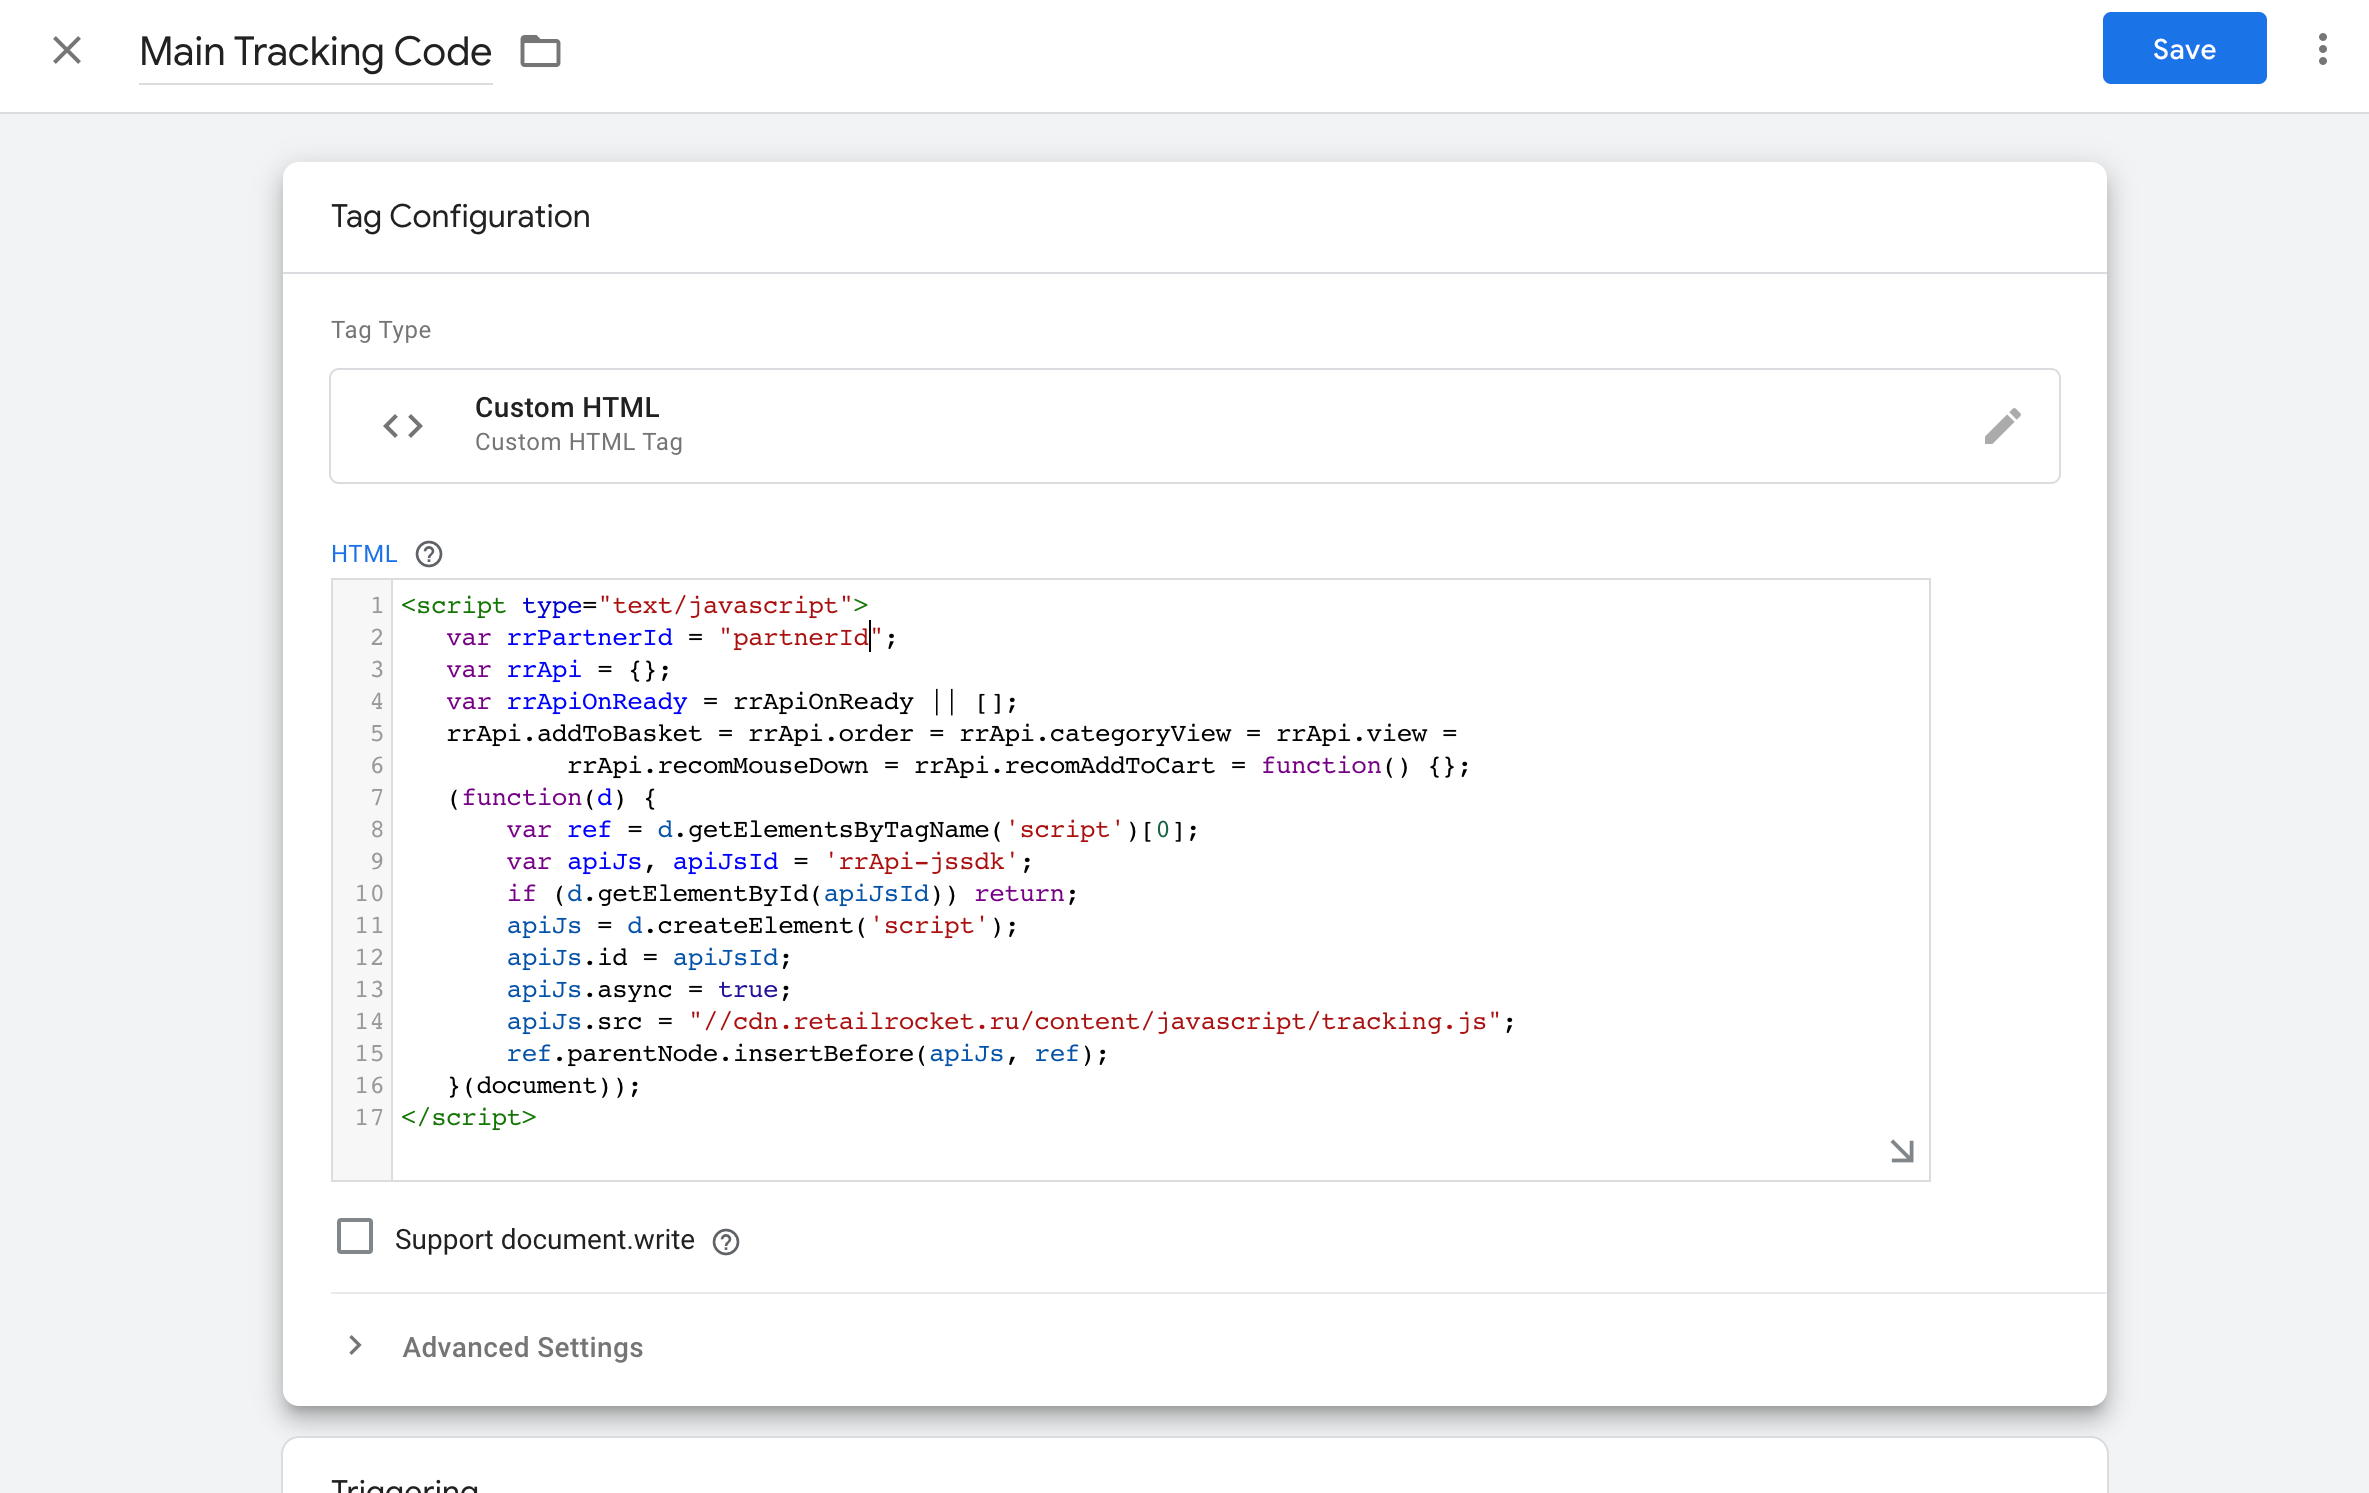
As a tag type select "Custom HTML", and put the following segment of code:
<script type="text/javascript">
   var rrPartnerId = "PartnerId";
   var rrApi = {};
   var rrApiOnReady = rrApiOnReady || [];
   rrApi.addToBasket = rrApi.order = rrApi.categoryView = rrApi.view =
           rrApi.recomMouseDown = rrApi.recomAddToCart = function() {};
   (function(d) {
       var ref = d.getElementsByTagName('script')[0];
       var apiJs, apiJsId = 'rrApi-jssdk';
       if (d.getElementById(apiJsId)) return;
       apiJs = d.createElement('script');
       apiJs.id = apiJsId;
       apiJs.async = true;
       apiJs.src = "//cdn.retailrocket.net/content/javascript/tracking.js";
       ref.parentNode.insertBefore(apiJs, ref);
   }(document));
</script>
Where "PartnerId" – partner ID in the Retail Rocket system.
Trigger
Now, for this tag you need to create trigger, which will execute this tracking code on some event. Main tracking code must be installed and executed once on all pages of the website.
To create trigger click on section "Triggering" below, and click on "+", for creating new trigger.
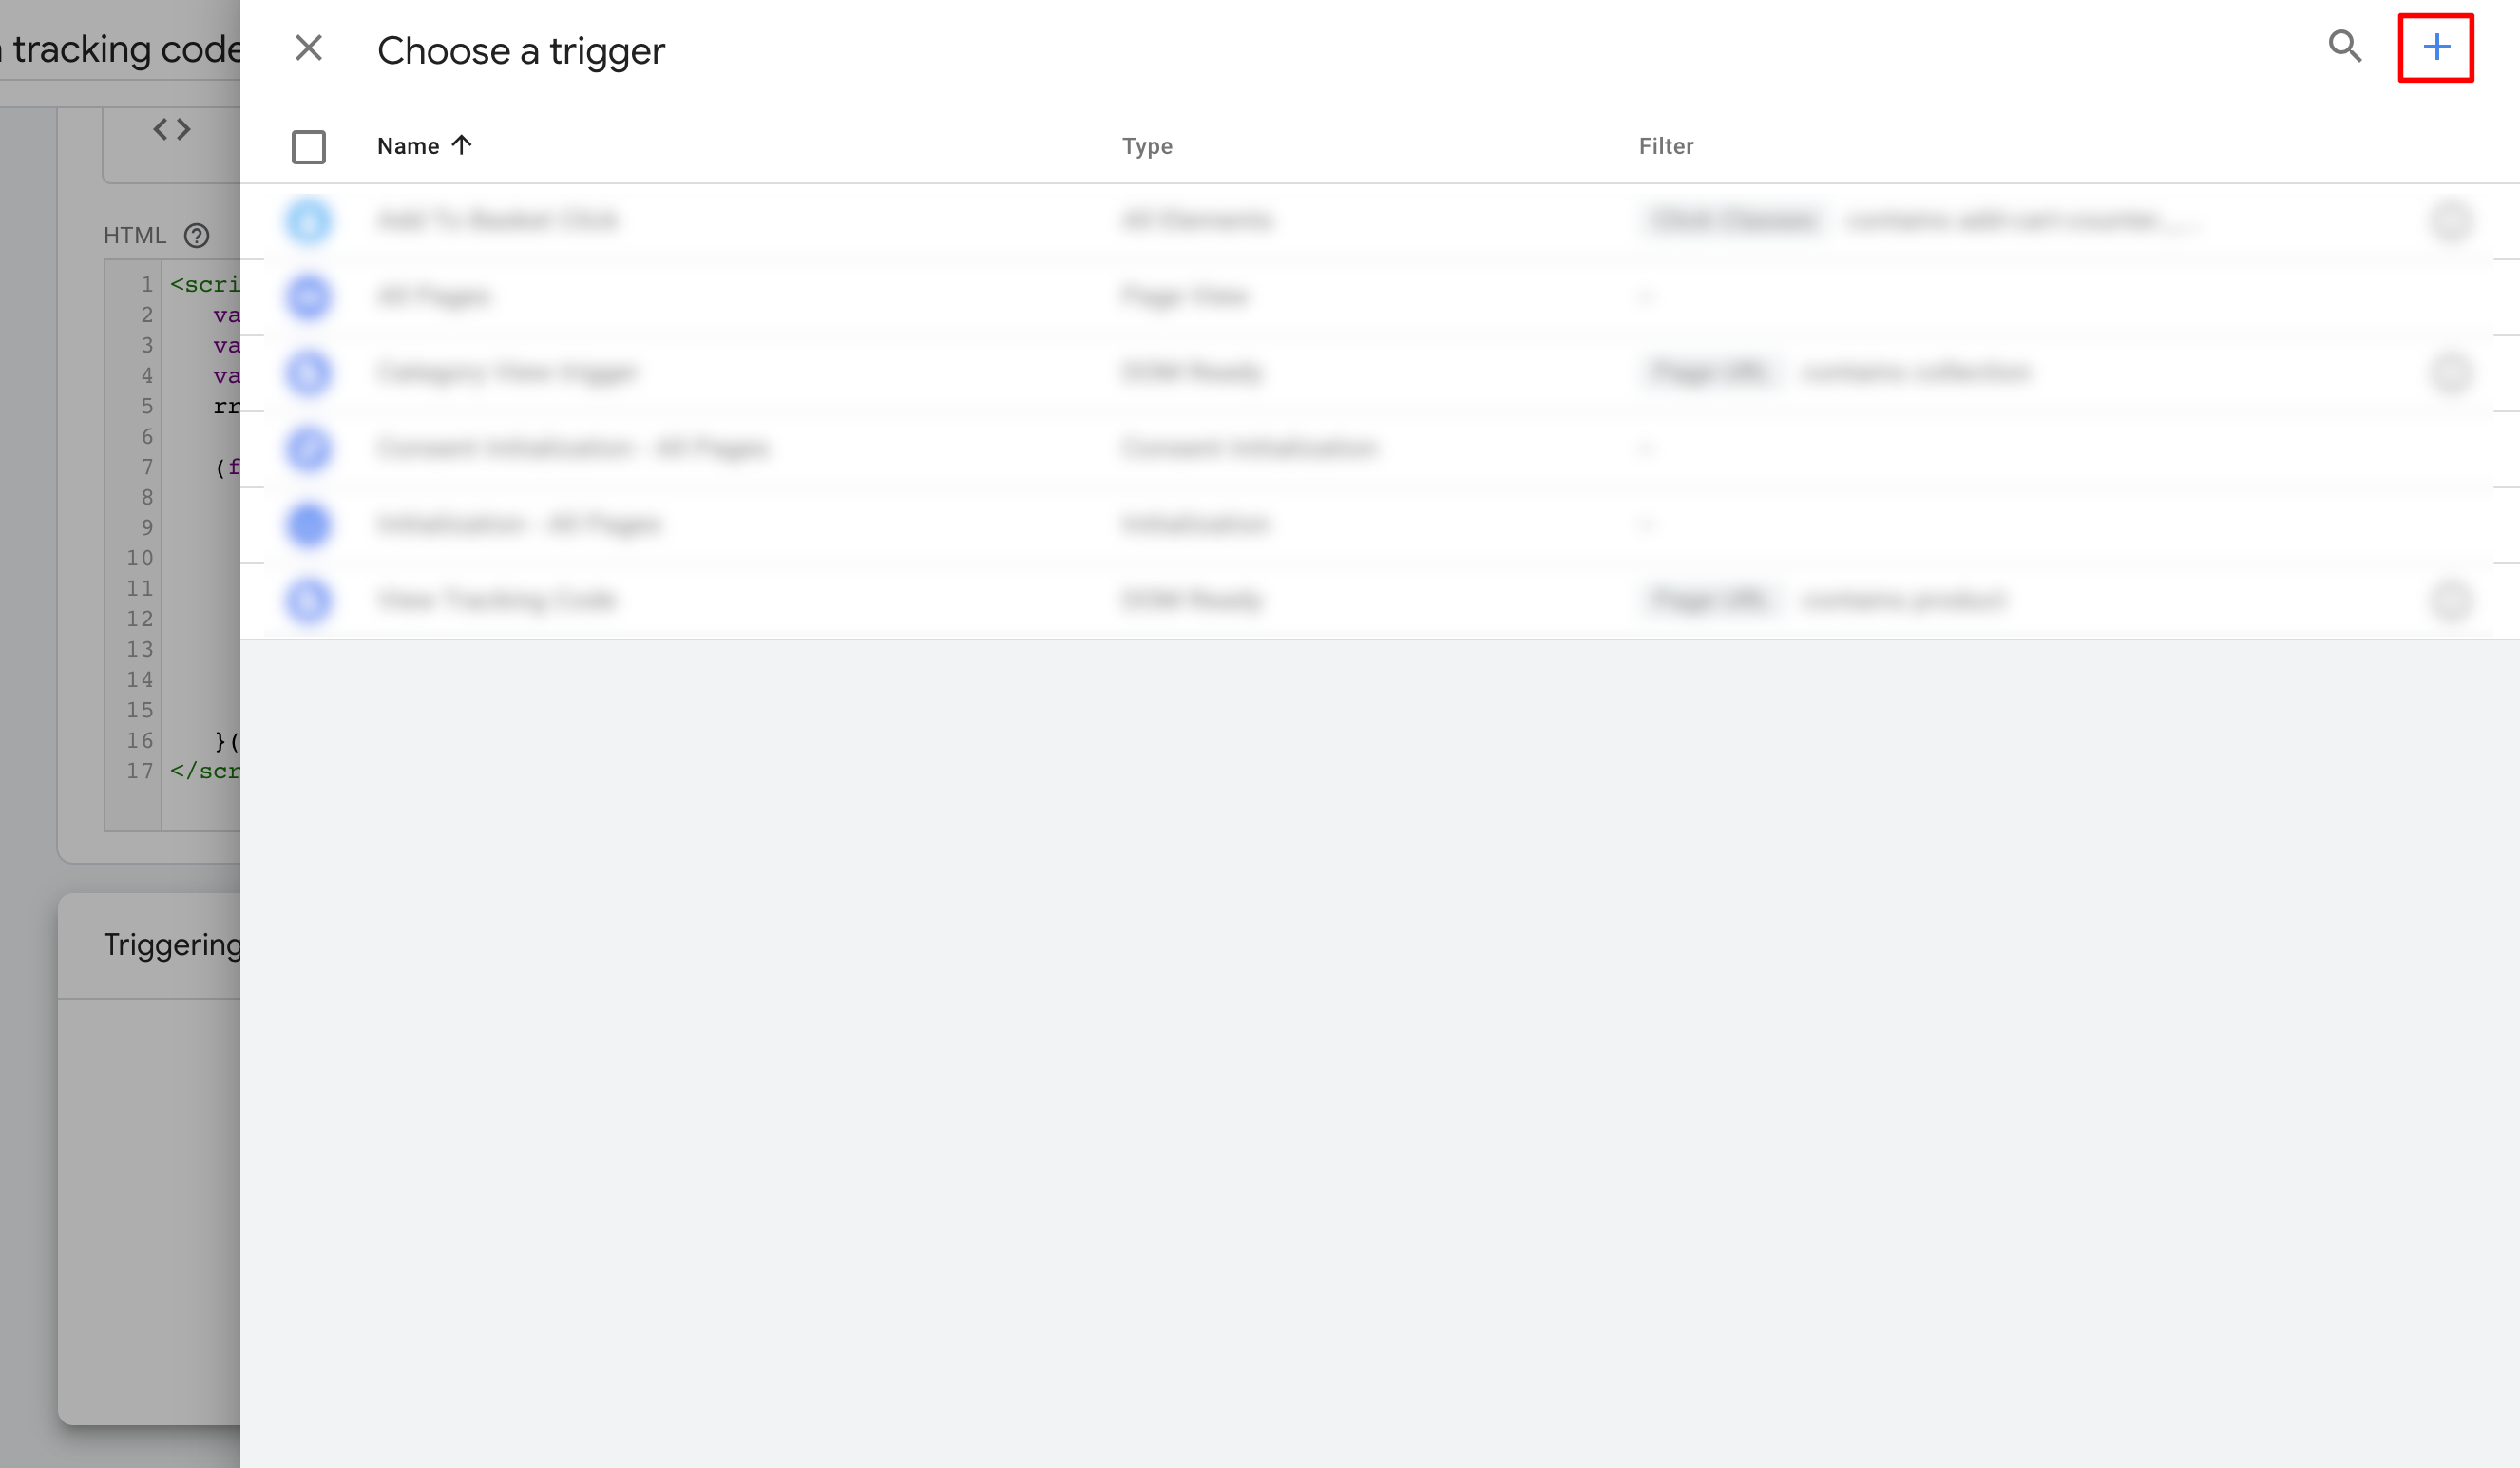
As a trigger type select "Page view" and mark option "All Page Views"

Tracking code for viewing a product page
Tag
In "Tags" section click on "New" button, to create new tag for this tracking code. Tag type should be set as "Custom HTML".
Put the following segment of code in this tag:
<script type="text/javascript">
(window["rrApiOnReady"] = window["rrApiOnReady"] || []).push(function(){
try{ rrApi.view({{product.id}}); } catch(e) {}
})
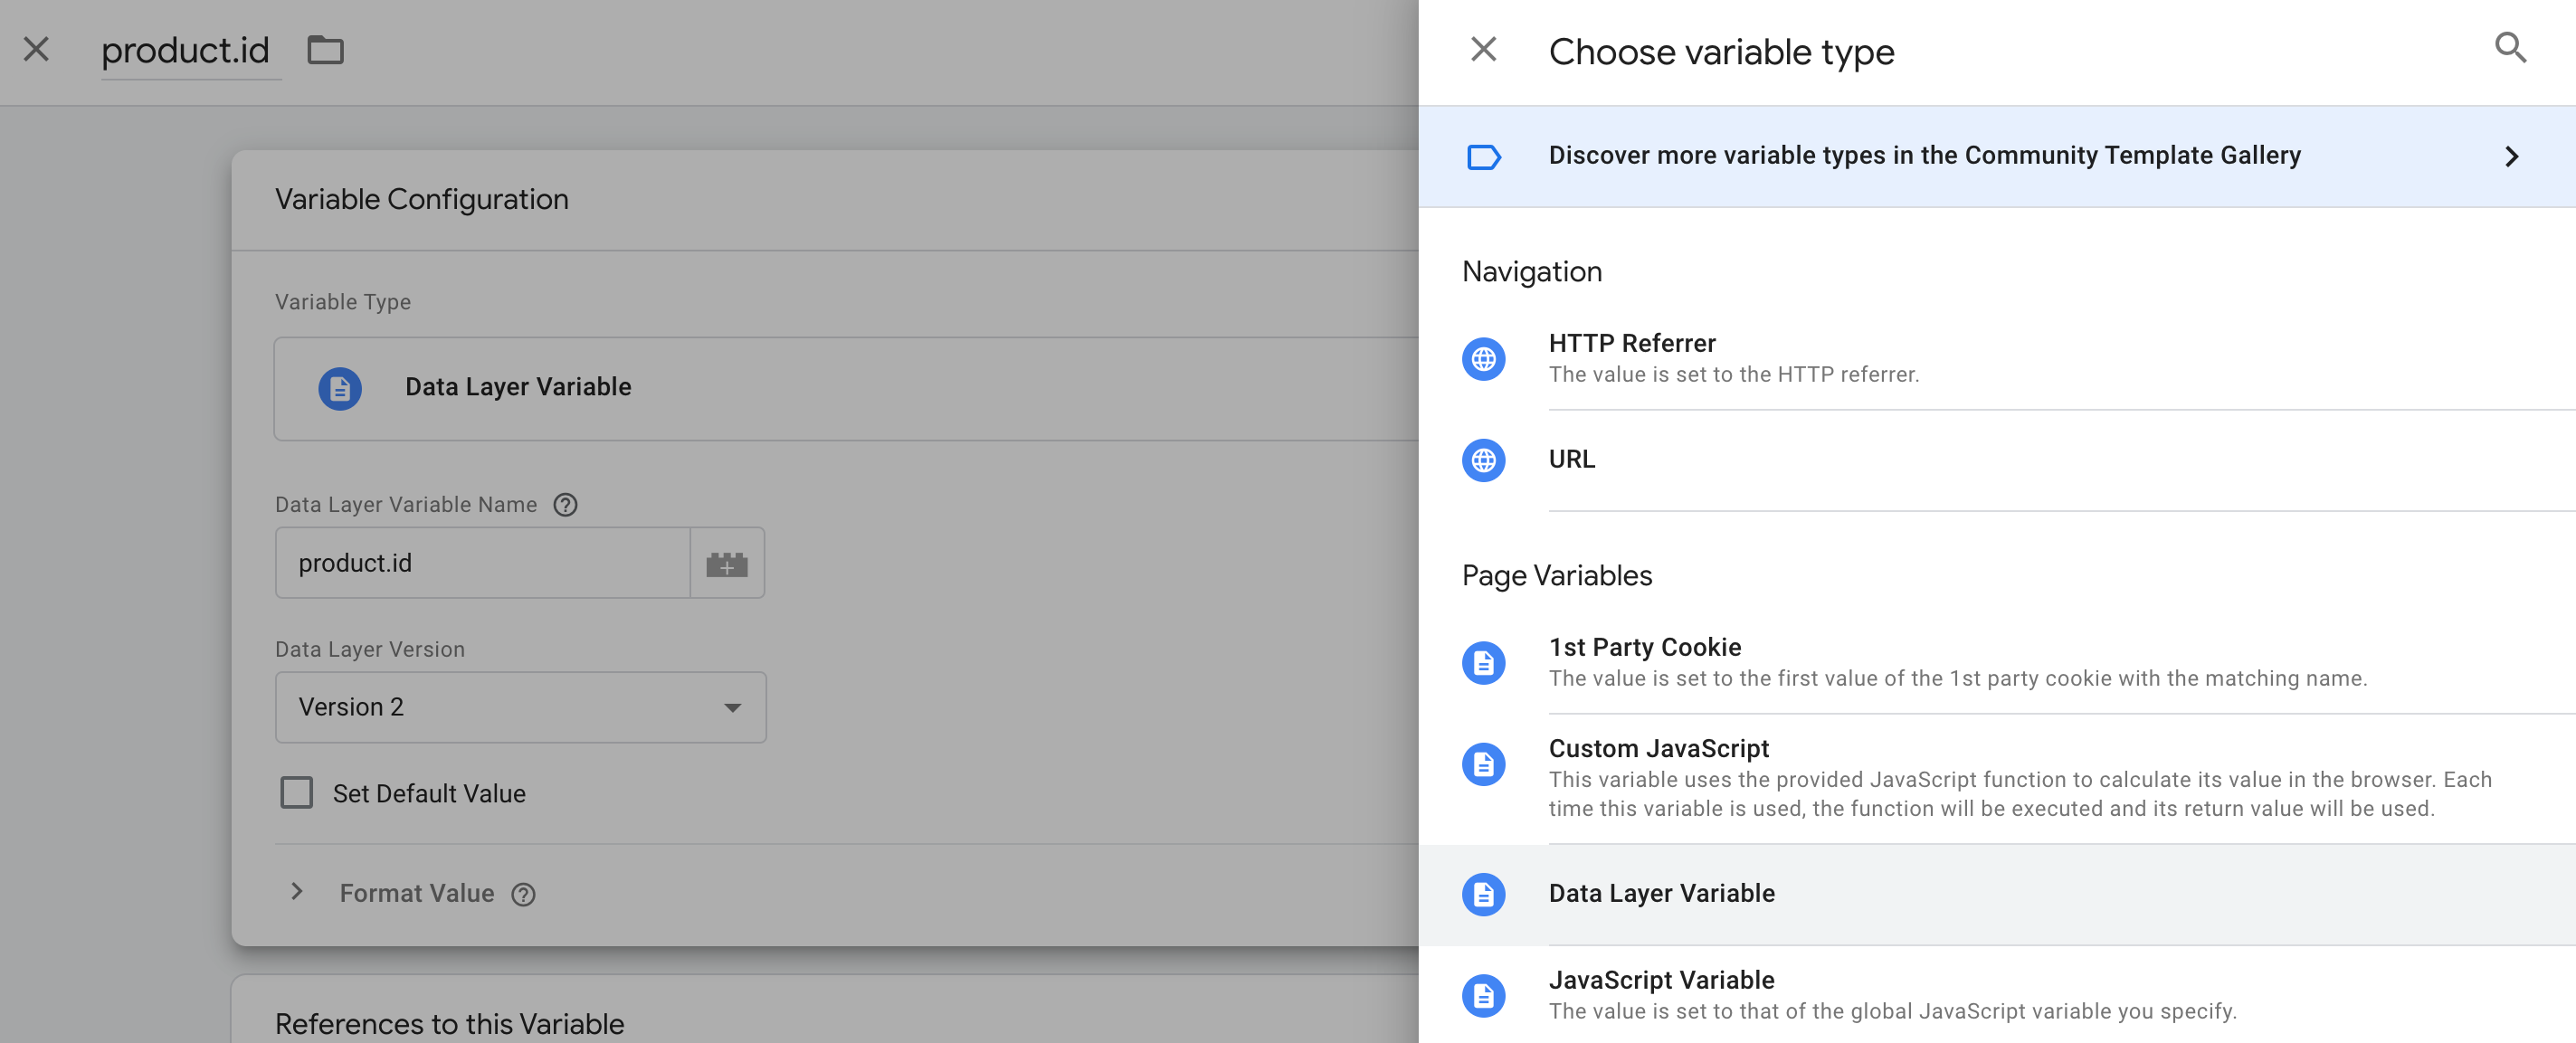
</script>Where is {{product.id}} is a user-defined variable.
Trigger
Tracking code of viewing of product page must be executed on every product page, and you need to pass a product ID to it.
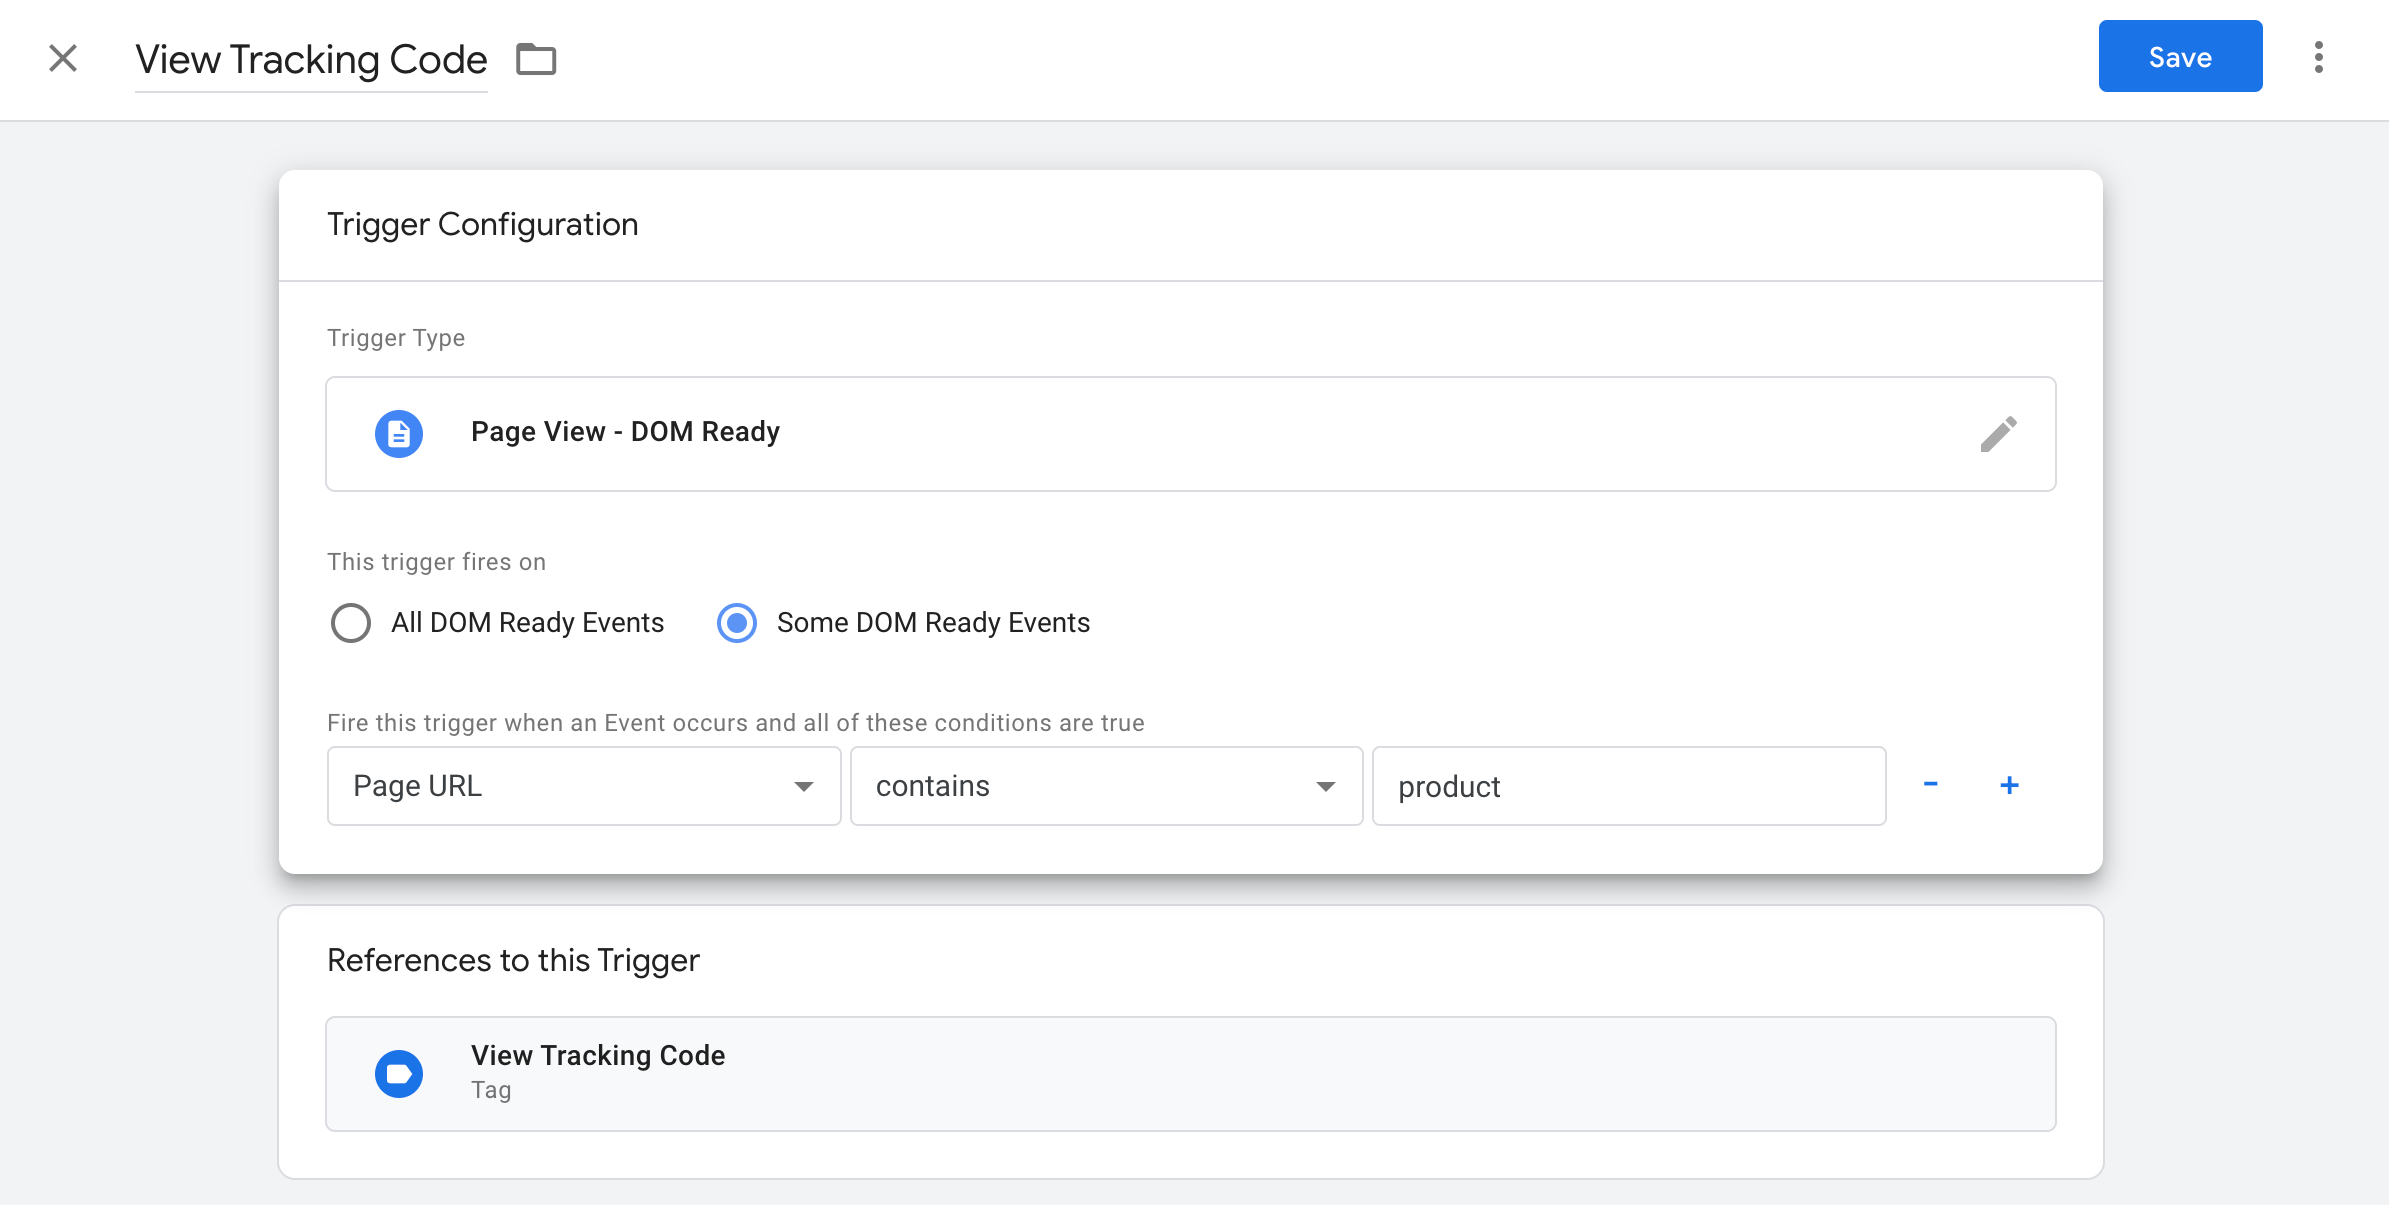
To create trigger click on section "Triggering" below, and click on "+", for creating new trigger.
As a trigger type, you should select "DOM Ready", and mark option "Some DOM Ready Events". Below you can select a condition for firing this trigger. In case if product URL contains word "product", for example "https://www.example-shop.com/product/skirt-123", you can use it.
Data Layer eventIn case you have made events for each page according to this instruction, you can use them directly.
Variable
In section "Variables", go to "User-Defined variables", and click on button "New"
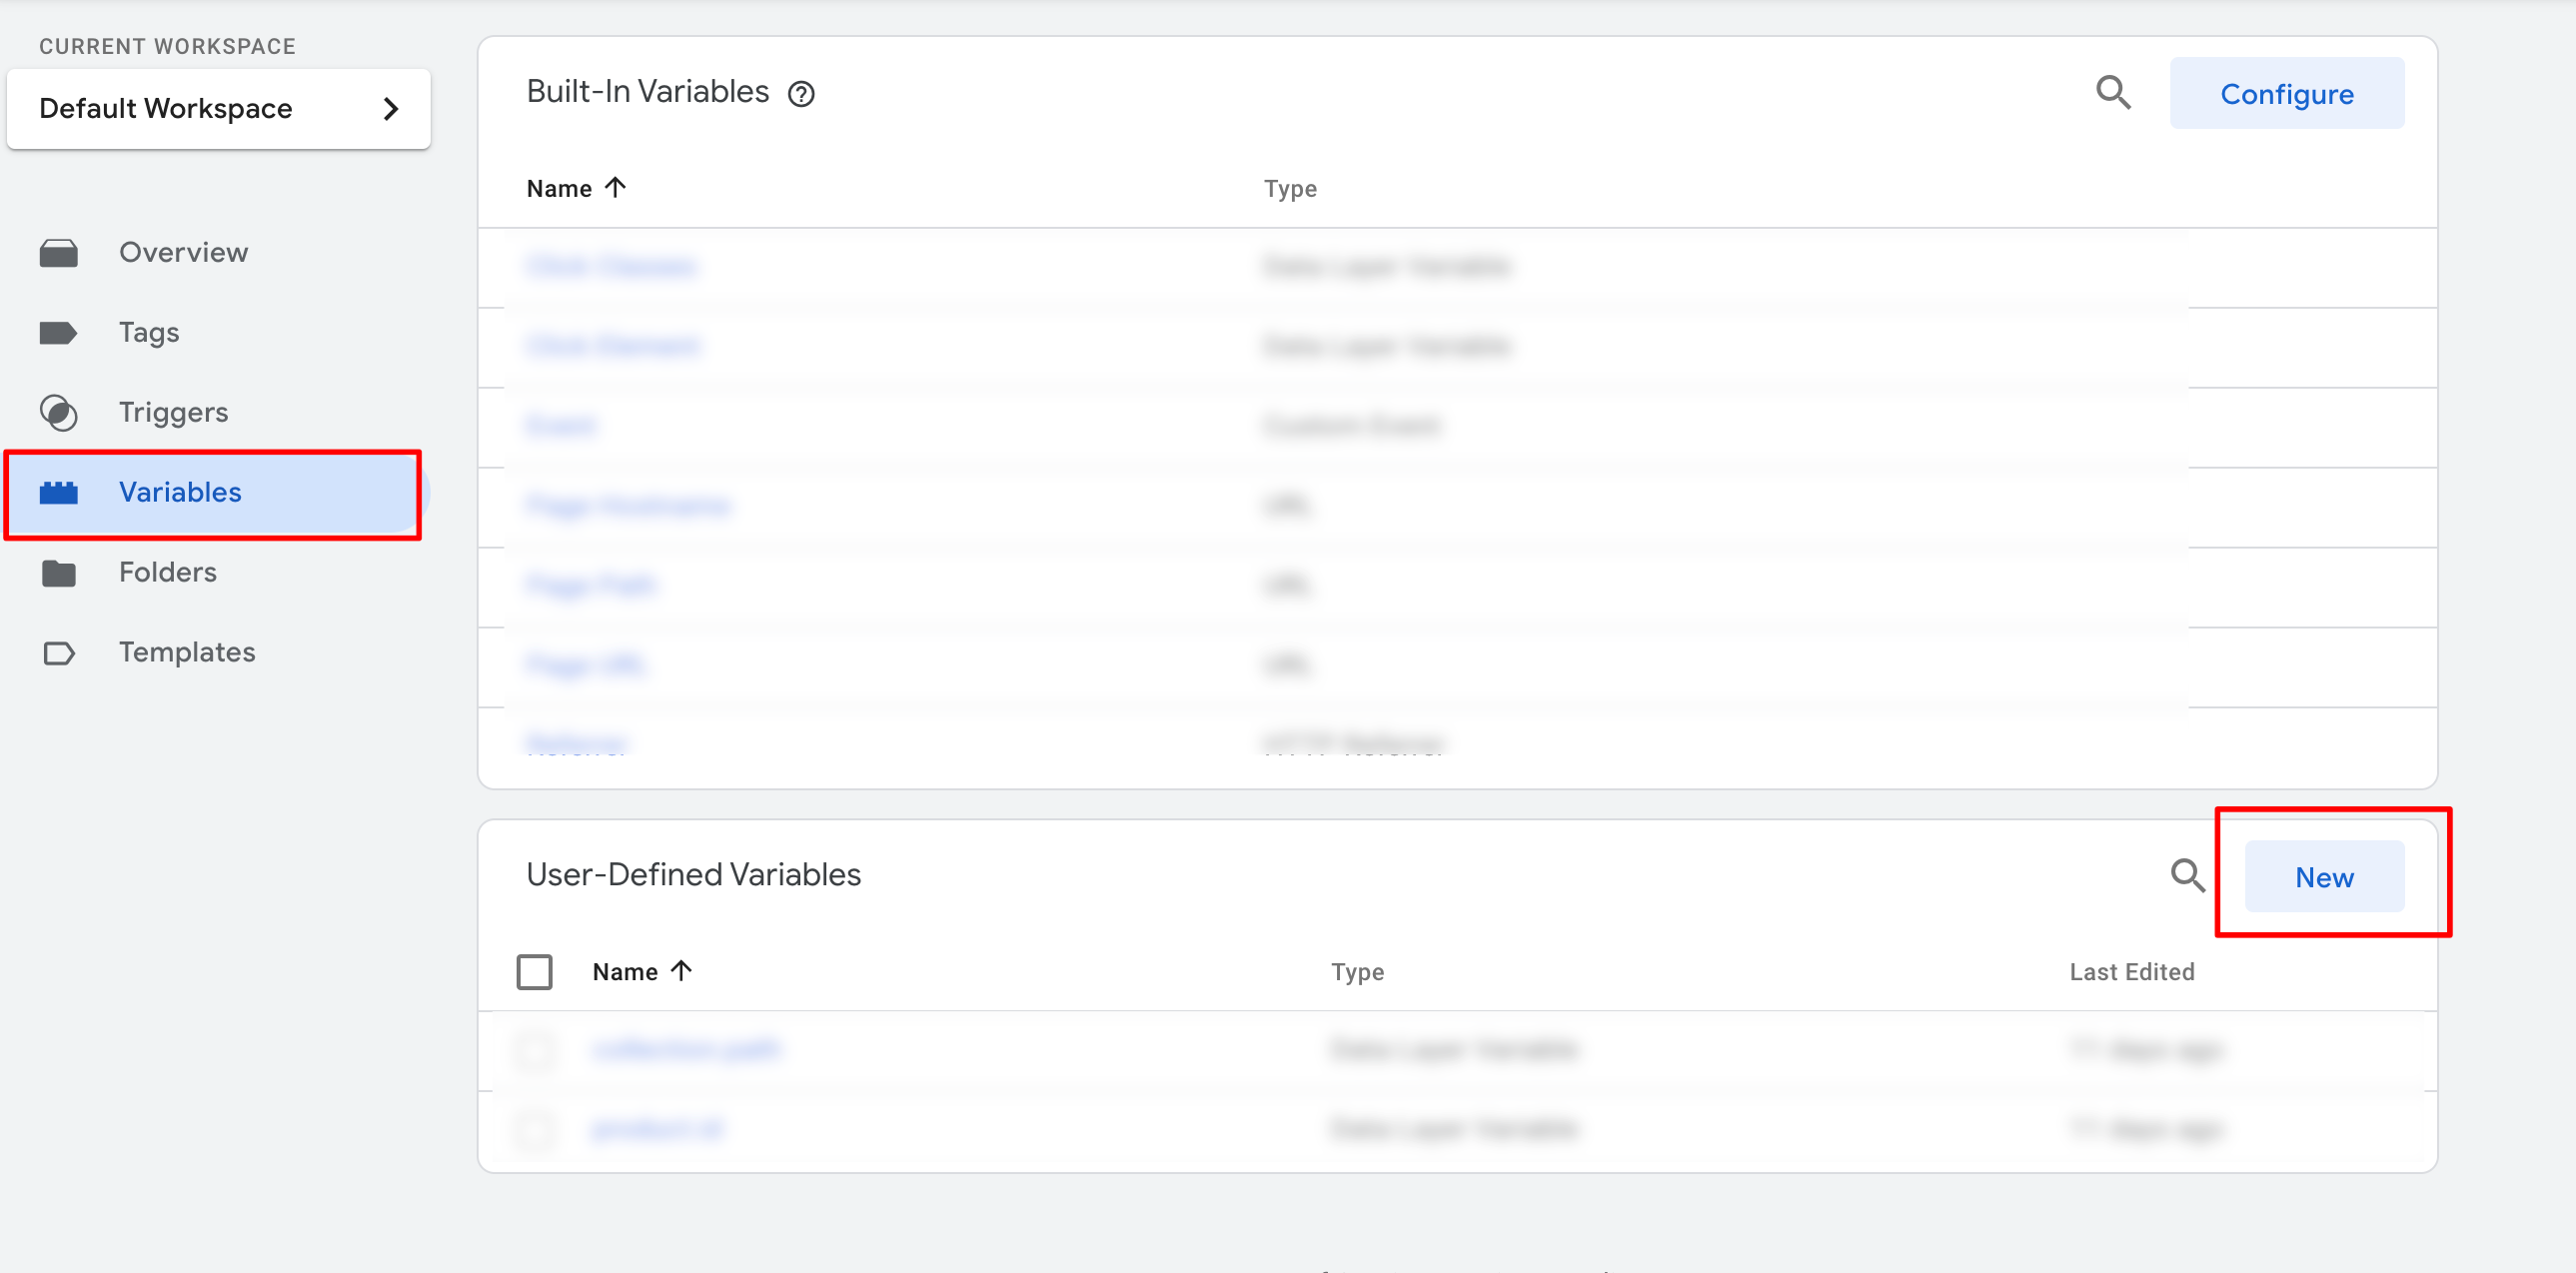
As a variable type you should select "Data layer variable", and then select the relevant variable from it.
Tracking code of viewing category page
Tag
In "Tags" section click on "New" button, to create new tag for this tracking code. Tag type should be set as "Custom HTML".
Put the following segment of code in this tag:
<script type="text/javascript">
(window["rrApiOnReady"] = window["rrApiOnReady"] || []).push(function() {
try { rrApi.categoryView({{category.id}}); } catch(e) {}
})
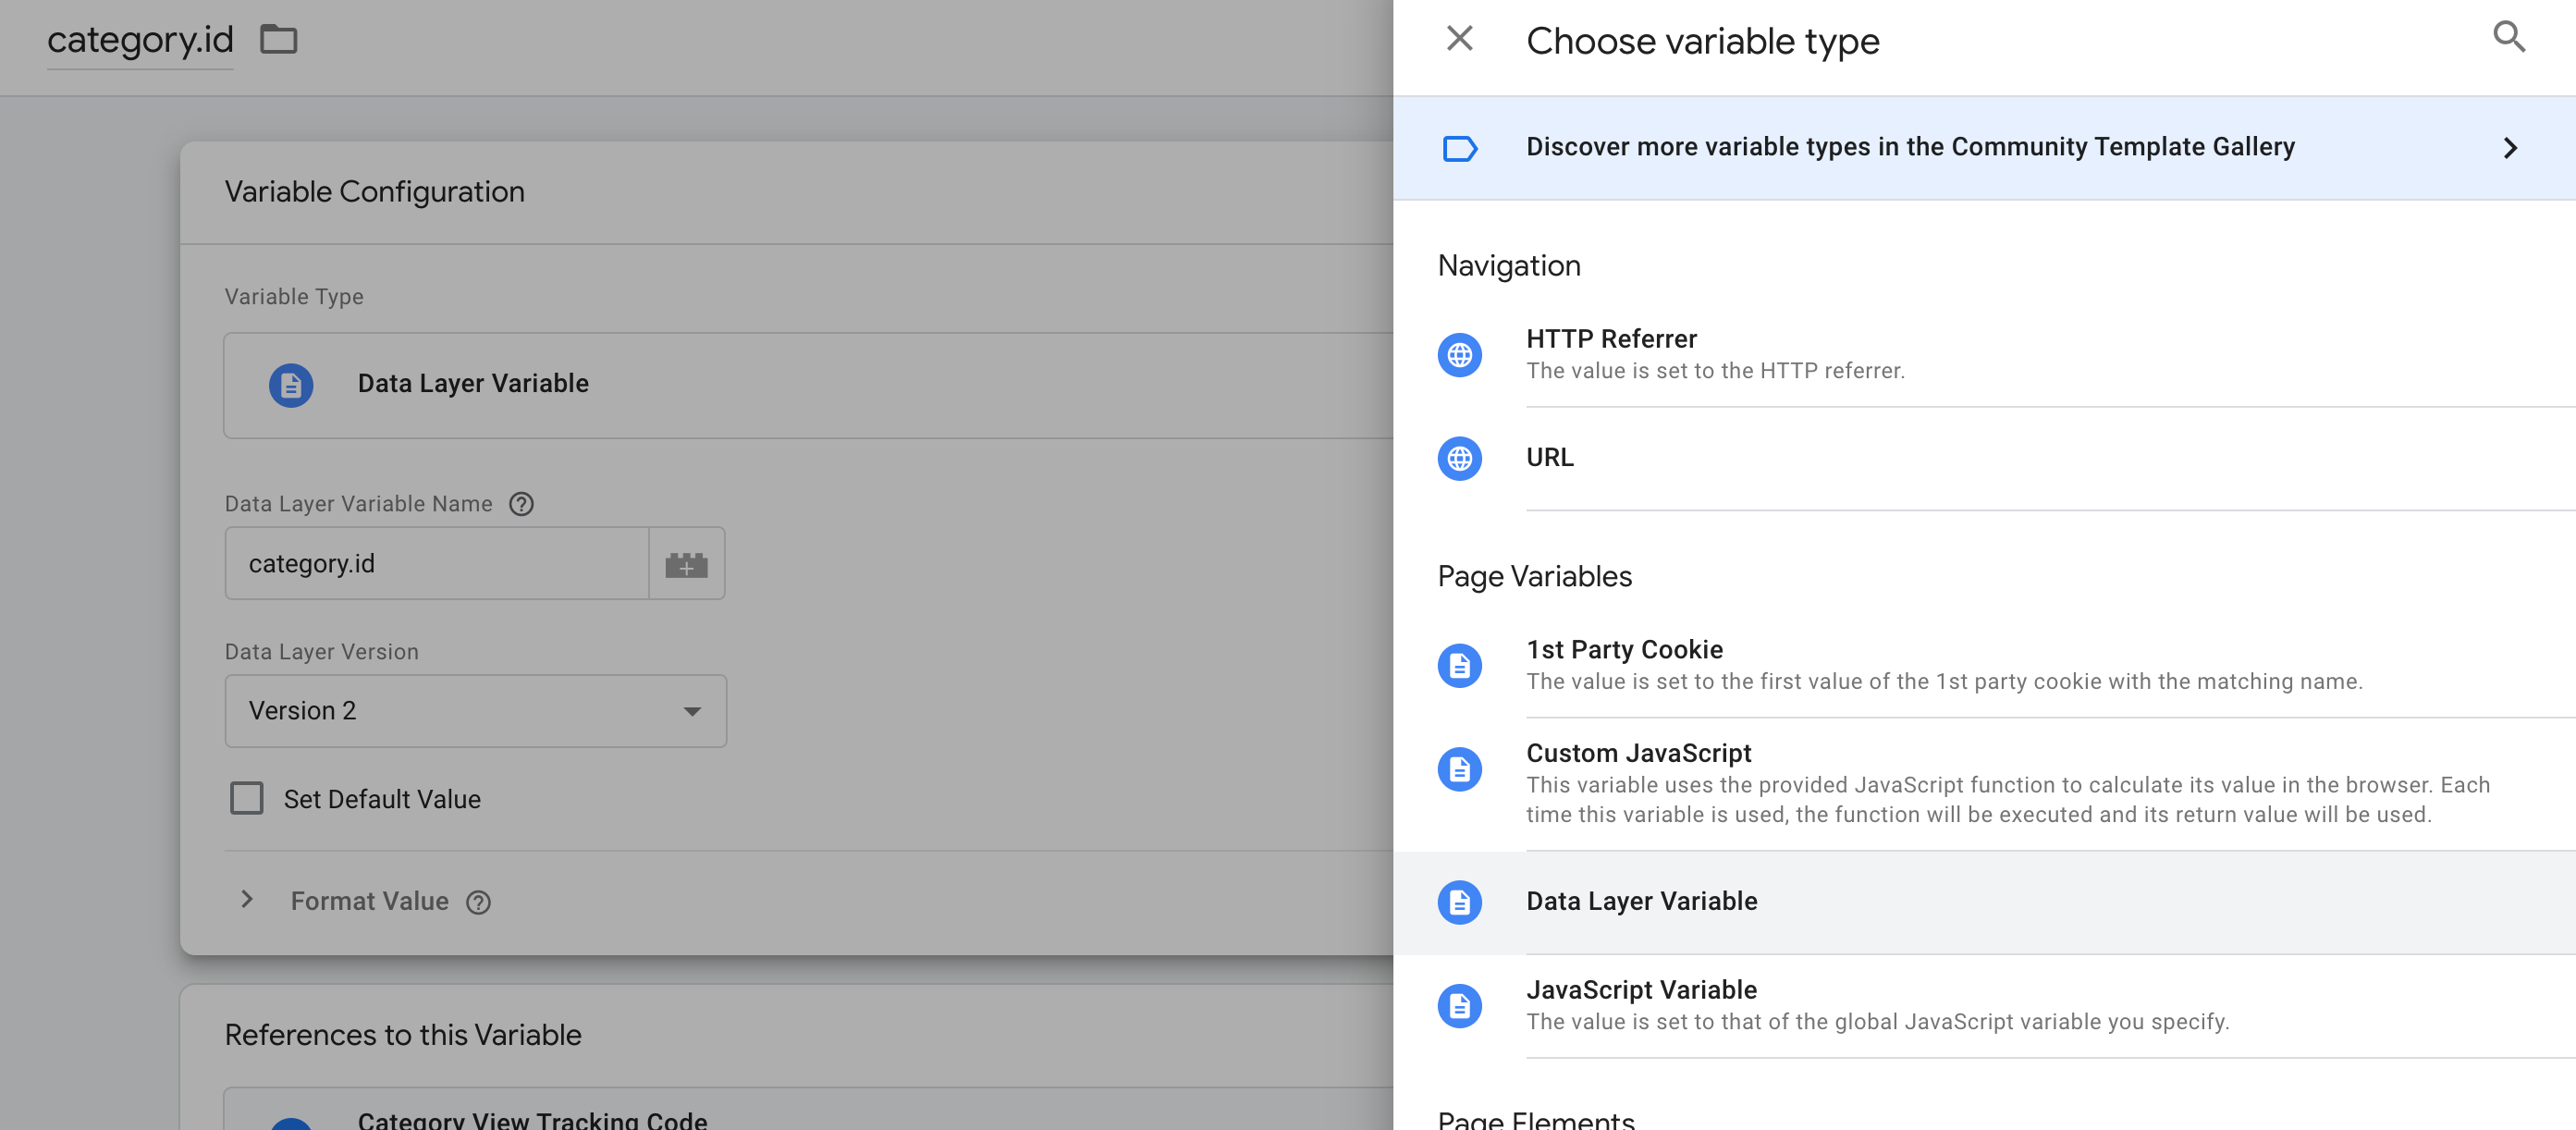
</script>Where is {{category.id}} is a user-defined variable.
Trigger
Tracking code of viewing of category page must be executed on every category page, and you need to pass a category ID to it.
To create trigger click on section "Triggering" below, and click on "+", for creating new trigger.
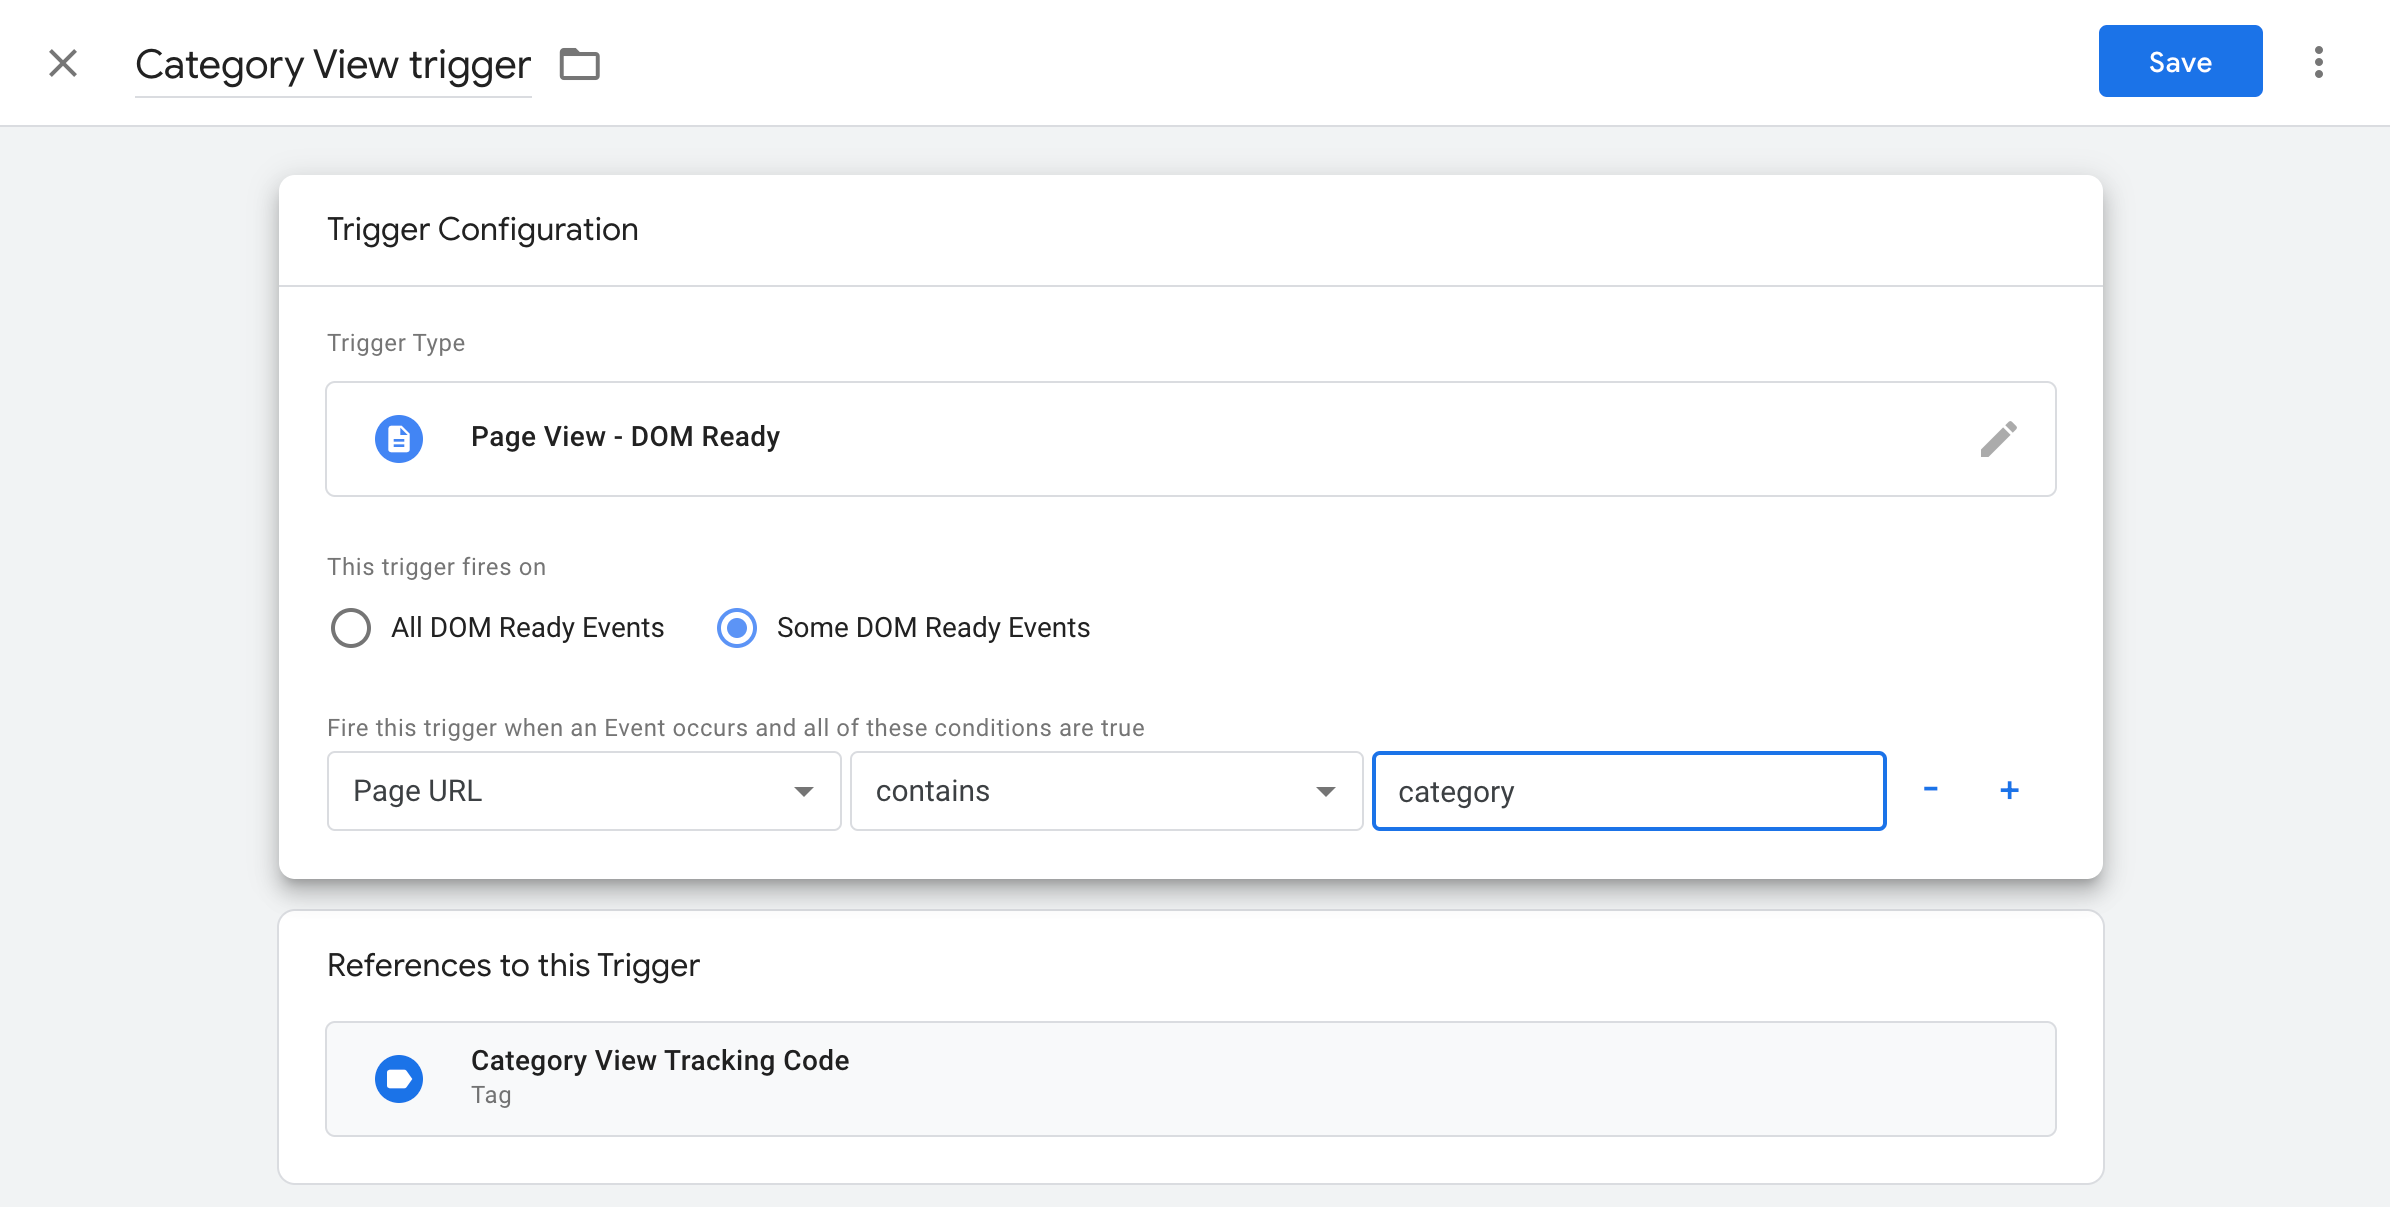
As a trigger type, you should select "DOM Ready", and mark option "Some DOM Ready Events". Below you can select a condition for firing this trigger. In case if category URL contains word "category", for example "https://www.example-shop.com/category/skirts", you can use it.
Data Layer eventIn case you have made events for each page according to this instruction, you can use them directly.
Variable
In section "Variables", go to "User-Defined variables", and click on button "New".
As a variable type you should select "Data layer variable", and then select the relevant variable from it.
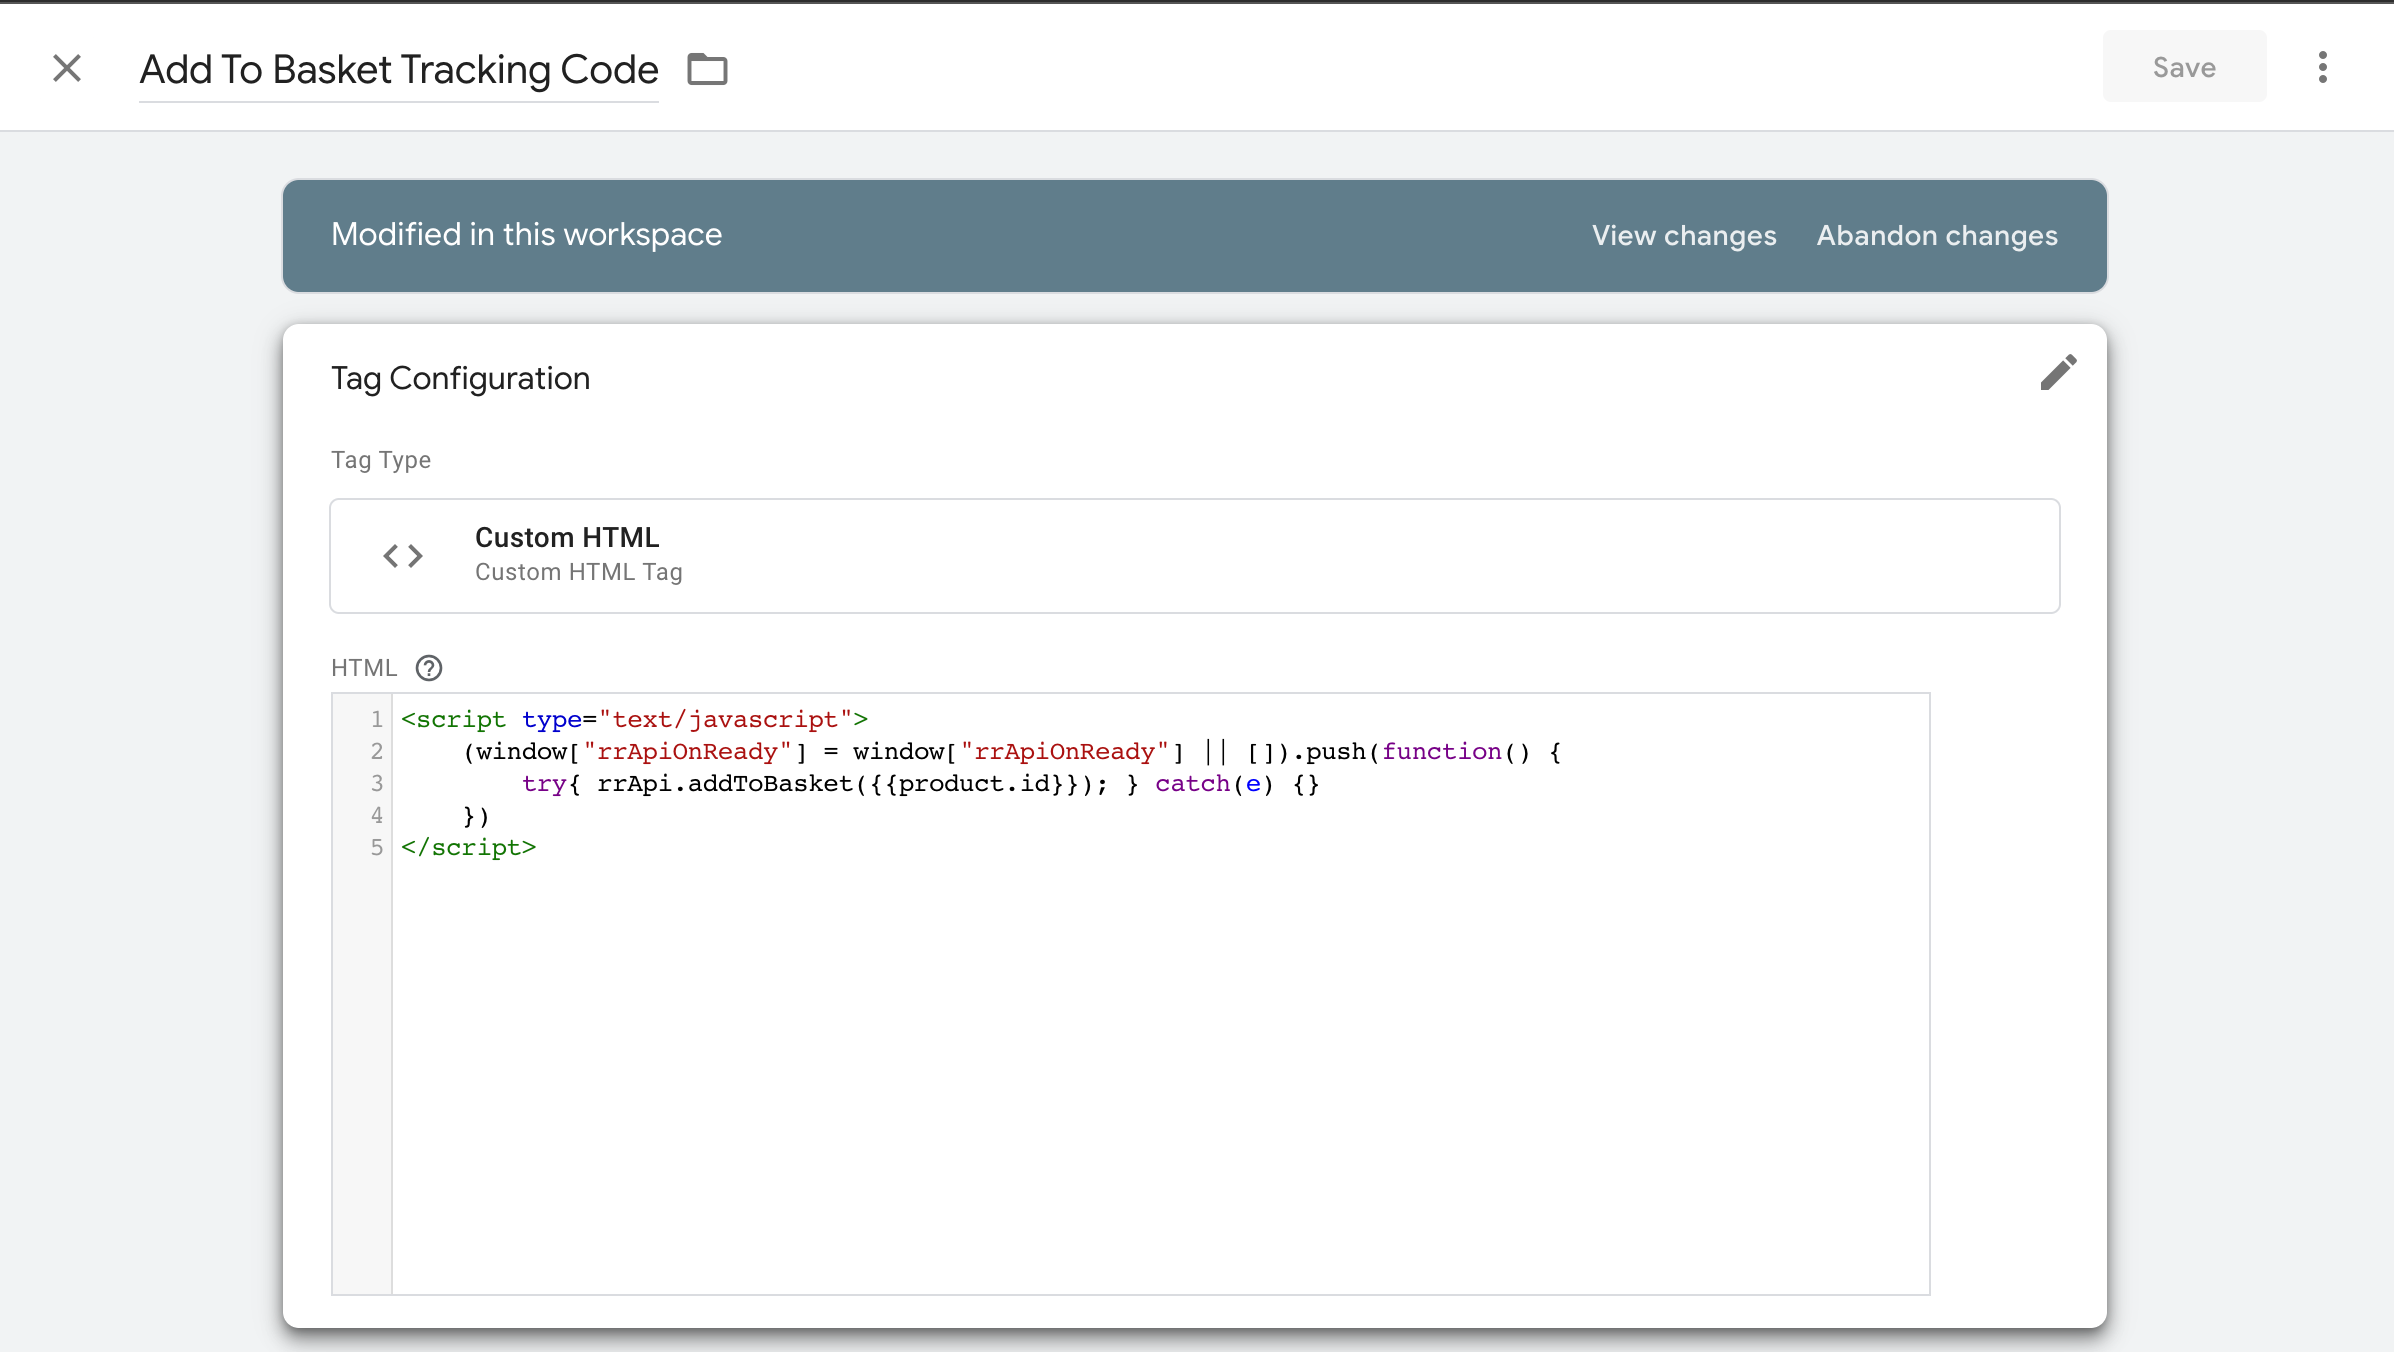
Tracking code of adding product to the basket
Tag
In "Tags" section click on "New" button, to create new tag for this tracking code. Tag type should be set as "Custom HTML".
Put the following segment of code in this tag:
<script type="text/javascript">
    (window["rrApiOnReady"] = window["rrApiOnReady"] || []).push(function() {
        try { rrApi.addToBasket({{product.id}}); } catch(e) {}
    })
</script>
Where is {{product.id}} is a user-defined variable.
Trigger
Tracking code of adding product to the basket must be executed every time, when a customer click on "Add To Basket" buttons and adds product to the basket.
To create trigger click on section "Triggering" below, and click on "+", for creating new trigger.
As a trigger type, you should select "Click - All Elements", and mark option "Some Clicks". Below you can select a condition for firing this trigger. You can use attribute of class of your "Add To Basket" button, for example it's "add-cart-counter__btn":
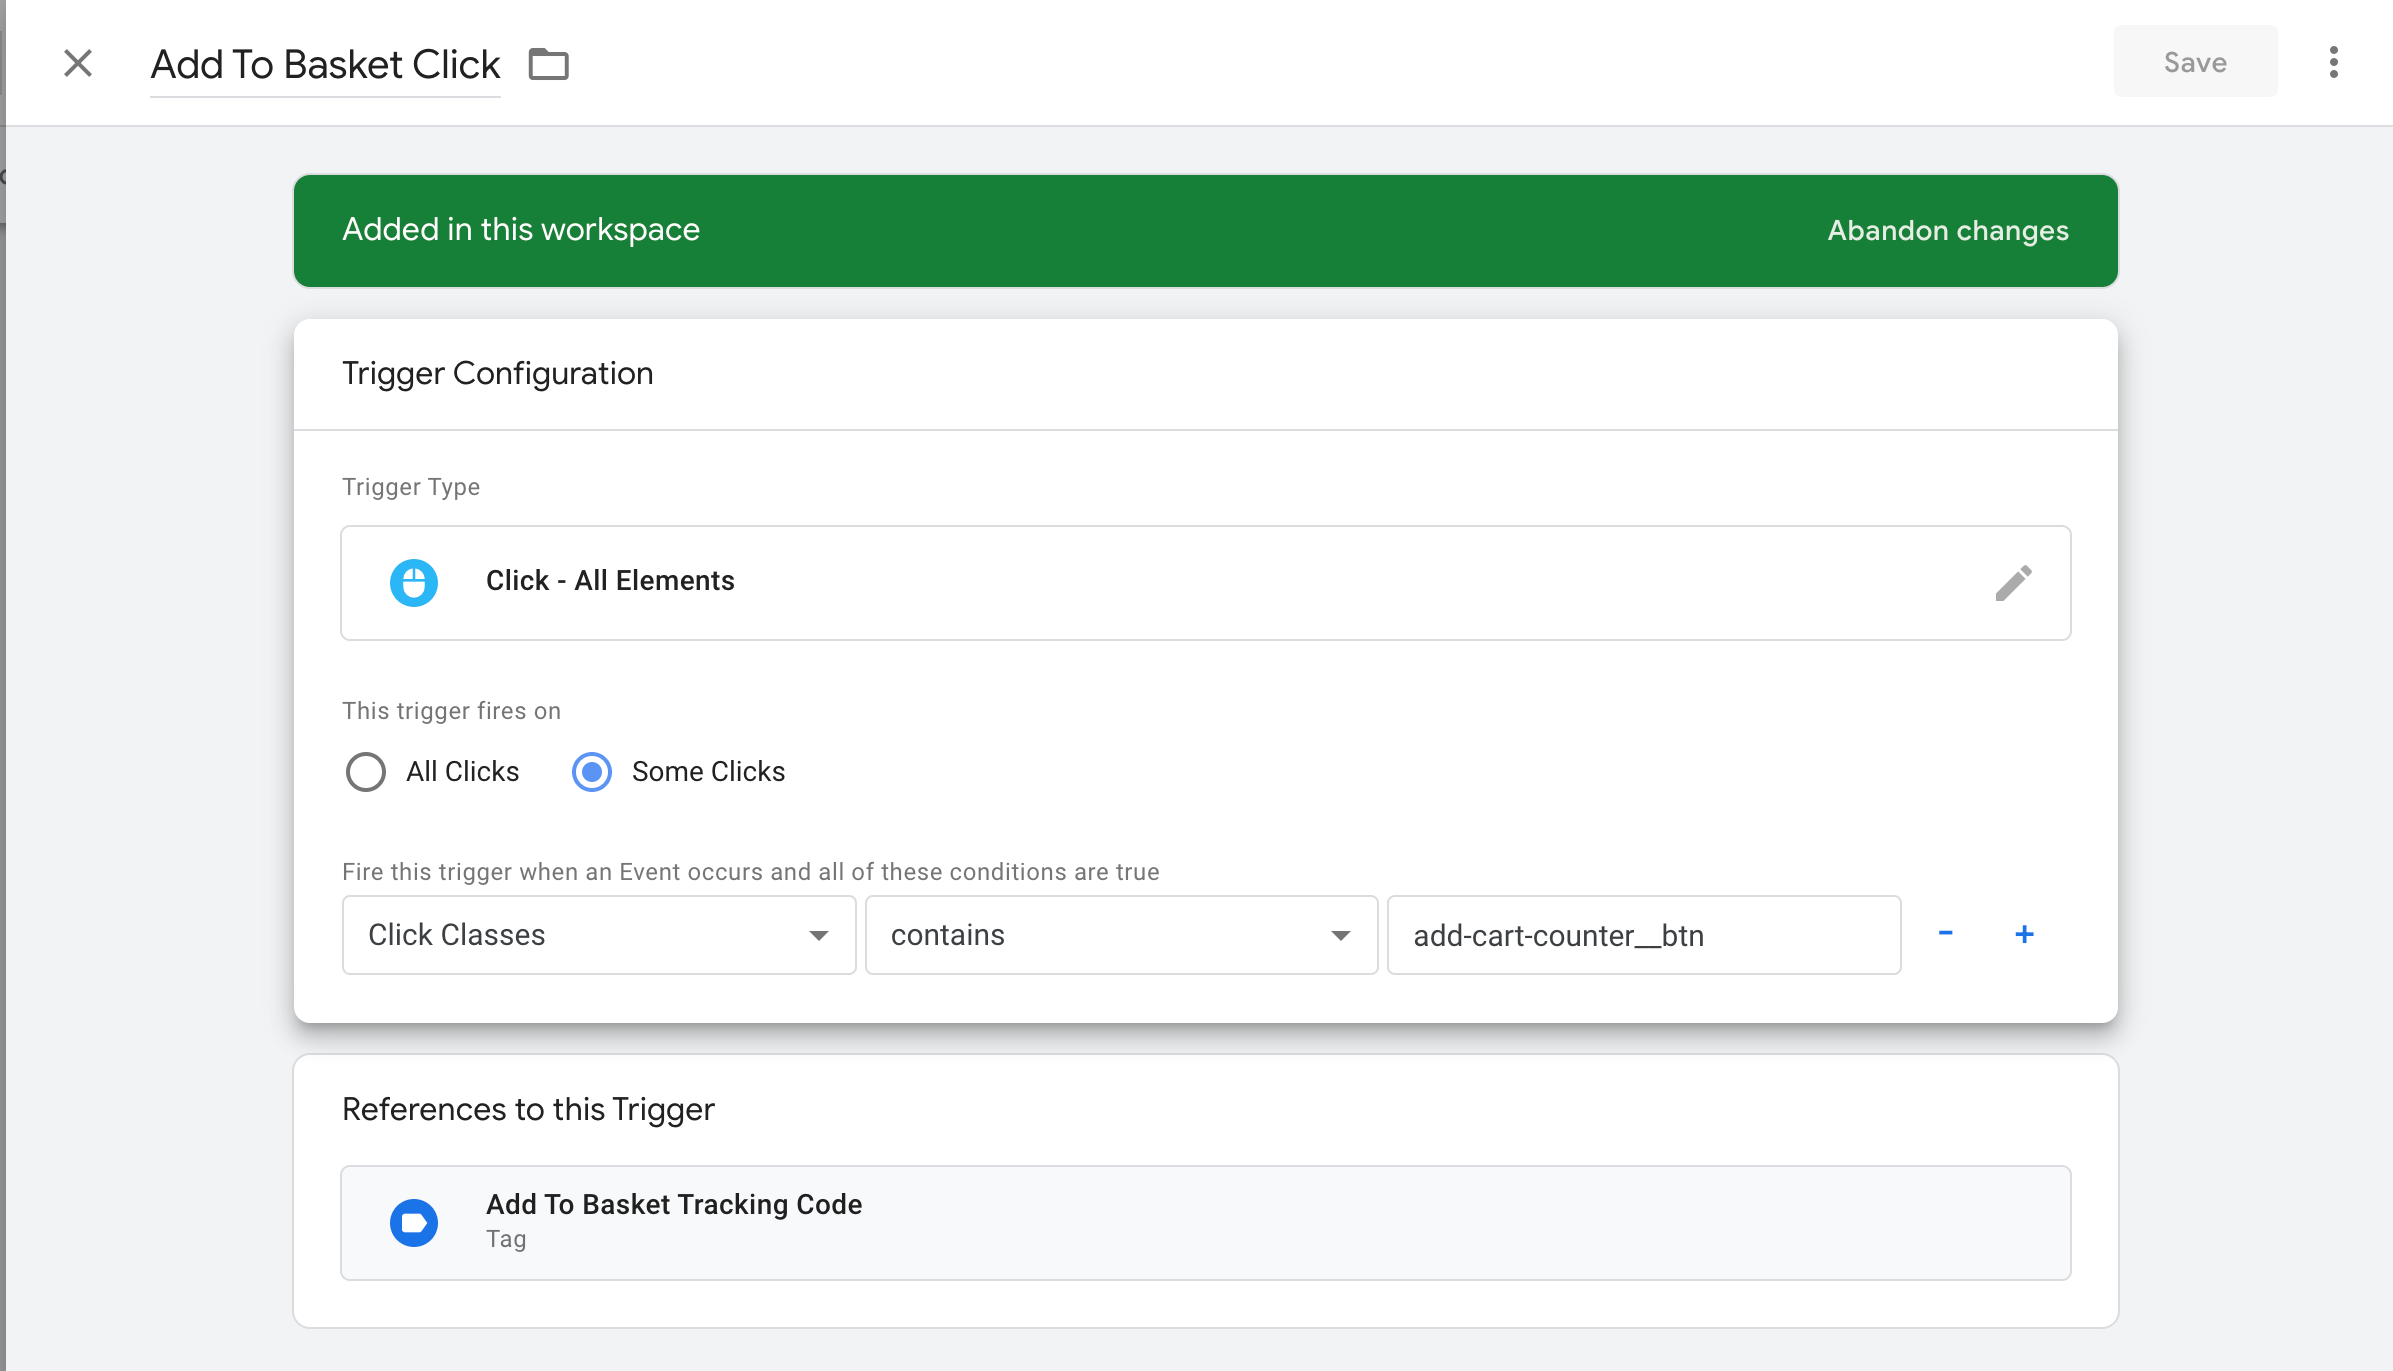
Data Layer eventIn case you have made events for each page according to this instruction, you can use them directly.
Variable
Since this tracking code requires product ID, you can use the same variable, that you already have used in the tracking code of viewing of product page - {{ product.id }}
Transaction tracking code
Tag
In "Tags" section click on "New" button, to create new tag for this tracking code. Tag type should be set as "Custom HTML".
Put the following segment of code in this tag:
<script type="text/javascript">
(window["rrApiOnReady"] = window["rrApiOnReady"] || []).push(function() {
    try {
        rrApi.setEmail({{customer.email}});
        rrApi.order({
            "transaction": {{order.number}},
            "items": {{products.checkout}}
        });
    } catch(e) {}
})
</script>
Where is {{products.checkoust}}, {{order.number}} and {{customer.email}} are user-defined variables.
Trigger
Transaction tracking code must be executed on success-order page, and you need to pass data about user, order and products in it.
To create trigger click on section "Triggering" below, and click on "+", for creating new trigger.
As a trigger type, you should select "DOM Ready", and mark option "Some DOM Ready Events". Below you can select a condition for firing this trigger. In case if "tha URL contains word "checkoust", for example "https://www.example-shop.com/checkout/order45345", you can use it.
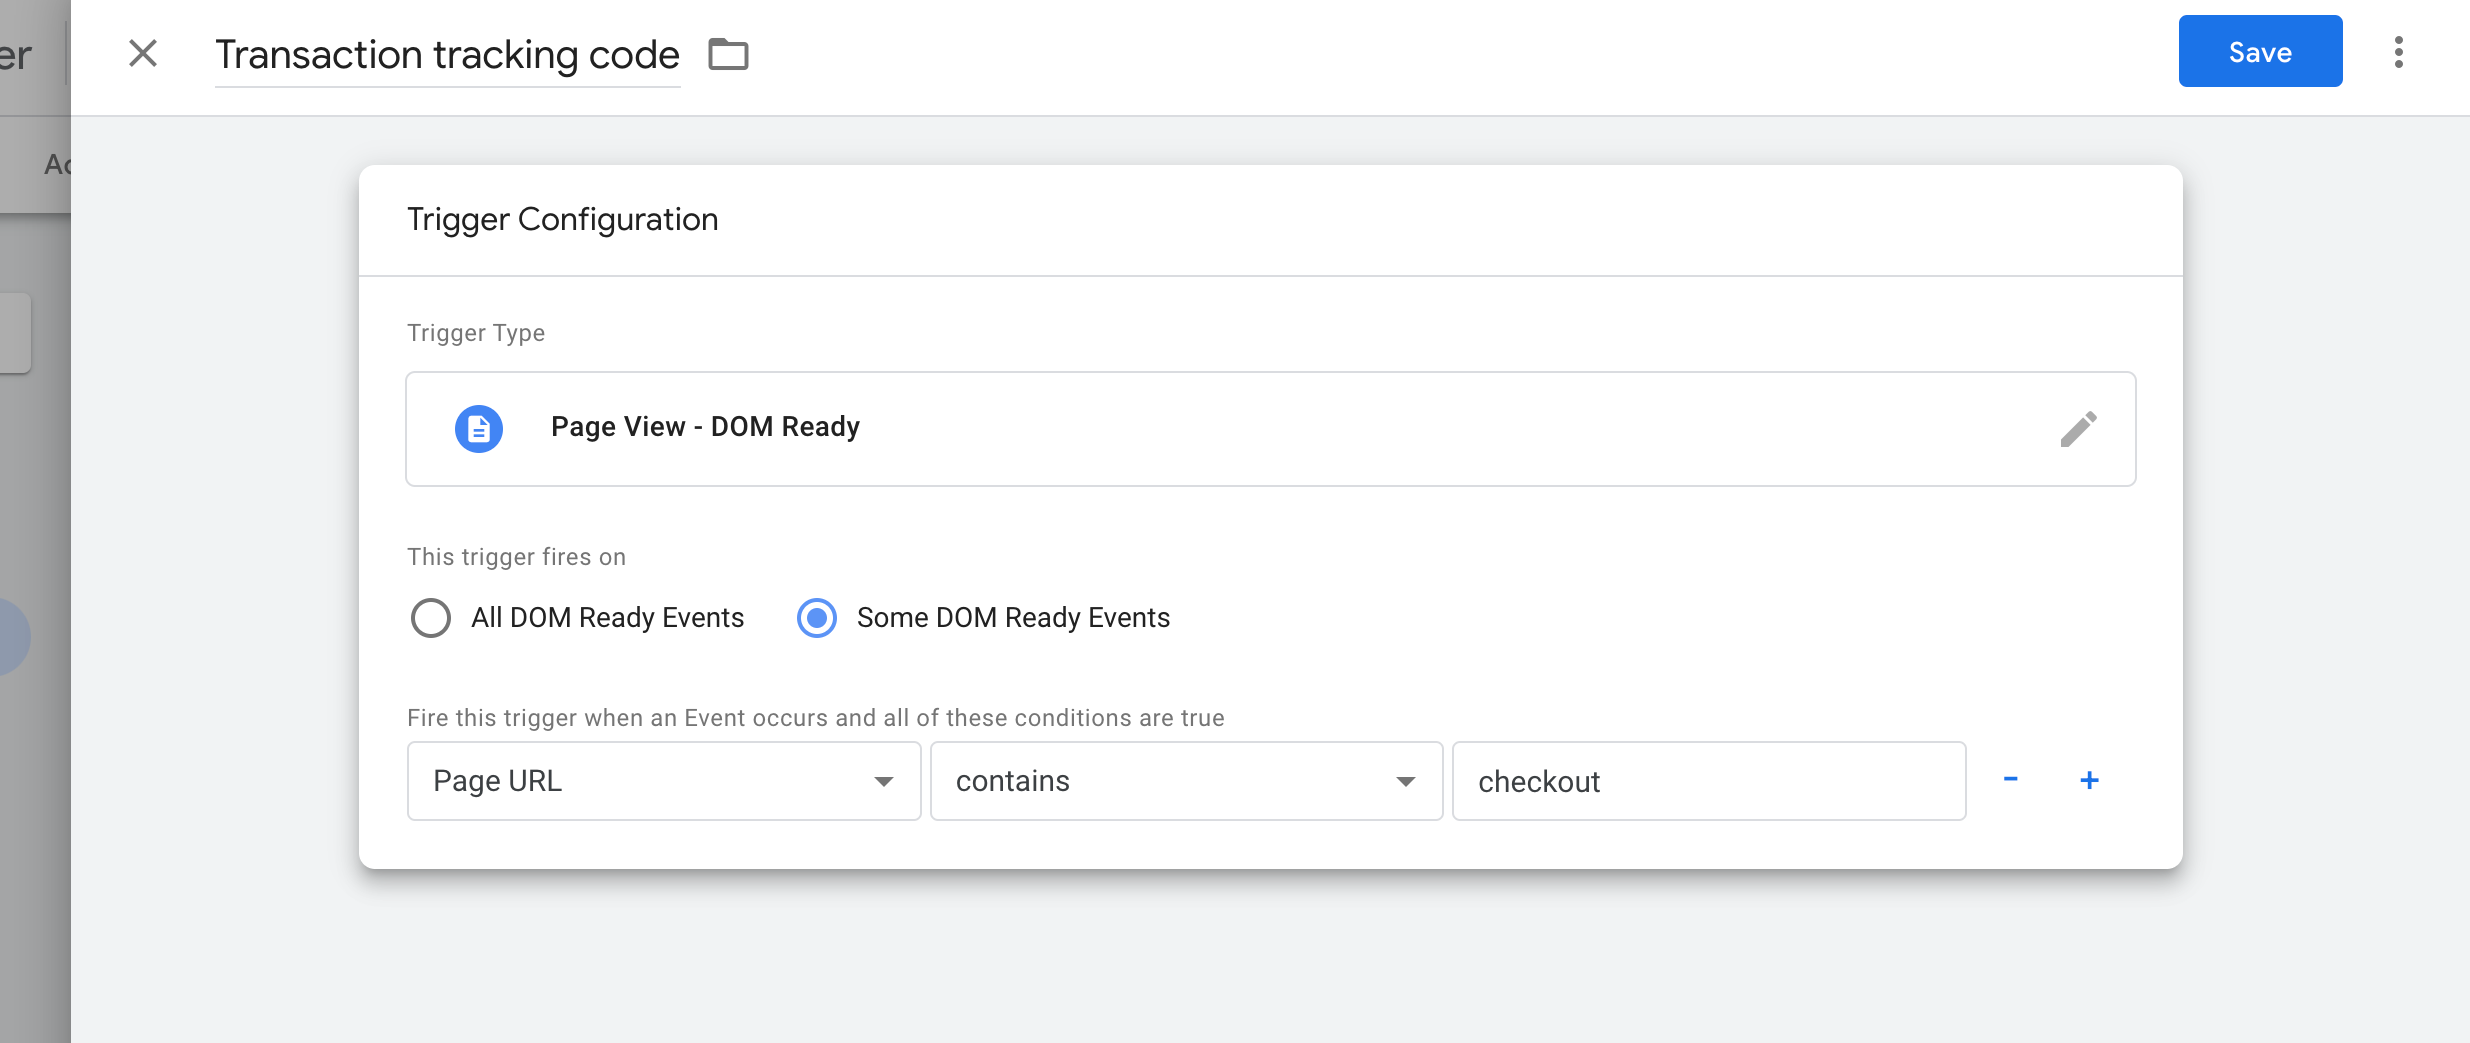
Data Layer eventIn case you have made events for each page according to this instruction, you can use them directly.
Variable
In section "Variables", go to "User-Defined variables", and click on button "New".
As a variable type you should select "Data layer variable", and then select the relevant variable from it.
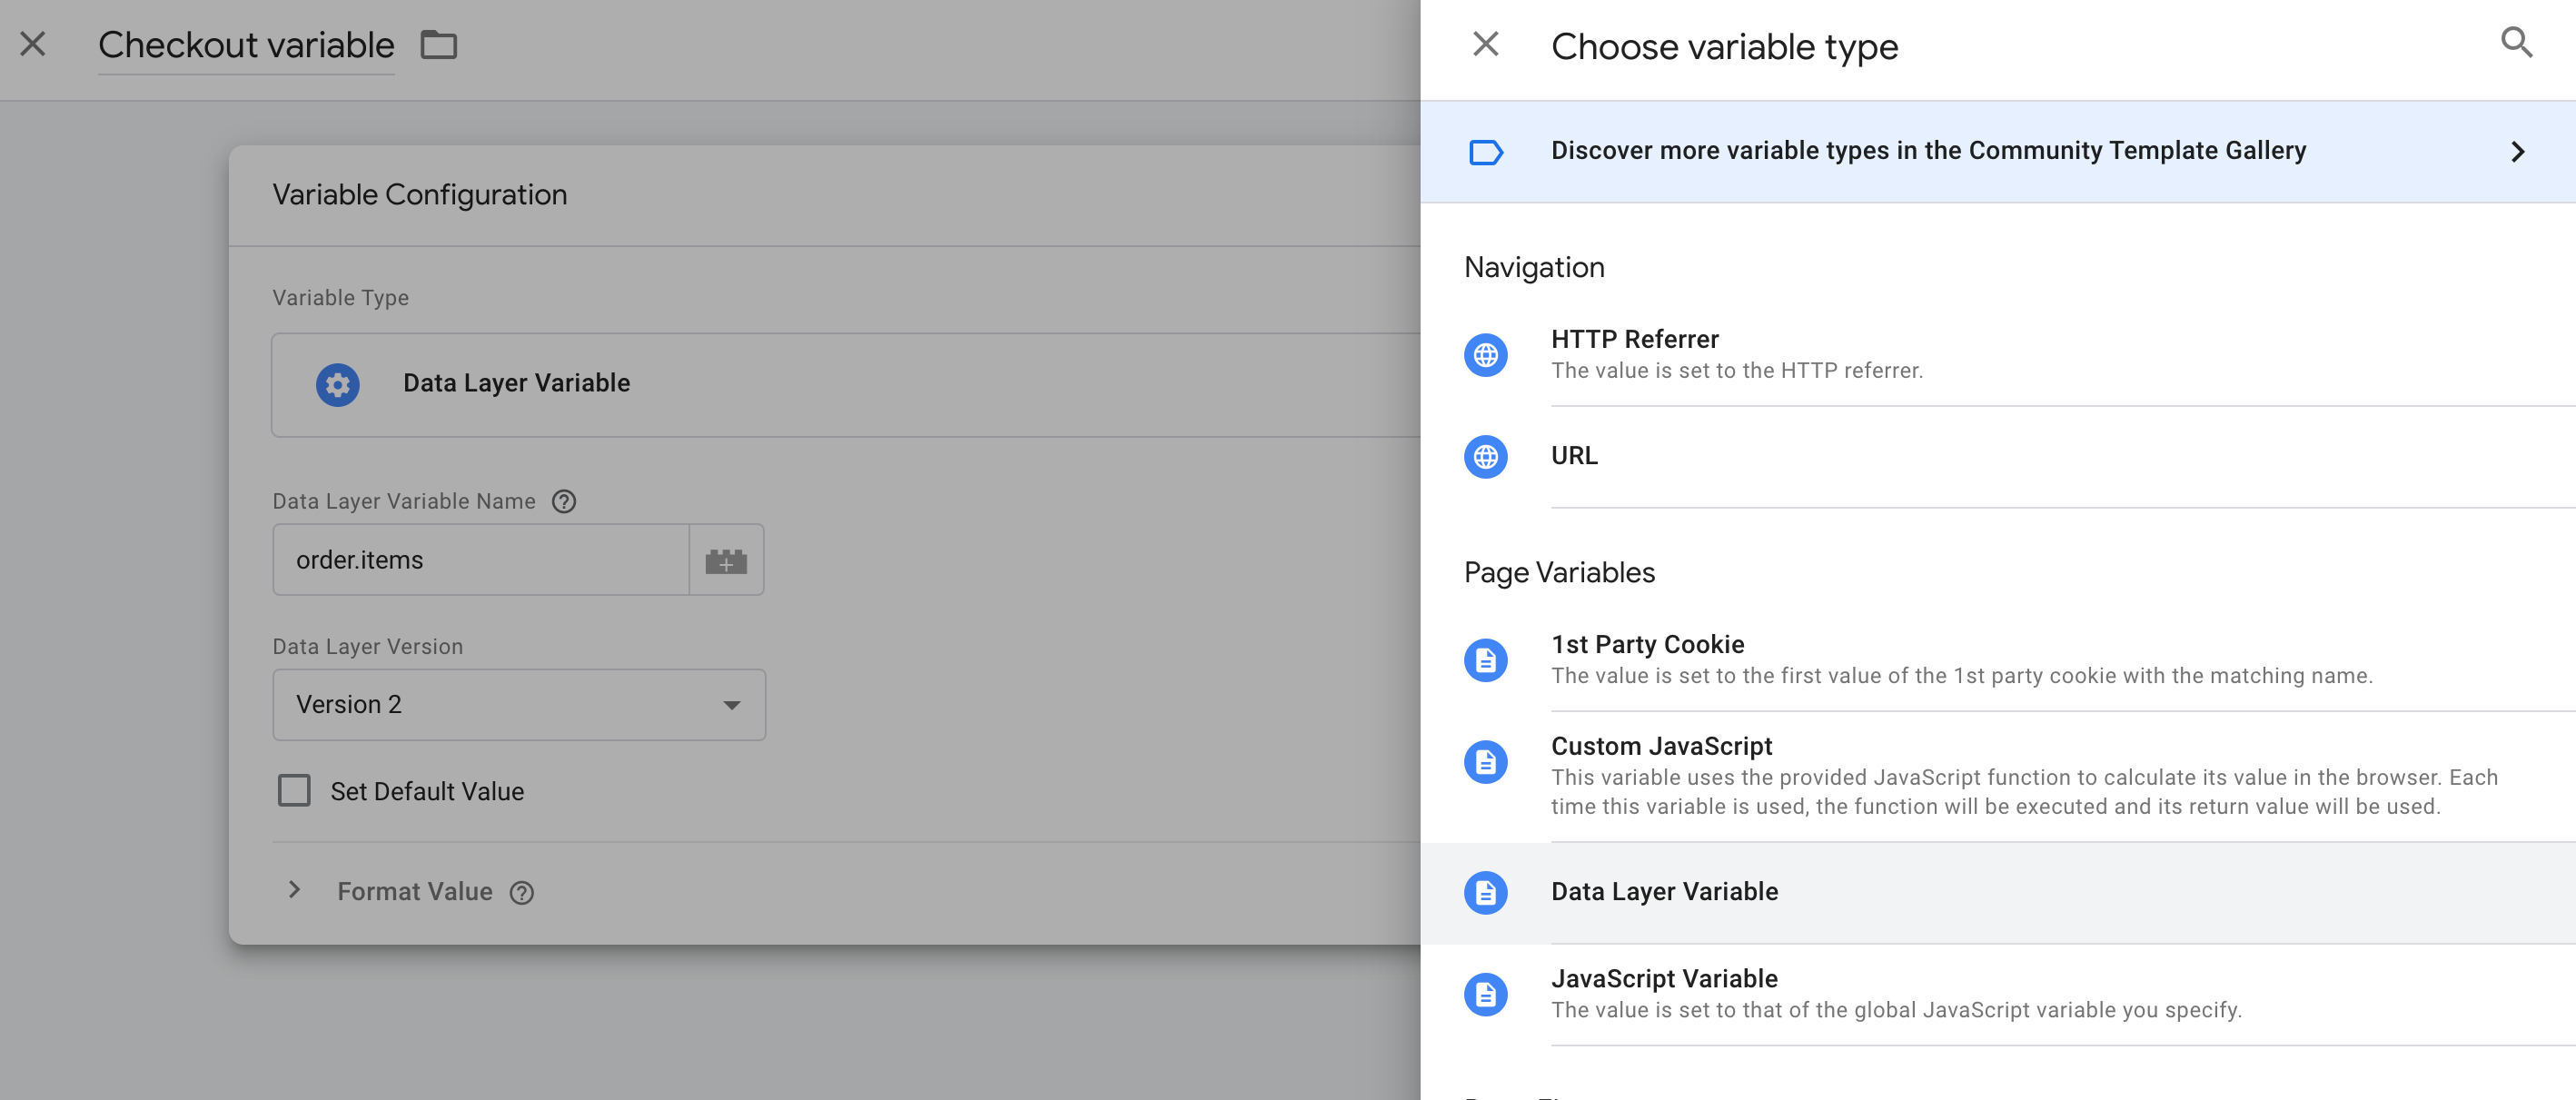
You should create 3 different variables for transaction tracking code:
- Number of transaction, for example
order.number; - Email address of a customer, for example
customer.email; - Array with information about products in order, which contain each product as a separated object with 3 parameters: id, quantity, price. For example
products.checkout. ;
Example of array:
[{"id": 123, "qnt": 1, "price": 199},
 {"id": 435, "qnt": 2, "price": 400}]
Email tracking code
Tag
In "Tags" section click on "New" button, to create new tag for this tracking code. Tag type should be set as "Custom HTML".
Put the following segment of code in this tag:
<script type="text/javascript">
    (window["rrApiOnReady"] = window["rrApiOnReady"] || []).push(function() {
        try { rrApi.setEmail({{registration.email}}); } catch(e) {}
    })
</script>
Where is {{registration.email}} are user-defined variables.
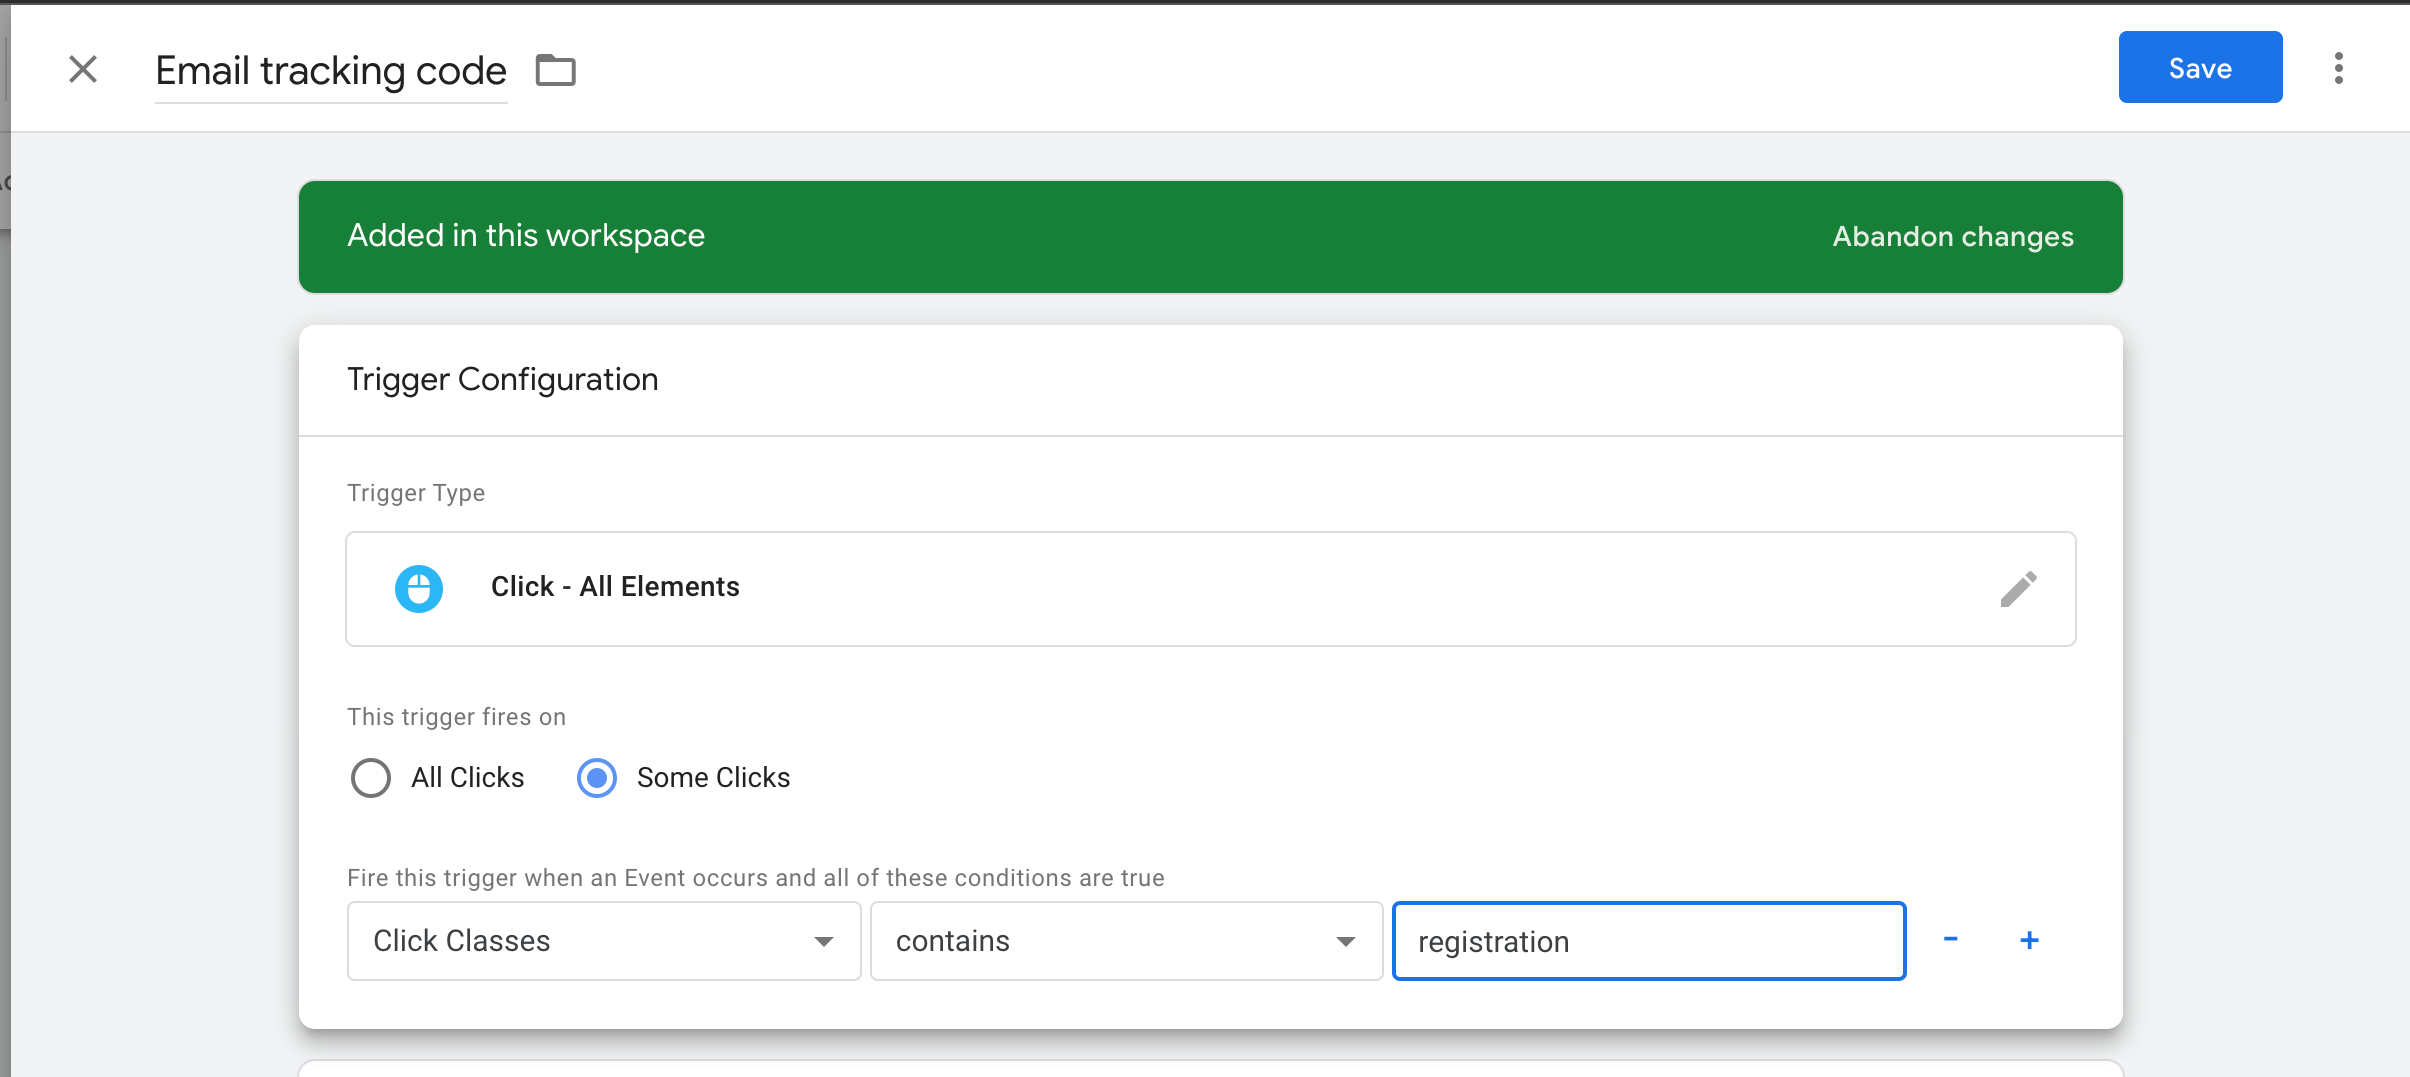
Trigger
Email tracking code must be executed on registration and authorization page, and you need to pass email address of user to it.
To create trigger click on section "Triggering" below, and click on "+", for creating new trigger.
As a trigger type, you should select "Click - All Elements", and mark option "Some Clicks". Below you can select a condition for firing this trigger. You can use attribute of class of your "Registration" button, for example it's "registration"
Data Layer eventIn case you have made events for each page according to this instruction, you can use them directly.
Variable
In section "Variables", go to "User-Defined variables", and click on button "New".
As a variable type you should select "Data layer variable", and then select the relevant variable from it.
Updated about 1 month ago