Shopify manual
This instruction is created for CMS Shopify (theme “Dawn”).
The process for installing tracking codes for later versions and modifications of Shopify may be different.
Main tracking code
This tracking code must be installed so that it works on all pages of the site.
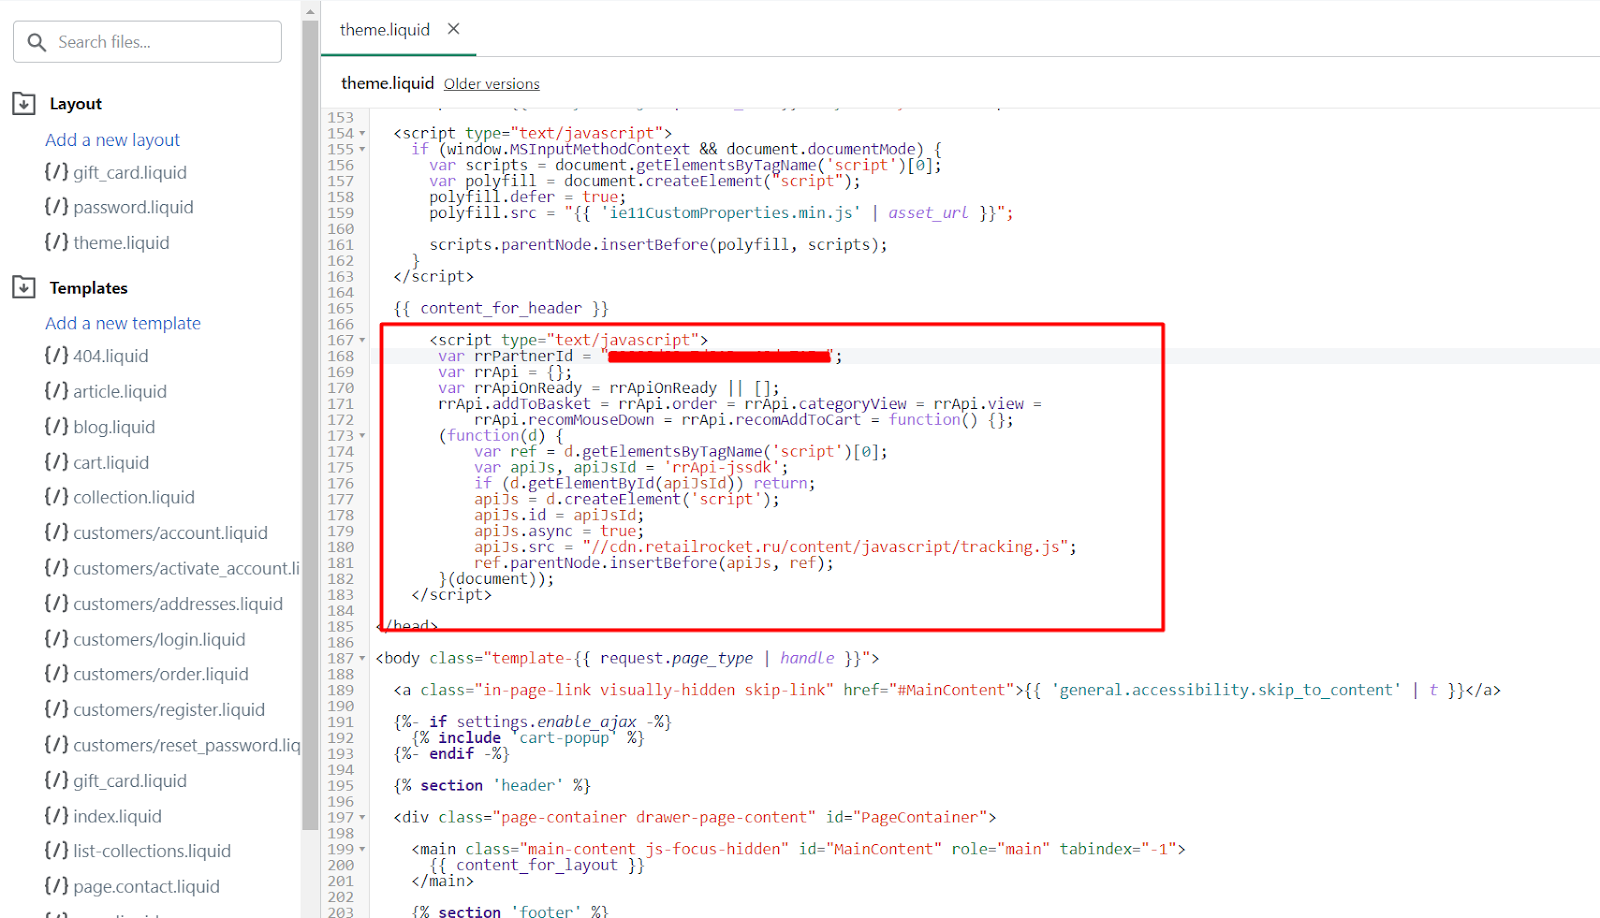
To do this, you need to go to the section Online Store -> Themes -> Actions -> Edit code -> Layout of installed theme, and find there a file theme.liquid.
In this file you need to find closing tag </head> (Ctrl+F) and paste before it the following code:
<script type="text/javascript">
   var rrPartnerId = "PartnerId";
   var rrApi = {};
   var rrApiOnReady = rrApiOnReady || [];
   rrApi.addToBasket = rrApi.order = rrApi.categoryView = rrApi.view =
           rrApi.recomMouseDown = rrApi.recomAddToCart = function() {};
   (function(d) {
       var ref = d.getElementsByTagName('script')[0];
       var apiJs, apiJsId = 'rrApi-jssdk';
       if (d.getElementById(apiJsId)) return;
       apiJs = d.createElement('script');
       apiJs.id = apiJsId;
       apiJs.async = true;
       apiJs.src = "//cdn.retailrocket.net/content/javascript/tracking.js";
       ref.parentNode.insertBefore(apiJs, ref);
   }(document));
</script>
where "PartnerId" – partner ID in the Retail Rocket system.
Example:
Product page tracker
This tracking code must be installed on all product pages.
To do this, you need to go to the section Online Store -> Themes -> Actions -> Edit code -> Sections of a selected theme and find the file main-product.liquid.
At the end of the file, paste the following code:
{% assign filteredCategories = "" %}
{% assign trashCategories = "sale,black friday,brands" | split: ','%}

{% for path in product.collections %}
    {% unless trashCategories contains path.title %}
        {% assign filteredCategories = filteredCategories | append: path.title | append: ',' %}
    {% endunless %}
{% endfor %}

<script type="text/javascript">
    (window["rrApiOnReady"] = window["rrApiOnReady"] || []).push(function() {
        retailrocket.productsGroup.post({
          "groupId": {{ product.id }},
          "name": {{ product.title | json }},
          "price": {{product.price | divided_by: 100}},
          "pictureUrl": {{ product.featured_image | img_url: '400x400' | prepend: "https:" | json }},
          "url": "{{ shop.url | append: product.url }}",
          "isAvailable": {{ product.available }},
          "categoryPaths": {{ filteredCategories | split: ',' | json }},
          "description": {{ product.description | json }},
          "products": {
          		{% for variant in product.variants %}
          		  	"{{ variant.id }}": {
                       "isAvailable": {{ variant.available }},
                       "name": {{ variant.title | json }},
                       "url": {{ shop.url | append: variant.url | json }},
                       "pictureUrl": {{ variant.featured_image | img_url: '400x400' | prepend: "https:" | json }},
                       "price": {{variant.price | divided_by: 100}},
                       "description": {{ variant.description | json }},
                	},
          		{% endfor %}
          }
        });
      rrApi.groupView({{ product.variants | map: "id" | json }});
    });
</script>
{% assign filteredCategories = "" %}
{% assign trashCategories = "sale,black friday,brands" | split: ','%}

{% for path in product.collections %}
    {% unless trashCategories contains path.title %}
        {% assign filteredCategories = filteredCategories | append: path.title | append: ',' %}
    {% endunless %}
{% endfor %}

{{filteredCategories | split: ',' | json}}

<script type="text/javascript">
    (window["rrApiOnReady"] = window["rrApiOnReady"] || []).push(function() {
        retailrocket.products.post({
          "id": {{ product.id }},
          "name": {{ product.title | json }},
          "price": {{product.price | divided_by: 100}},
          "pictureUrl": {{ product.featured_image | img_url: '400x400' | prepend: "https:" | json }},
          "url": "{{ shop.url | append: product.url }}",
          "isAvailable": {{ product.available }},
          "categoryPaths": {{ filteredCategories | split: ',' | json  }},
          "description": {{ product.description | json }},
        });
      rrApi.view({{ product.id }});
    });
</script>
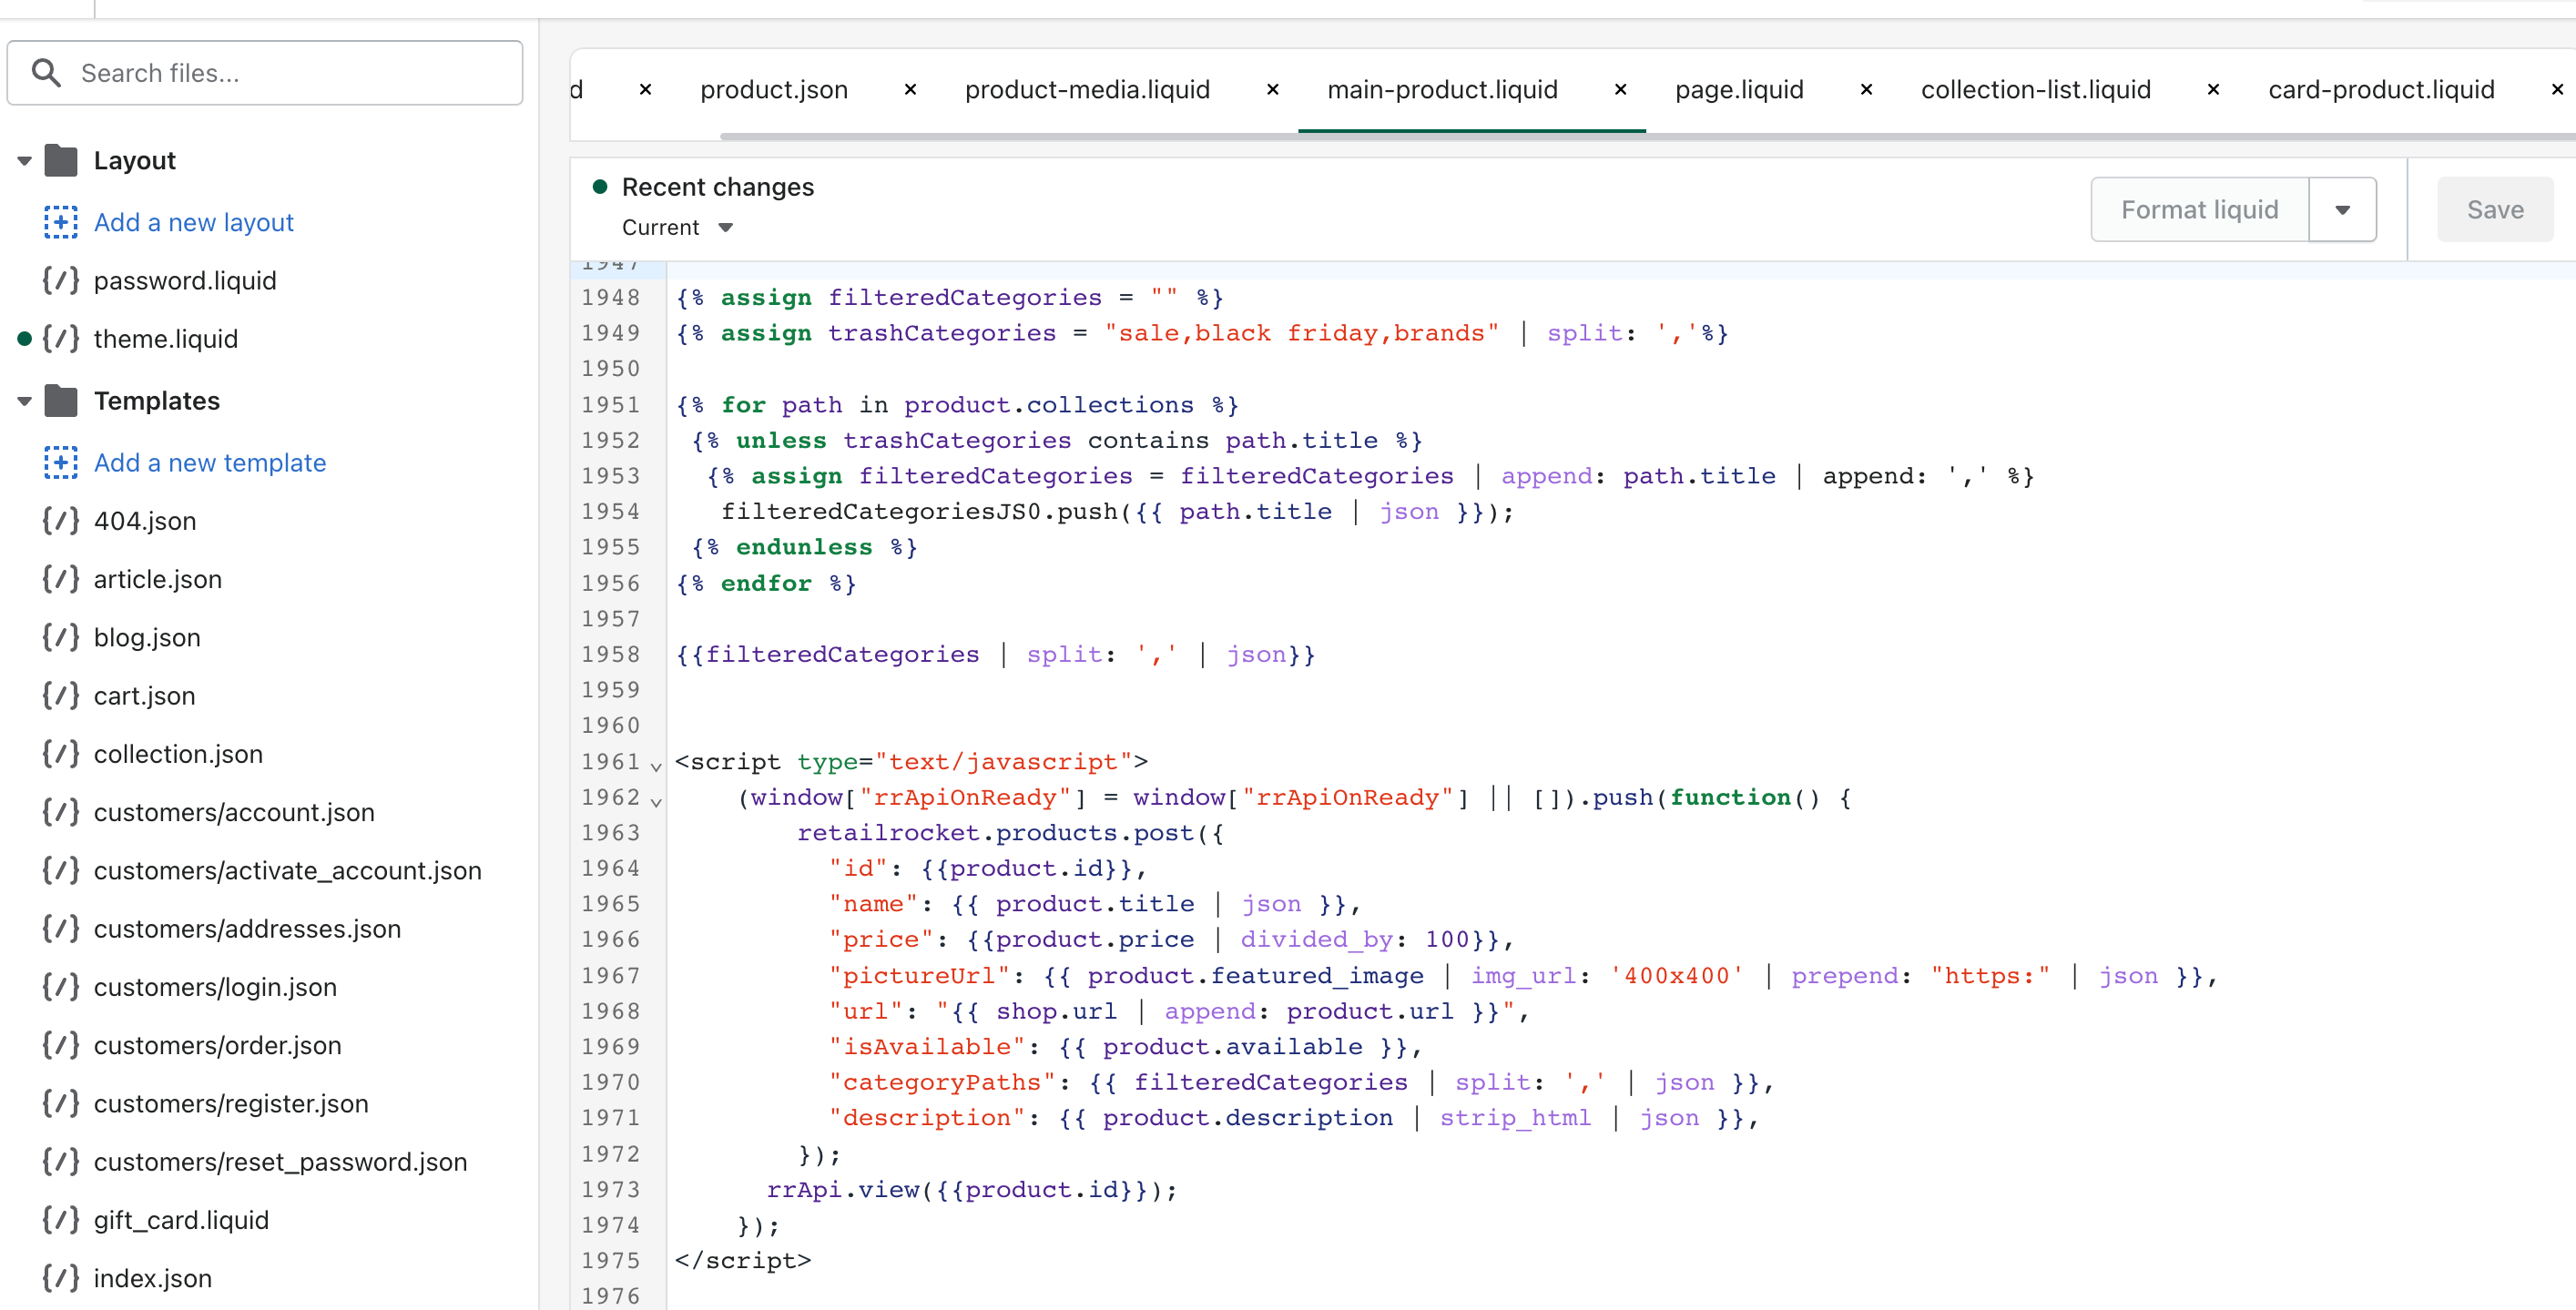
In array "trashCategories" you should list all sales/brands/ofertas collections.
Example:
NoteIf the site has pop-up windows for quick product viewing, then the trackers must be additionally installed in the template for this window (the installation principle is the same).
Category page tracker
This tracking code must be installed on all category pages.
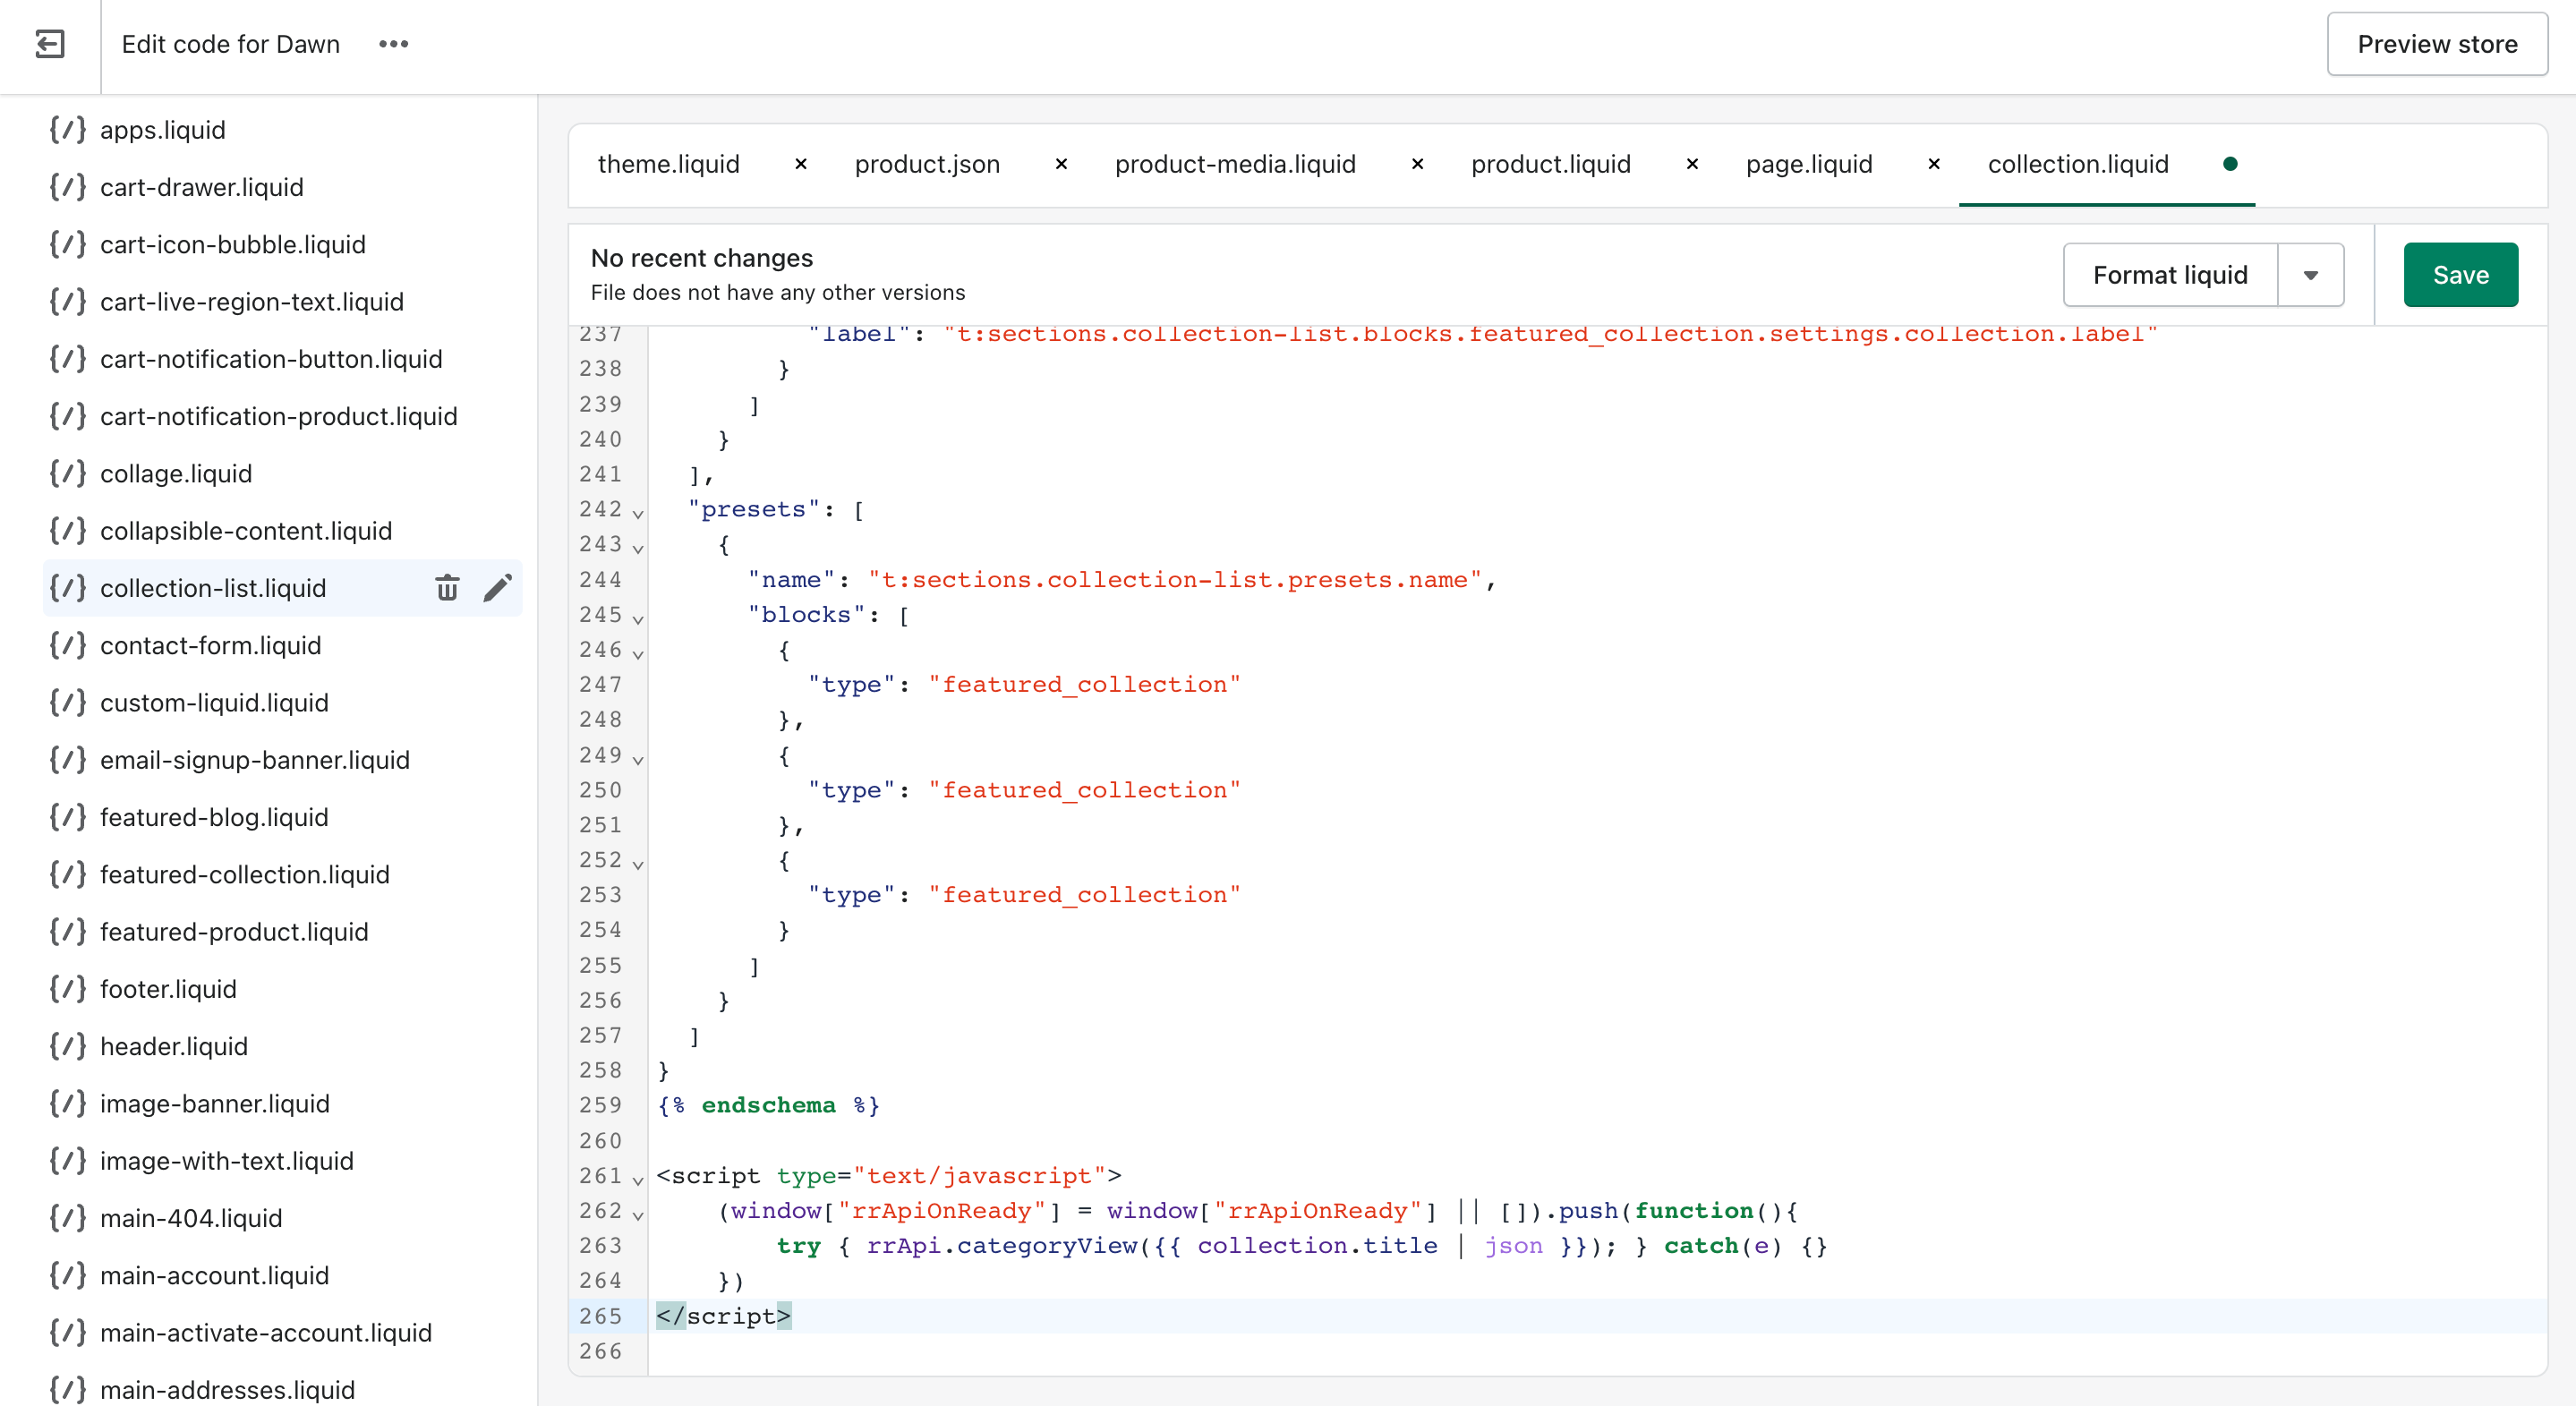
To do this you need to find the file main-collection-product-grid.liquid (section _Online Store -> Themes -> Actions -> Edit code -> Sections).
At the end of this file paste the following code:
<script type="text/javascript">
    (window["rrApiOnReady"] = window["rrApiOnReady"] || []).push(function(){
        try { rrApi.categoryView({{ collection.title | json }}); } catch(e) {}
    })
</script>
Example:
Add to cart tracker
For integration with grouped products
This tracker must be installed on all buttons on your site that add a product to the cart.
To do this you need to find the file buy-buttons.liquid (section Online Store -> Themes -> Actions -> Edit code -> Snippets).
Find the element <button> with attribute class="product-form__buttons", this code should look like this:
<button
	type="submit"
	data-use-primary-button="{% if use_primary_button %}true{% else %}false{% endif %}"
	class="ProductForm__AddToCart Button {% if selected_variant.available and use_primary_button %}Button--primary{% else %}Button--secondary{% endif %} Button--full"
	{% if selected_variant.available %}data-action="add-to-cart"{% else %}disabled="disabled"{% endif %}>
On this element <button> add an attribute "id = rr"
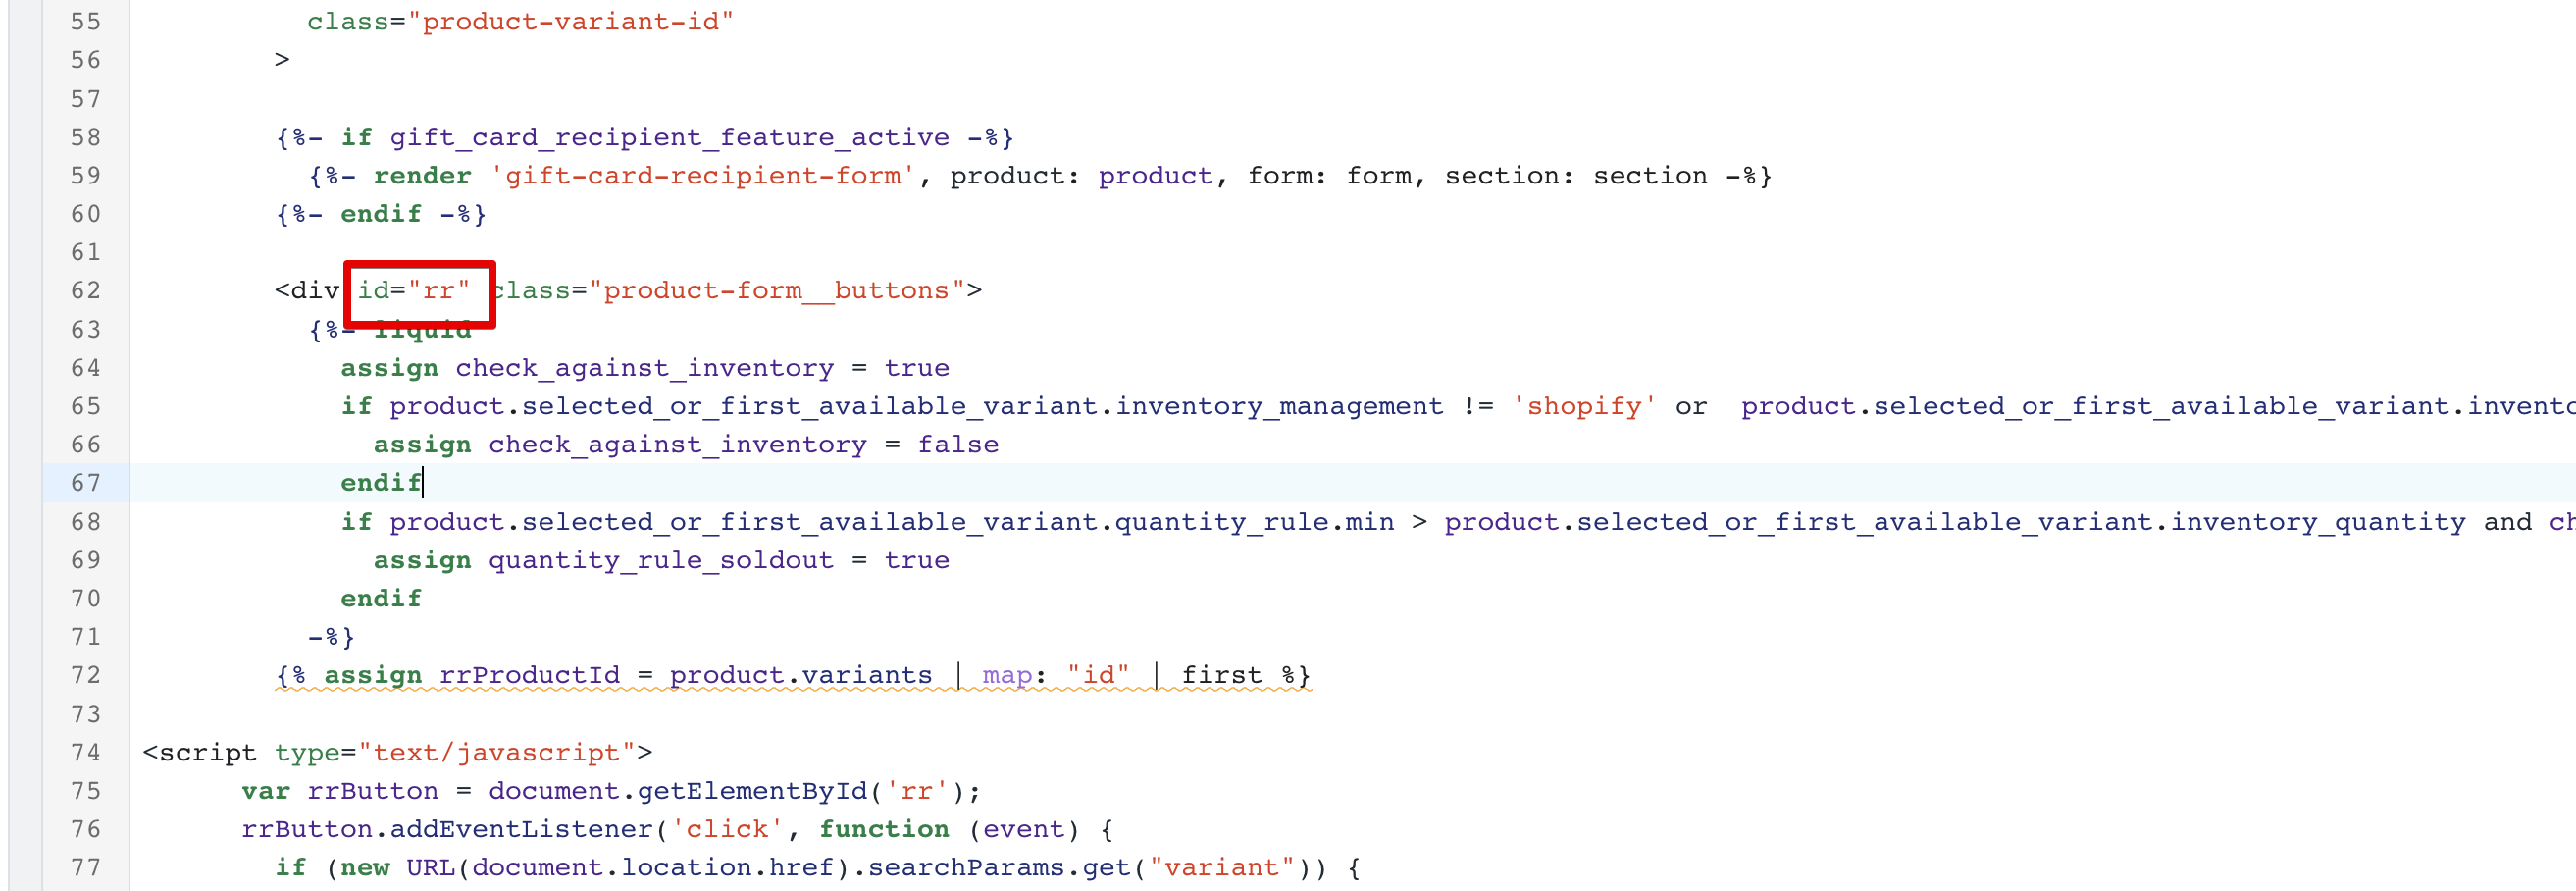
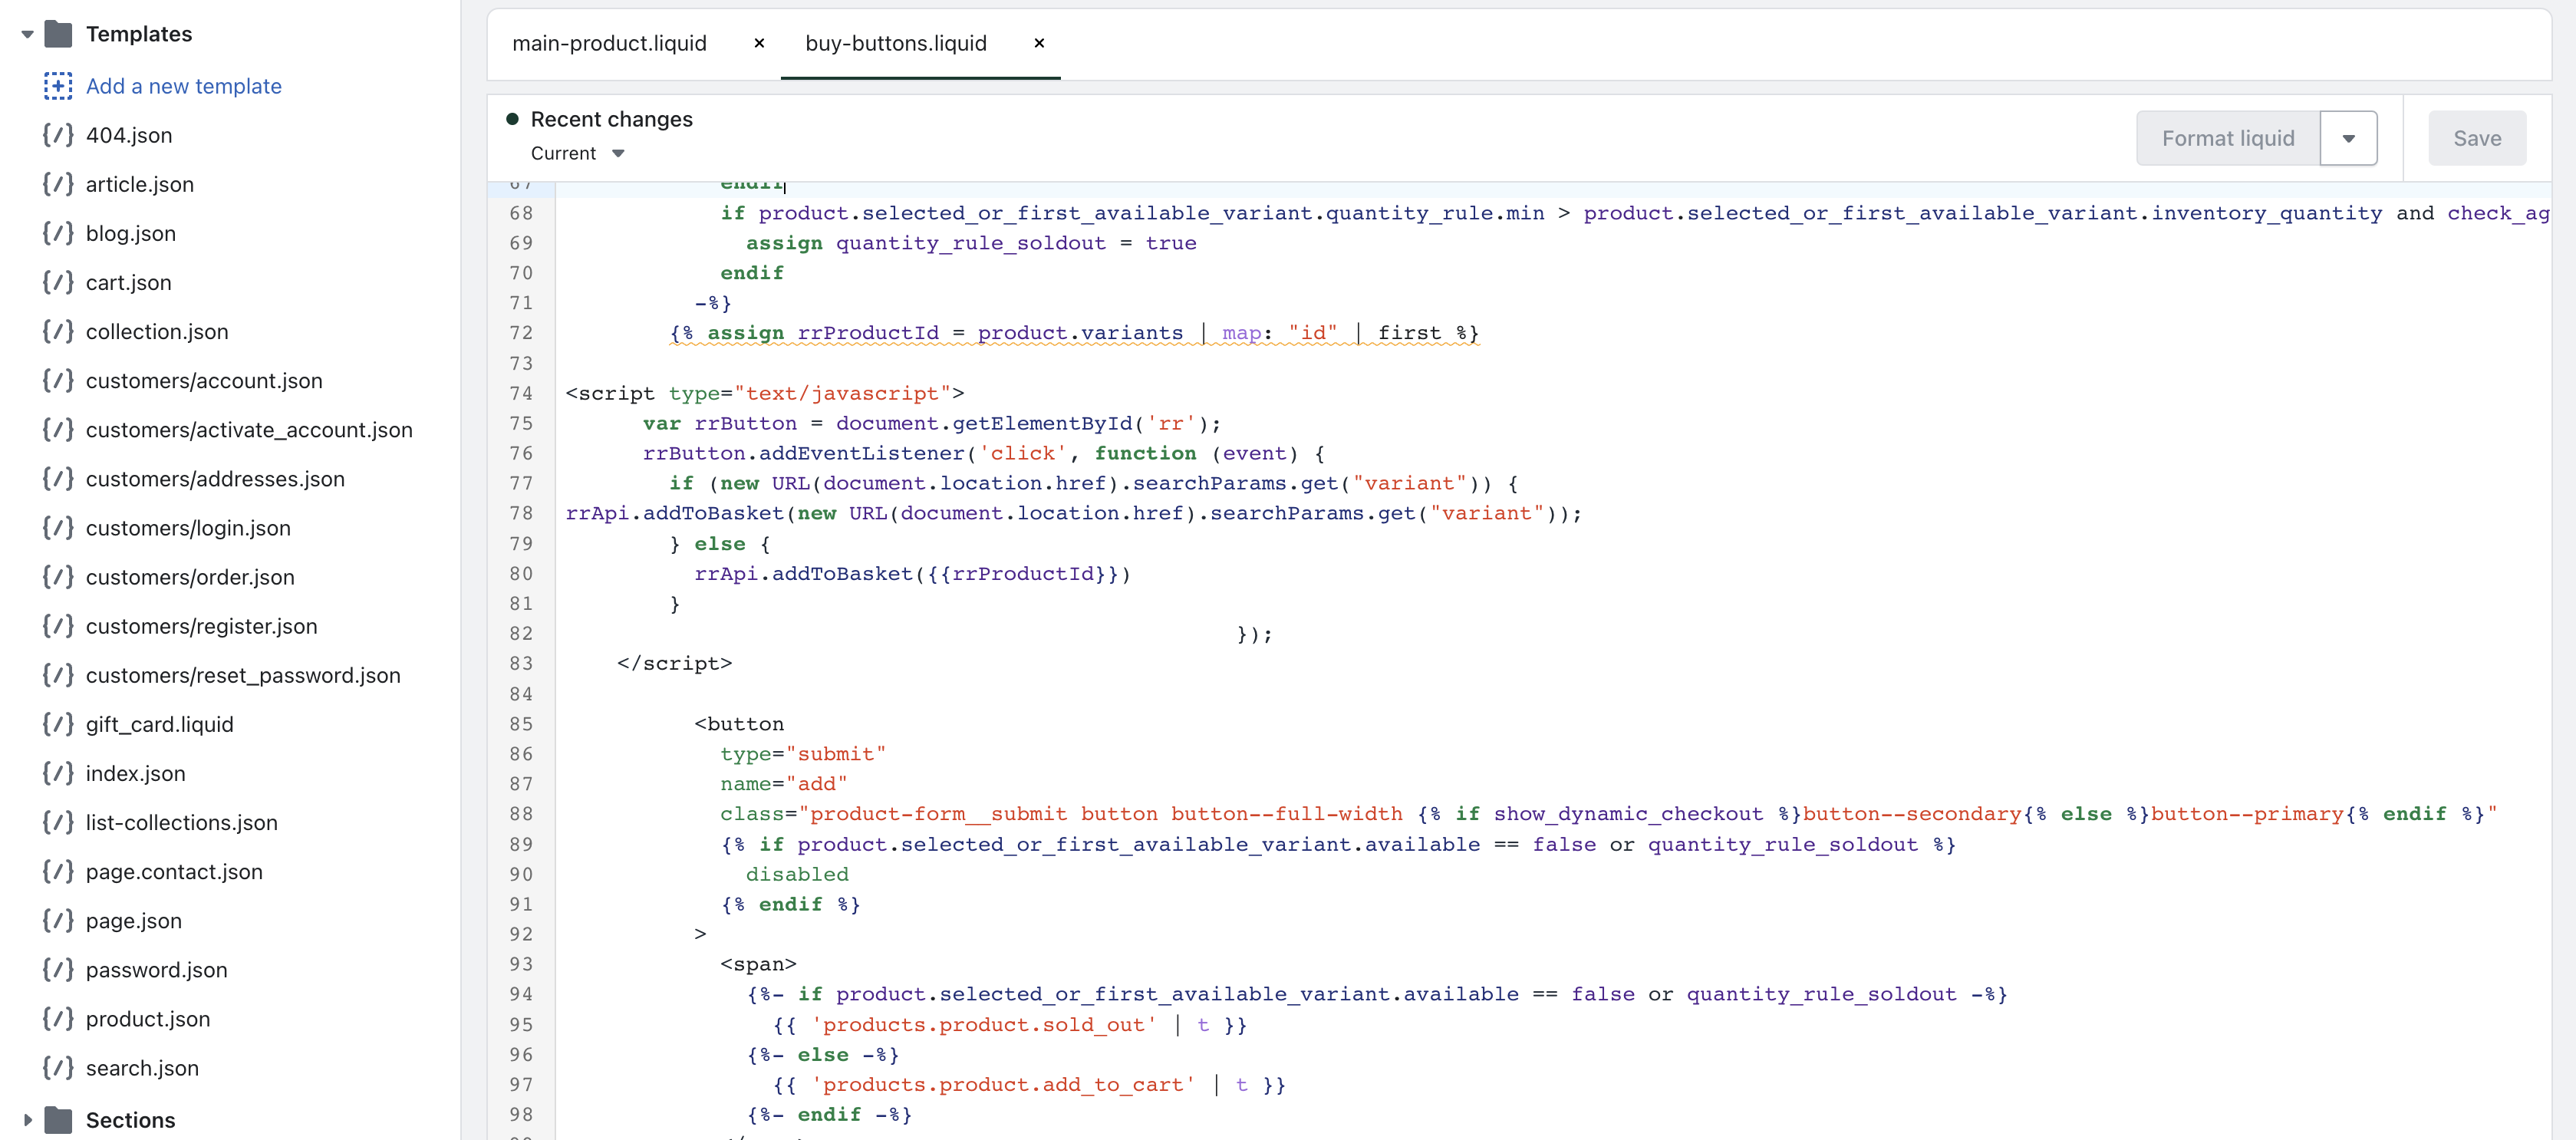
Next, below the button place this code:
{% assign rrProductId = product.variants | map: "id" | first %}

<script type="text/javascript">
    var rrButton = document.getElementById('rr');
    rrButton.addEventListener('click', function(event) {
        if (new URL(document.location.href).searchParams.get("variant")) {
            rrApi.addToBasket(new URL(document.location.href).searchParams.get("variant"));
        } else {
            rrApi.addToBasket({
                {
                    rrProductId
                }
            })
        }
    });
</script>
Example:
For integration without grouped products
This tracker must be installed on all buttons on your site that add a product to the cart.
To do this you need to find the file card-product.liquid (section Online Store -> Themes -> Actions -> Edit code -> Snippets).
Find the element <button> with attribute class="ProductForm__AddToCart Button", this code should look like this:
<button
	type="submit"
	data-use-primary-button="{% if use_primary_button %}true{% else %}false{% endif %}"
	class="ProductForm__AddToCart Button {% if selected_variant.available and use_primary_button %}Button--primary{% else %}Button--secondary{% endif %} Button--full"
	{% if selected_variant.available %}data-action="add-to-cart"{% else %}disabled="disabled"{% endif %}>
On this element <button> add a attribute:
onmousedown="try { rrApi.addToBasket({{product.id}}) } catch(e) {}"
NoteIf the site has pop-up windows for quick viewing of products, which have a button for adding to the cart, so rrApi.addToBasket() tracker must be installed on the button in the template for this window (the installation principle is the same).
Transaction tracker
On the final checkout page (where a user is informed that the order has been completed, "Thank you" page), you need to install a transaction tracker.
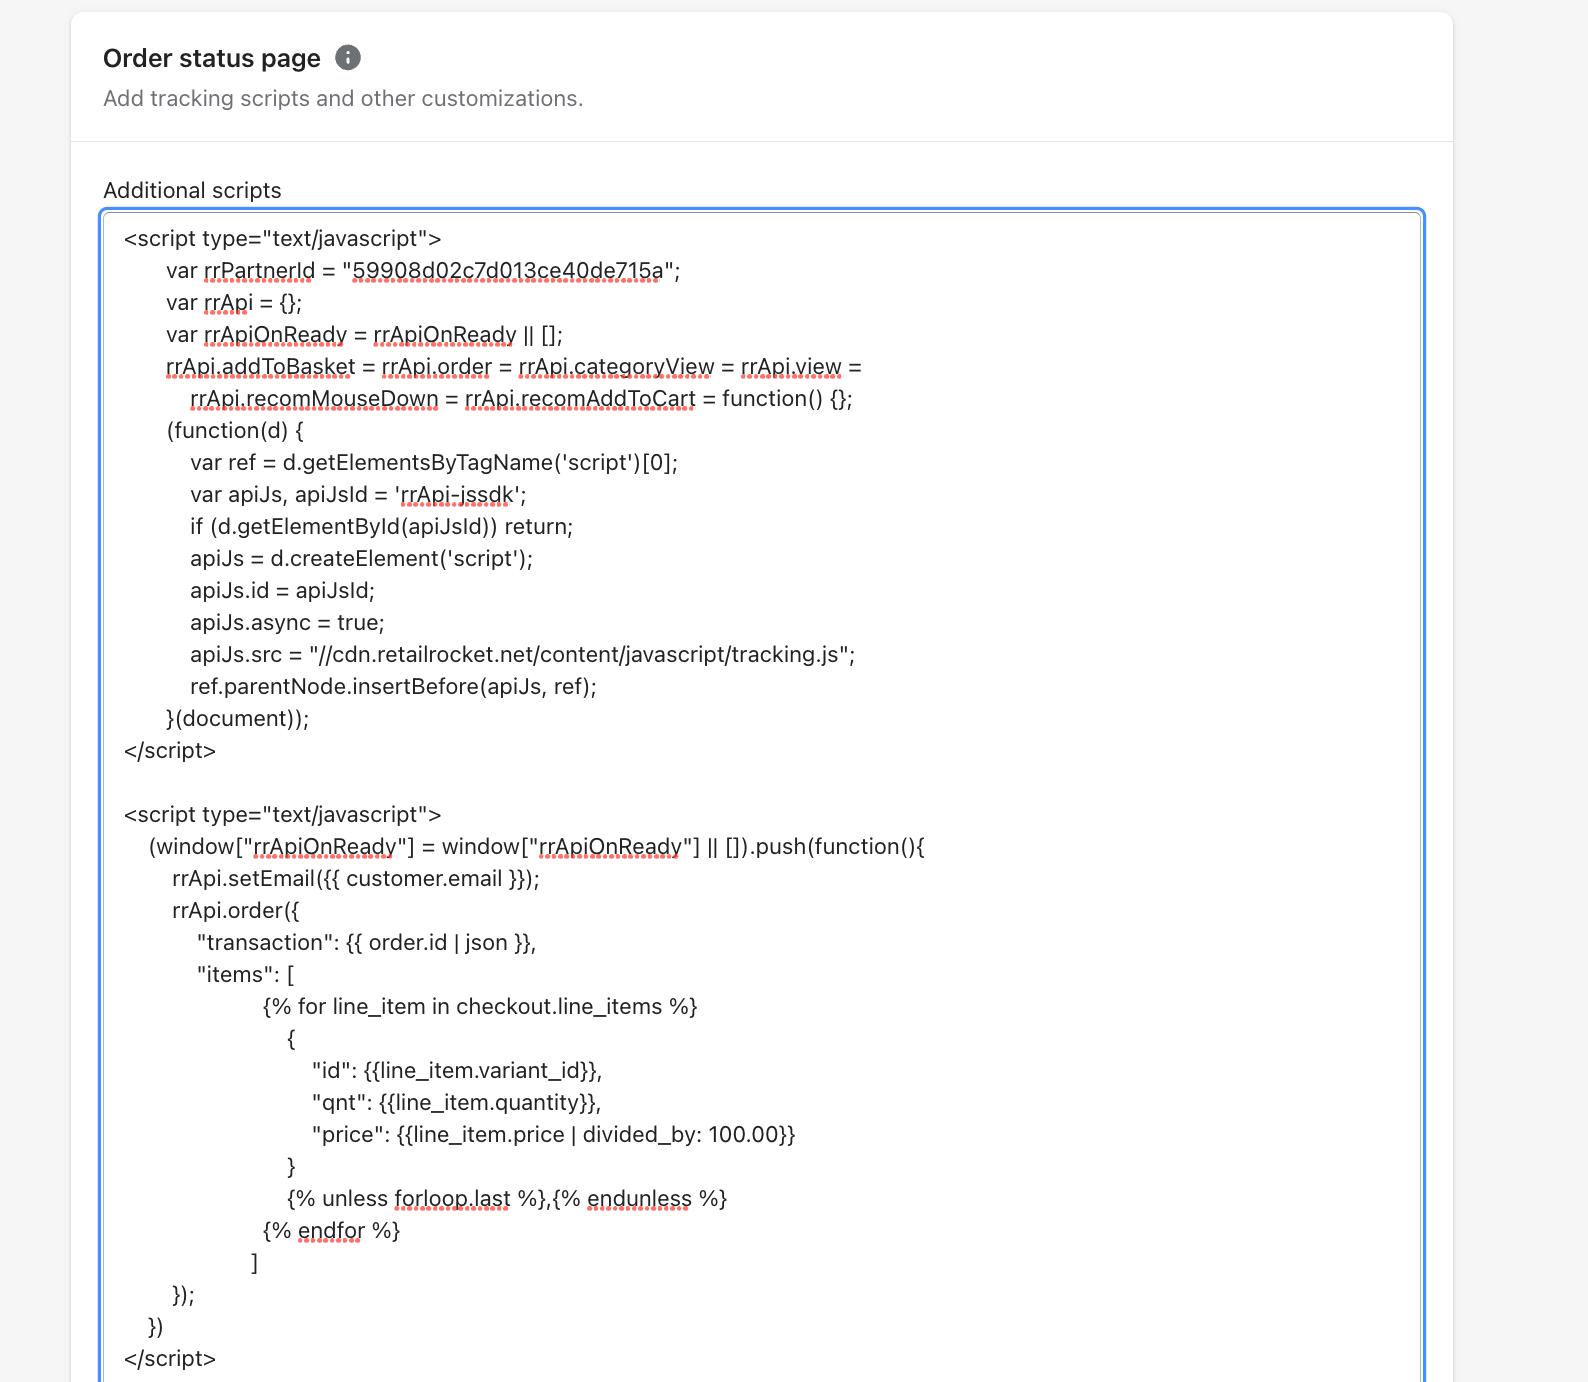
Go to section Settings -> Checkout, find the field "Additional scripts", paste the main tracking code there (point 1), and after that paste the following code of transaction tracker :
<script type="text/javascript">
    (window["rrApiOnReady"] = window["rrApiOnReady"] || []).push(function(){
        rrApi.setEmail({{ customer.email }});
        rrApi.order({
            "transaction": {{ order.id | json }},
            "items": [
                       {% for line_item in checkout.line_items %}
                           {
                               "id": {{line_item.variant_id}},
                               "qnt": {{line_item.quantity}},
                               "price": {{line_item.price | divided_by: 100.00}}
                           }
                           {% unless forloop.last %},{% endunless %}
                       {% endfor %}
                     ]
        });
    })
</script>
Example:
NoteIf the site contains a “quick” order or “1-click” order form, then the rrApi.order () tracker must be additionally called when placing orders through this form.59
Email tracking code
To install tracking code at subscription form in the footer, find a file footer.liquid (section Online Store -> Themes -> Actions -> Edit code -> Sections).
Find the element <input> with class "input-group_field newsletter__input" and add to it the following attribute:
onblur="rrApi.setEmail(this.value)"
The email tracker can be installed to any form of the website, in which a user can enter his email.
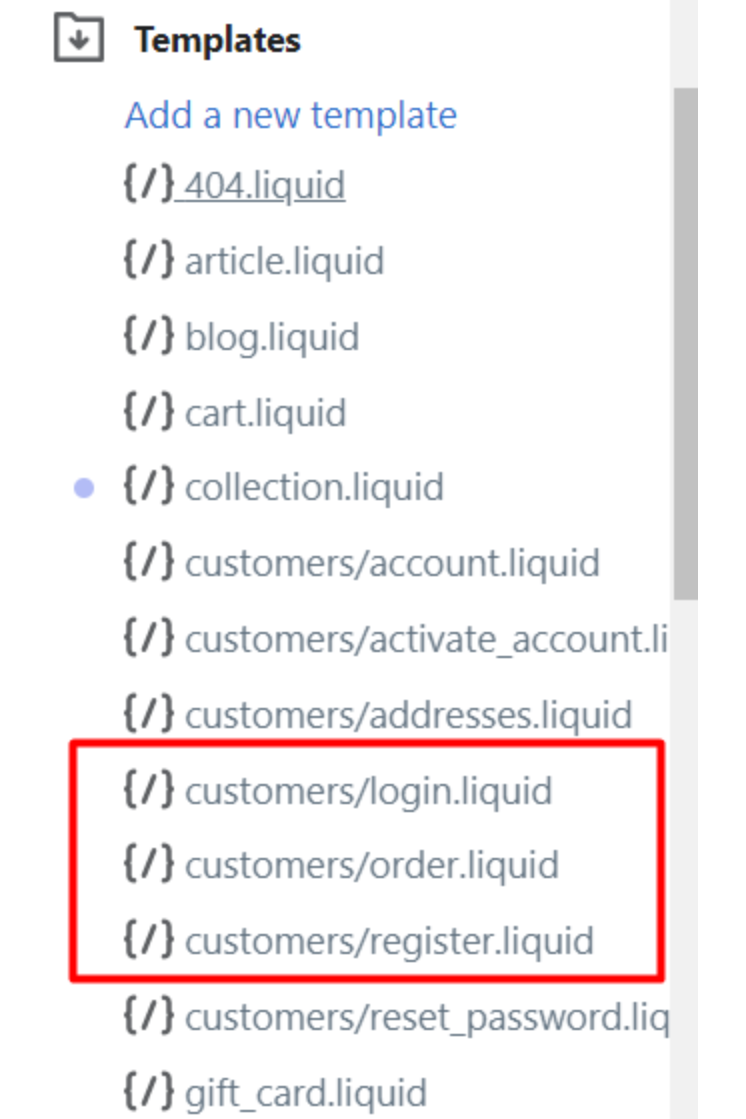
The other fields for entering an email address are in the section Templates:
Updated about 1 month ago
